Hand Gesture Recognition using Deep Learning
As we know, the vision-based technology of hand gesture recognition is an important part of human-computer interaction (HCI). In the last decades, keyboard and mouse have played a significant role in human-computer interaction. However, owing to the rapid development of hardware and software, new types of HCI methods have been required. In particular, technologies such as speech recognition and gesture recognition receive great attention in the field of HCI.
Gesture is a symbol of physical behaviour or emotional expression. It includes body gesture and hand gesture. Gesture can be used as a tool of communication between computer and human.
Gesture recognition is greatly different from the traditional hardware based methods and can accomplish human-computer interaction. Gesture recognition determines the user intent through the recognition of the gesture or movement of the body or body parts. In the past decades, many researchers have strived to improve the hand gesture recognition technology. Hand gesture recognition has great value in many applications such as augmented reality (virtual reality), sign language interpreters for the handicapped, and robot control.
The process of hand gesture recognition is described as follows:
- First, the raw data is created using webcam. Images of hands are taken and stored.
- This data is then preprocessed, converting it to 50X50X1 binary format. Images collected are converted to numpy arrays. Data augmentation is used to make more instances of data and make the data more scattered.
- Model training consists of three parts:
- Convolution
- Polling
- Flattening
Finally model is trained and is ready for new data to be classified.
The Proposed Method for Hand Gesture Recognition
Data creation:
Data includes images of hand gestures those have been taken from webcam using a python script.
Each class has 1200 images

Data preprocessing:
Collected images are now prepared for training. Size of each image is 50x50x1 in binary format. Image collected is converted to numpy arrays to make this suitable for tensor processing in training.

Since training data is very less therefore data is augmented which is explained below.
Data Augmentation:
Data augmentation is a way we can reduce overfitting on models, where we increase the amount of training data using information only in our training data. The field of data augmentation is not new, and in fact, various data augmentation techniques have been applied to specific problems.
datagen = ImageDataGenerator(featurewise_center=True,
featurewise_std_normalization=True,
rotation_range=20,
width_shift_range=0.2,
height_shift_range=0.2,
horizontal_flip=True)
Model Training:
All the classes has been trained using deep learning.Libraries included:
import keras
from keras.models import Sequential
from keras.layers.normalization import BatchNormalization
from keras.layers.convolutional import Conv2D
from keras.layers.core import Activation , Dense , Dropout , Flatten
from keras.layers import AveragePooling2D, MaxPooling2D, GlobalMaxPooling2D, GlobalAveragePooling2D
from keras.preprocessing.image import ImageDataGenerator, array_to_img, img_to_array, load_img
from keras import backend as K
import numpy as np
from keras.utils import np_utils
from keras import optimizers
from keras.layers import BatchNormalization
from keras.callbacks import ModelCheckpoint
from keras.models import load_model
from utils import get_data , get_no_of_classes , get_image_size
import matplotlib.pyplot as plt
import math
import h5py as h5py
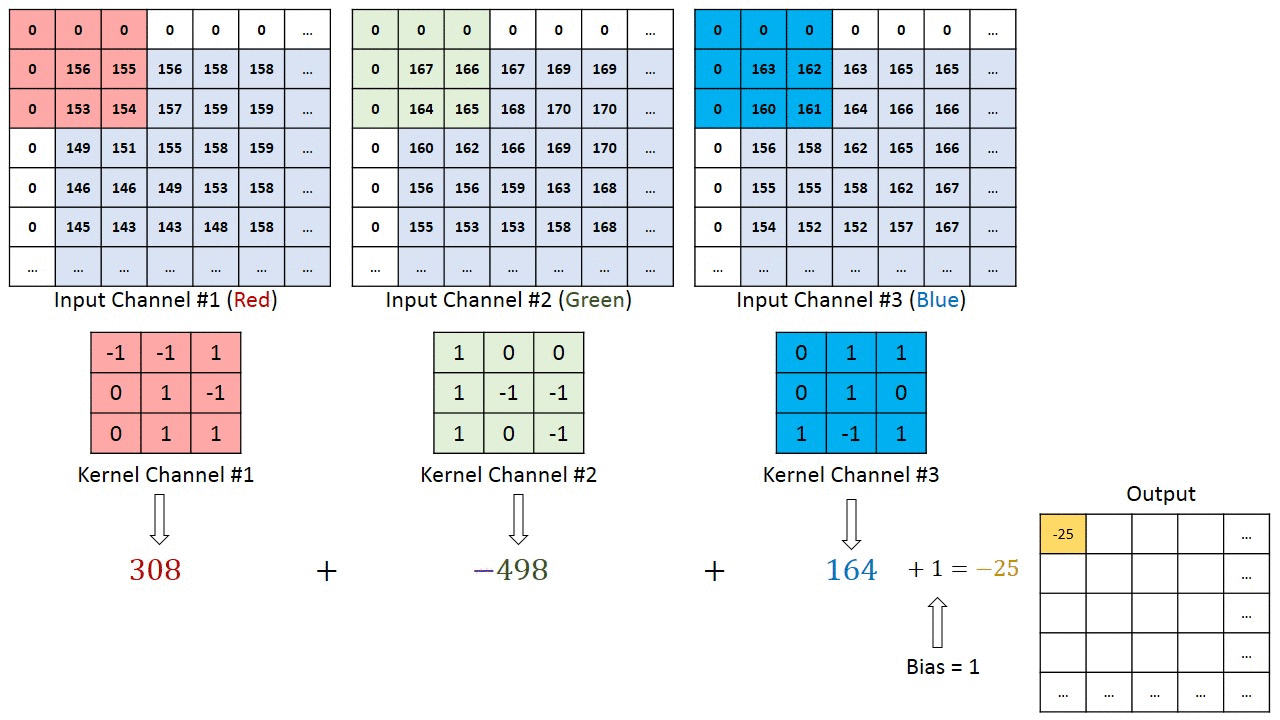
It consists of three parts -
- Convolution
- Polling
- Flattening
The primary purpose of Convolution is to extract features from the input image. Convolution preserves the spatial relationship between pixels by learning image features using small squares of input data.
model.add(Conv2D(32, (5,5), input_shape=(input_size[0], input_size[1], 1), activation=’relu’))keras.layers.Conv2D(filters,kernel_size,data_format=None,activation=None)
- filters: Integer, the dimensionality of the output space (i.e. the number of output filters in the convolution).
- kernel_size: An integer or tuple/list of 2 integers, specifying the height and width of the 2D convolution window. Can be a single integer to specify the same value for all spatial dimensions.
Since every image can be considered as a matrix of pixel values. Consider a 5 x 5 image whose pixel values are only 0 and 1 (note that for a grayscale image, pixel values range from 0 to 255, the green matrix below is a special case where pixel values are only 0 and 1):

Also, consider another 3 x 3 matrix as shown below:

Then, the Convolution of the 5 x 5 image and the 3 x 3 matrix can be computed as shown in the animation below:

The obtained matrix is also known as the feature map. An additional operation called ReLU is used after every Convolution operation.
The next step is pooling.
Pooling (also called subsampling or downsampling) reduces the dimensionality of each feature map but retains the most important information. In case of Max Pooling, we define a spatial neighbourhood (for example, a 2×2 window) and take the largest element from the rectified feature map within that window. Instead of taking the largest element we could also take the average (Average Pooling) or sum of all elements in that window. In practice, Max Pooling has been shown to work better.


After pooling comes flattening. Here the matrix is converted into a linear array so that to input it into the nodes of our neural network.

After that those linear outputs are converted to number of output classes.
Next step is training the model:
Using TensorFlow backend.
preparing all images as numpy arrays …
total image available 7200
no of training images: 5760
no of test images: 720
no of validation images: 720
Train on 5760 samples, validate on 720 samples
Epoch 1/5
5728/5760 [============================>.] — ETA: 0s — loss: 0.6663 — acc: 0.3317 — val_loss: 0.1562 — val_acc: 0.3317
Epoch 2/5
5728/5760 [============================>.] — ETA: 0s — loss: 0.1008 — acc: 0.4288 — val_loss: 0.0487 — val_acc:0.4489
Epoch 3/5
5728/5760 [============================>.] — ETA: 0s — loss: 0.0457 — acc: 0.5595 — val_loss: 0.0258 — val_acc:0.5433
Epoch 4/5
5728/5760 [============================>.] — ETA: 0s — loss: 0.0282 — acc: 0.72000 — val_loss: 0.0167 — val_acc: 0.73000
Epoch 5/5
5728/5760 [============================>.] — ETA: 0s — loss: 0.0203 — acc: 0.8498 — val_loss: 0.0120 — val_acc: 0.8555
accuracy : 85.55%
Now the model is ready for giving output on new images.
This model can be connected to raspberry pi for glowing LED’s based on different hand gestures or doing other mechanical work as shown: