Trying out Wazuh SIEM

Introduction
I am currently studying for my CISSP certification and came across the topic of SIEM’s. I have never had any experience with this type of software and figured it would be beneficial to get hands on experience to better understand how SIEM functions and why it is important in the field of Cyber Security.
What is SIEM?
Security Information and Event Management is a software designed to collect logs/events from a wide variety of sources and centralizes them. This allows for a wide variety of features including real-time threat identification, alerting blue teams of adverse events, compliance auditing and more.
Today we will be looking at Wazuh, a free and open-source SIEM solution. It is a powerful SIEM that also includes XDR capabilities.
Some notable features of Wazuh:
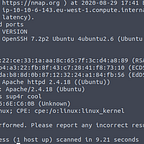
- Vulnerability detection and scanning
- Compliance testing for PCI DSS, HIPPA, NIST 800–53, GDPR and TSC
- Security Information and Event Management
- Incident response
- Intrusion detection
Wazuh is composed of four main components:
- Indexer: The Wazuh indexer is responsible for indexing and storing alerts. It also provides a search engine to sort through alerts.
- Server: This is the central component of this SIEM solution, it aggregates logs from agents and is capable of analyzing events to discover indicators of compromise.
- Dashboard: This is the graphical web interface for Wazuh, it provides an easy way to visualize events and threats throughout the network.
- Agent: This component runs on the end devices, it is responsible for communicating events to the server.
The Setup
- VM1: The Wazuh server VM which includes the Indexer and Dashboard components.
- VM2: An Ubuntu VM with the Wazuh Agent installed
- VM3: A Windows 11 VM with the Wazuh Agent installed
- VM4: A Kali Linux VM to generate failed authentication events
What will we be testing?
- The File Integrity Monitor
- Detecting Malware with FIM and Yara
- Detecting brute-force attempts
The File Integrity Monitor
What is file integrity?
File Integrity is the assurance that a file has not been altered or tampered with in an unauthorized way. There are many important files on devices that need their integrity maintained, examples of this include the /etc/passwd file on Linux and registry hives on Windows. In many cases organizations rely on the integrity of data to maintain regulatory compliance. Failure to maintain file integrity in these cases could result in substantial financial loss or even reprucussions by law enforcement.
Example of the need for file integrity:
In my previous post I discussed DNS poisoning and how it could easily be used to steal credentials by pointing legitimate DNS records to malicious websites. Another method of achieving this attack is to modify a clients hosts file. Before DNS requests are sent, the hosts file is checked to see if a record exists for a domain. If this file is modified an attacker could point legitimate DNS requests to malicious locations. As an example I have pointed dell.com to an example web server on localhost.

Now when we navigate to dell.com we instead are redirected to our example web server.

This example demonstrates why file integrity is important. We do not want malicious attackers or even users to modify important system files, as it often provides an avenue of attack for hackers. If unauthorized changes do occur it is important to have a system in place that detects these changes to detect/prevent attacks.
So how does file integrity monitoring work?
File integrity monitoring works by creating hashes of files. Hash algorithms like SHA256 can take a file as input, and generate a fixed length value that is essentially a snapshot of a file. If the file is modified in the slightest of ways including changing a single character, the hash value changes. File integrity monitors take these snapshots of files then compare them regularly or when certain events are generated to see if a change in the hash value occurs.
Demonstration of file hashes with sha256:
In this example we create a file test.txt with the contents of “Hello World” and then take a SHA256 sum of the file.

We will then use the sed tool to change the capital ‘H’ in ‘Hello’ to a lower case ‘h’ and check the sum again

Notice that the sums are different despite only changing one character from an uppercase to lowercase.
Configuring the file integrity monitor on the WIndows VM:
To configure the monitoring on our Documents directory we need to modify the following file on windows:
C:\Program Files (x86)\ossec-agent\ossec.conf
add the following line between the <syscheck> tags:
<directories check_all=”yes” whodata=”yes”>C:\Users\$YOUR-USER\Documents</directories>
This configuration uses the who-data audit feature which includes information about the user who modified the files.

Now save the file and lets generate some events by creating and modifying a text file in the Documents directory.

We can see from the event generated that the FIM compared the checksums and noticed a change in the fim.test.txt file. The output contains a plethora of useful information about the event including the SID of the account that modified the file, the filename and path of the modified file and the hashes before and after the file modification.
Detecting Malware with FIM and Yara
At this point we know what the FIM is and how it works, so how does this work with Yara as a means to detect malware?
Yara (Yet Another Ridiculous Acronym😂) is a free and open-source tool primarily used for malware research. It uses a rule based language for identifying patterns or signatures in files to identify malware. It has a fantastic community that shares their findings to create powerful rule sets that can identify a wide variety of malware. In our case Yara is used with the FIM to monitor for file creation/modification, when this type of event occurs a Yara script is executed to scan the file for potential malware signatures. The results are then sent to the Wazuh server to analyze scan results and generate alerts.
Several configuration changes need to be made to both the Wazuh server and agents for this setup to work. Full steps can be found at this URL.
On Ubuntu VM
- Yara and a rule set need to be downloaded/installed.
- Yara.sh needs to be created, this is the script that invokes Yara and its rules to actively scans files.
- /var/ossec/etc/ossec.conf Is modified to configure the monitored directory/directories.
On Wazuh server
- A Decoder is configured on the Wazuh server. This is what analyzes the output from the yara.sh script
- A custom rule is created to detect FIM changes in the monitored directory
- The execution of the yara script is then configured in the /var/ossec/etc/ossec.conf configuration file, to execute when FIM events are detected in the monitored directory/directories
In this case we are monitoring the /tmp/yara/malware directory for malware

Lets cd to the /tmp/yara/malware directory and download some common malware I regularly used during my OSCP studies: PHP reverse shell from Pentestmonkey.
Download with:
wget https://github.com/pentestmonkey/php-reverse-shell/blob/master/php-reverse-shell.php
Viewing the event in the Wazuh WUI:

From the output we can see that Yara positively identifies the PHP reverse shell as malware. It includes the level, which is a classification of rules which identifies the severity of the event. In this case we get a level 12 which correlates with a High Importance Event. We also get information about where/when the file was downloaded to and what rule ID was matched.
Detecting bruteforcing Attempts
Wazuh in its default configuration is capable of monitoring authentication attempts. We will be testing this by conducting a password attack against both the Ubuntu VM and the Windows VM.
How does it work?
Authentication attempts are logged on most operating systems by default. On Windows authentication logs can be viewed usingthe Event Viewer. Example of failed SSH authentication attempts in event viewer:

On Linux authentication attempts can be viewed by looking directly at log files, In this case we can view failed SSH authentication attempts by reading the /var/log/auth.log

Wazuh takes these logs/events and aggregates them on the Wazuh server and gives us a graphical view of these logs. This makes it easier to visualize and gives us the ability to detect and respond to these threats. Wazuh is not only limited to detection, it can be configured to actively stop brute force attempts by automatically blocking IP’s which pass a certain threshold of failed authentication attempts.
To generate failed authentication attempts we will be using Hydra on a Kali Linux VM to brute force SSH and RDP services.
For Ubuntu we will attempt to brute force SSH
hydra -l root -P /usr/share/wordlists/rockyou.txt 10.1.1.75 -t 4 sshFor Windows we will attempt to brute force RDP
hydra -l Administrator -P /usr/share/wordlists/rockyou.txt rdp://10.1.1.247Viewing Ubuntu Failed SSH authentication events:

Wazuh detects several failed authentication attempts. It identifies the username that was used for the authentication attempt, in this case the root user. Additionally we get a time stamp and the IP address of the attacker. Authentication attempts on Linux can be filtered via the indexer using the following rule id’s: 5551, 5712, 5710,5711, 5716, 5720, 5503, 5504.
Viewing Windows Failed RDP authentication events:

We can see that Wazuh detected several failed authentication requests via RDP. We get the same data about the event displayed in the previous example. The final event shows that the user account Administrator was locked as a result of the bruteforce attempts. Note that this is a feature of the Windows OS and not Wazuh. Authentication attempts on Windows can be filtered via the indexer using the following rule id’s: 60122,60204.
Conclusion
SIEM is a valuable reasource, it can give security professionals deep insight into events occuring on networked devices. This ability enhances an organizations security posture by assisting them in identifying and even actively responding to malicious events. SIEM does not only provide value to organizations, but also to power users on private networks. In my case I will be using this solution on my own network to monitor high value services that I use daily such as my home surveillance server. It is wonderful to know that free and open-source SIEM solutions exist for all, as it seems that most solutions are targeted towards organizations with large security budgets. Much respect to Wazuh and it’s awesome community!