How to make an Alexa Skill to Introduce Yourself, on your tea break, with node.js

One of my most popular posts is How to make a custom Amazon Alexa Skill on your lunch break. It still gets over a thousand views a month, but I wrote it over a year ago, and a lot has moved on since then, Alexa wise.
So this post is how to make a Skill in even less time than your lunch break. Maybe a tea break? A sneaky walk outside to just get some air break? A furtive check of Medium to see how many claps I got today, break? Anyway, it’ll take less time.
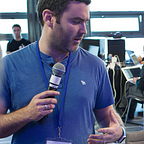
Today we’ll be making a really simple Skill — to introduce yourself! I’ve given a lot of talks about emerging technology and the future recently, like here and here, as part of my job in Liberty IT. When I figure it’s an audience that wouldn’t have seen custom Alexa Skills before, like a school, I love to get Alexa to introduce me. Like this:
I’ve had a slight stammer since childhood, so Alexa saying she probably speaks more clearly than me is more than likely true!
What you need first
To get setup to start creating Skills you need:
- An Amazon Web Services Account (AWS). It’s free to get an account, and most minor usage of their services are also free, but always check the pricing plan for whatever service you’re using. We’ll be using Lambdas, which give you an absolute tonne of uses for free.
- An Amazon Developer Account — this is different than an AWS account! I know, crazy! Sort it out Bezos! It’s also free.
- Node installed on your machine.
Ok, once you’ve done all that, let’s get cracking.
How Alexa Skills Work
- You create a “Skill” instance on the Amazon Developer site. Here is where you define the “questions” — known as intents — that users can ask the Skill. For example, if you had a Skill called “Andy Bot” you could ask Alexa things like: “Alexa, ask Andy Bot what he’ll be talking about today”
- You then create an AWS Lambda function which provides the “answers” e.g. “Today, Andy Bot will be talking about the future!”
- The Node.js comes in with the Lambda function — you can use a Node module to speed up development; it’s not really necessary for such a trivial Skill like this one, but I wanted to show it to you, as it’s super handy.
That’s basically it! You can of course make it more complex — based on what your Skill to actually do. You can include third-party API calls, calls to databases for content — or anything else you can do from a Lambda like any back-end service.
Create the Skill
On the Amazon Developer site, login and click on Developer Console:

Then click on ALEXA SKILLS KIT:

Then click on Create Skill:

You’ll then be asked to name your Skill, I choose Mercury, Roman God of Heralding (sort of), who better to introduce me?

Choose the language you want the Skill built for (note you can add more languages later if you wish). They don’t have English (Ireland) yet, or even better, Gaeilge, which is a travesty. Bezos!

You’ll then be asked if you want to write a custom Skill or to use a template, we’ll select Custom and then click Create skill:

You’ll then see this:

There’s a lot going on here, but it’s actually a lot more no-code friendly than it used to be, especially with the Skill builder checklist on the right-hand side. Click on 1. Invocation Name which will open this:

This is asking you what name will the users use to “invoke” the Skill, i.e. to start the Skill. I’ve gone ahead and entered mercury. There’s some rules about what’s allowed and what’s not allowed as an invocation name, it’s worth having a look at that:

You can then go ahead and hit Save Model, upon which you should see a little floating message box:

It advises that a build must be ran aswell, but if you hit the Build Model button you’ll see this error message:

This is because we haven’t entered any Intents yet — those “questions” we mentioned earlier.
Go ahead and hit Intents in the left hand menu:

which will open up this:

There are three default Intents — Stop, Help and Cancel, which are common to all Skills. In a proper Skill, you’d be expected to provide “answers” for these Intents e.g. if a user says “Help” while using your Skill, it should be able to handle it and answer appropriately.
For now, hit the +Add Intent button, and you’ll see this:

Here we’ll create our first Intent — I’ve called mine “IntroductionIntent” but you can call yours more or less whatever you want, like “GetOffTheFloorNeymar” … if you, like me, are writing/reading this blog while watching Brazil in the World Cup …
Go ahead and hit Create custom intent and then you’ll can enter some Utterances:

Utterances are examples of what users may say when asking this question. Because people are not chatbots, they could ask the same question in many different ways. The utterances are your way to specify those different ways, so Alexa can handle them. For example,
** AVENGERS SPOILER ALERT!!!! **
if you wanted to ask why did Thor take so long to throw his new axe hammer thing at Thanos at the end of the latest Avengers movie, you could ask:
- “Why did Thor take so long to throw his new axe at Thanos”
but there’s lots of other utterances we can add:
- “Why did Thor not throw his axe at Thanos earlier”
- “Why did Thor not throw his axe at Thanos sooner”
- “Why didn’t Thor throw his axe at Thanos sooner”
- “Why didn’t Thor throw his axe at Thanos earlier”
- “I know they needed to make a sequel, but Thor arriving a bit late and then not decapitating Thanos immediately was just bad writing. And in the end of Thor Ragnorak he didn’t need a weapon, he was the lightning and thunder! Why need one now?!”
How many utterances to add is an interesting question, and not one easily answered. Our experience has shown that “Intent Matching” — i.e. matching intents with questions is probably the trickiest part and usually requires iterative refining and adjusting of intents and utterances, based on testing and real-world usage. Typically with chatbots (and an Alexa Skill is basically that — a chatbot), when real users use it in real settings you’ll get a whole lot more utterances to add that you hadn’t thought of before.
Anyway … let’s add these utterances:
- What is on the agenda today
- What’s on the agenda for today
- What will we be discussing today
- What will I be talking about today
Note that question marks are not needed.
When entered:

Note also that you can also upload a csv file of utterances using this button:

but that’s not needed today.
Hit Save Model and when that’s done, hit Build Model. You’ll see this:

for a short while, then it’ll be done.
While we’re here, add another intent, to be used by the user to ask what can our Skill do. I call it “WhatCanItDoIntent” and add these utterances:

Again — Save Model and Build Model. We’re done with our Intents — but before we move on, if you click on JSON editor in the lefthand panel, you can see that instead of using the UI, you can enter / edit the Intents & Utterances using JSON instead, if that’s how you roll.

Ok, now hit Endpoint on the left-hand panel, to open this view:

The Endpoint is what is called by your Skill when a user interacts with it — basically it’s where the “answer” will come from, for their “question”.
You can specify your own HTTPS endpoint, but Amazon of course recommend you use an AWS Lambda function. So — now we leave the Amazon Developer portal for a while and head to the AWS Console, where we’ll create a Lambda to handle calls from the Skill. First though, click on AWS Lambda ARN and take a note of the Skill ID — we’ll reference this in our Lambda code.

In AWS, go to the Lambdas page:

If you haven’t used Lambdas before, they allow you to run code without a server i.e. serverless. There are of course servers underneath the hood, but you don’t have to worry about them, AWS handles all that.
Hit Create Function:

You can use existing AWS provided templates, but we’re going to Author from scratch:

Fill in the details:
- Name: I call mine mercuryFunction
- Runtime: what code we’re using, I select Node.js 6.10. There’s also C#, Go, Python and even Java (I know, #oldschool).
- Role: leave it at Choose an existing role
- Existing role: choose lambda_basic_execution

Then hit Create Function and the Lambda window opens:

Note the ARN in the top right-hand corner (again slightly obscured) — we’ll be copying that into our Skill later.
Now — we could use standard functions to do what we want to do — but I want to use a Node module, so you can see how easy it makes things.
On my machine I initialise a node project:
- npm init
and once I’ve sorted that, I run:
- npm install --save alexa-sdk
This installs the open-source Alexa sdk from Amazon. Note that there is a new SDK, which would be:
- npm install — save ask-sdk
but I’m sticking with alexa-sdk for the minute as it’s super easy to use and I haven’t had time yet to try the new one.
Ok, in your index.js file, first add this to require the sdk:
const Alexa = require('alexa-sdk');then add a line to reference your Skill ID (that you took a note of earlier!):
const APP_ID = 'amzn1.ask.skill.XXXXXXXXXXXXXXXXXXXXXXXXXXXXXXXXX';then add the default handler function that gets called when the function is invoked:
exports.handler = function(event, context, callback) {
    console.log("event: " + JSON.stringify(event));

    const alexa = Alexa.handler(event, context, callback);
    alexa.appId = APP_ID;
    alexa.registerHandlers(handlers);
    alexa.execute();
};
This is boilerplate stuff — and includes a line to log out the event parameter, which is the input object to the function from Alexa.
Ok, now add the handlers constant, which we’ll use to specify what answers to send back for each Intent:
const handlers = {
    'LaunchRequest': function () {
        this.emit('IntroductionIntent');
    },

    'IntroductionIntent': function () {
        this.emit(':tell', "Hi, I'm Andy Bot and I probably speak clearer than he does! Today we'll be talking about technology and the future, about driverless cars and augmented reality. But first, let's talk about Stranger Things!");
    },

    'WhatCanItDoIntent': function () {
        this.emit(':tell', 'I can speak normally like this or <amazon:effect name="whispered">I can whisper like this</amazon:effect> or I can <prosody rate="x-slow">I speak quite slowly like this</prosody> or I can <prosody pitch="x-high" rate="x-fast">speak really quickly like this Ok, I love you, bye bye!</prosody> Bye!');
    }
};
Ok, what’s going on? For each Intent we add an entry e.g.
'IntroductionIntent': function () {}and inside the function we use:
this.emit(':tell',' whatever you want to say back ');to send back to the user, via Alexa, whatever text you want spoken.
It’s that simple!!
Note in the WhatCanItDoIntent Intent, I’m using some SSML (Speech Synthesis Markup Language) to add some variation to the Alexa voice. e.g.
<amazon:effect name="whispered">I can whisper like this</amazon:effect>will make Alexa whisper! See the documentation here for more info.
Ok, that’s us almost done. Package up your files, including the node_modules folder and upload to the Lambda here:

and hit Save in the top right-hand corner.
Wait a moment or so, and you should see this message:

We now need to tell the Lambda that it’ll be called by Alexa. In the Designer section in the main window, select Alexa Skills Kit:

and you’ll see Configuration required appear. Scroll down and enter your Skill ID, from the Amazon Developer portal:

And hit Add and then Save.
Ok, go back to the Amazon Developer Portal, and in the Endpoints section, add in your Lambda ARN and hit Save Endpoints:

Now hit the Test tab at the top, and when that opens, hit the toggle to enable testing:

Now we can test the connectivity between this Skill and the Lambda.
Enter in some text like “Ask mercury what will we be talking about today” which should trigger our IntroductionIntent, and the correct answer should be returned:

Awesome. Now try for the WhatCanItDoIntent with “Ask mercury what can it do”:

Even more awesome. Ok, now we want to try it out on an actual Echo device.
This is a development Skill i.e. we haven’t published it, but it will be enabled on any Echo that you’re signed into with the same Amazon account which you created the Skill with.
So let’s try it out:
Brilliant.
Ok, that’s it! A long enough tutorial, but once you know the steps, there’s actually very little required to get a simple Skill going.
If you’ve any thoughts or comments, let me know below, and you can get me on Twitter or LinkedIn. Thanks, Andy