How to buy Bitcoin and Ethereum with a bank account or credit card

Welcome to Part 1 of our series on how to buy cryptocurrencies safely in the U.S. This will be a comprehensive guide covering everything needed from start to finish, with screenshots to guide you along the way.
- Part 1 —How to buying Bitcoin and Ethereum with a bank account or credit card (this post)
- Part 2- How to trade Bitcoin and Ethereum for other cryptocurrencies
At Lunafi, we like to do educational meetups on different topics surrounding cryptocurrency. If you are in San Diego, we would love to have you at one of our Meetups!
One of the things we learned was people don’t know where to start with cryptocurrencies. So, we did a Meetup on this topic and thought we would share our talk.
We know there is a plethora of information out there and it is hard to know who to trust and what information is relevant. Hopefully you will find some value in this article.
Table of Contents
This post will be split into five sections:
- What type of exchange do I use and what information do I need in order to create an account?
- Coinbase: Creating an account and verifying your identity
- Coinbase: Purchasing Bitcoin and Ethereum with a bank account
- Gemini: Creating an account and verifying your identity
- Gemini: Purchasing Bitcoin and Ethereum with a bank account
Note: creating an account and verifying your identity on exchanges can take anywhere between 1–7 days, and purchasing Bitcoin or Ethereum with a bank account can take anywhere from seconds to 7 days depending on the exchange, your bank, and your level of verification. If you’re at all interested in purchasing cryptocurrencies, we suggest you start the process sooner than later so that you’re not stuck waiting for these to complete while you watch the prices rise impatiently.
1. What type of exchange do I use and what information do I need in order to create an account?
The easiest/safest way to buy Bitcoin or Ethereum in the U.S. is to use a fiat-to-cryptocurrency exchange. This type of exchange allows you to sell fiat (U.S. dollars) and buy cryptocurrencies (Bitcoin / Ethereum). The reason that these two cryptocurrencies are important is because they are the most common trading pairs for other cryptocurrencies. A trading pair is the currencies used in a buy / sell agreement. The trading pair in this case is Bitcoin/USD (BTC-USD) and Ethereum/USD (ETH-USD). We will talk about other trading pairs in the section for buying other cryptocurrencies.
So, what U.S. based exchanges allow you to buy cryptocurrencies with U.S. dollars?
Background information about creating accounts on an exchange
Both Coinbase and Gemini provide easy to setup account processes. We highly recommend you create an account on both. Think of these sites as entry and exit points to the cryptocurrency world. If you ever wanted to pull all your money back into cash and one of these sites go down, you would be stuck in a predicament. With that being said, you don’t normally need to create an account on both, unless you plan on buying a lot of cryptocurrencies (> $10,000 weekly). The other potential benefit of having two accounts is in case one of the exchanges block new sign-ups or go down for days.
Note: Although its not included in this tutorial, you should enable 2FA on your accounts as an extra layer of security.
In order to create accounts you will need the following information:
- Email address
- Full name, cell phone number, and home address
- Social Security number
- Driver’s license (front and back) and sometimes a passport / other forms of ID
- Bank account (either login or routing / account number)
- Webcam, so you can take a picture of yourself.
- Sometimes a recent bill (utility, cable, etc)
Why do I need all this information?
The U.S. has very strict laws on trading fiat (U.S. dollars) and virtual currencies/securities (Bitcoin, etc). These laws are normally refered to as “Know your customer” (KYC) and “Anti money laundering” (AML). You can read more information about what these are here and here.
2. Coinbase: Creating an account and verifying your identity
Account creation and verification
Note: The images may become out of date because websites are constantly changing them to make it easier to register. Harith Kamarul wrote a great article on creating an account on Coinbase, so I am going to utilize his text and images below.
Step 1: Go to www.coinbase.com. It should look similar to the picture below and it should be a secure website (check the top left near the url to make sure it is a legitimate website). Then click on Sign Up.

Step 2: Fill out the name and email section. Note: You should also read the user agreement and privacy policy.

You will be directed to a confirmation page that says to check your email and verify your account. Make sure you verify the email on the same computer you signed up. There have been issues when trying to do it on a different computer or cell phone.

The email will look something like this:

Step 3: It is time to start the verification process.
First, you select if you are signing up as a individual or business. In most cases, it will be an individual.

Then choose the correct country (U.S.) and enter a local cell phone number

Then connect your bank account. Bank account ACHs are free and have higher limits, but you could also use a debit/credit card and pay an extra fee if you don’t want to tie it to your bank account.

Next you will need to upload documents to verify your identity. The screens will look like this:


Once they are uploaded you should be greeted by this screen (if not, something went wrong and you may want to click Back and try again with a different method):

You will now be asked to enter information about your debit card / bank account. The verification process will take a few days (depending on your choice). So you may see a screen like this

They will show up on your bank statements as something like this:

You will enter that information in the verification stage (if you skipped this, you can find this information by going to this url (https://www.coinbase.com/verifications/identity/)

Step 4: If everything went well you should be done!
If you get stuck the Coinbase documentations provides other links here:
Ensure the Personal Details section is completed on this page: https://www.coinbase.com/settings
Ensure the information on this page is accurate: https://www.coinbase.com/verifications/identity/customer_info
For US customers, complete the steps listed here: https://www.coinbase.com/ssn
3. Coinbase: Purchasing Bitcoin and Ethereum with a bank account
Step 1: Login to www.coinbase.com. It should bring you to the https://www.coinbase.com/dashboard page. It will look something like this:

Step 2: Click on Buy/Sell. Select either Bitcoin or Ethereum. Enter the payment method (either your bank or the debit card). Then enter your weekly bank limit and select Buy.

The left hand side should tell you how soon the payment will go through (instantly or a few days).

Step 3: Voila! You have bought your first cryptocurrency. If you are ready to buy a different cryptocurrency, feel free to skip to that section. If you want to compare this experience to purchasing on Gemini, feel free to do so.
4. Gemini: Creating an account and verifying your identity
Gemini account creation and verification
Note: The images may become out of date because companies are constantly changing them to make it easier to register.
Step 1: Go to www.gemini.com. It should look similar to the picture below and it should be a secure website (check the top left near the url to make sure it is a legitimate website). Then click on Register.

Step 2: You should see a register screen similar to the one below. Fill it out and put a secure password in there (try not to re-use a password). Note: You should be reading their use agreement and privacy policy.

Step 3: After you create your account you will receive an email similar to:
Hi XXX,
We have lift-off! You’re only a few steps away from trading bitcoin. It’s a good idea to add hello@gemini.com and support@gemini.com to your address book to prevent any messages from being incorrectly marked as spam.
Please use the following code to complete your Gemini account registration:
<an activation code you will need to verify your email address>
Onward and upward,
Team Gemini
Gemini Trust Company, LLC
(d/b/a Gemini Exchange, LLC in DE, MA, ND, OR, SD, VA)
600 Third Avenue, 2nd Floor
New York, NY 10016
+1 (866) 240–5113
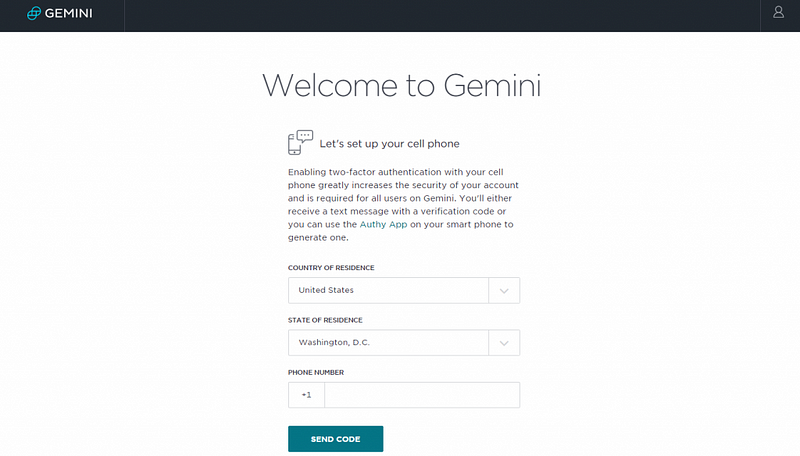
Step 4: You will now go through a verification process.
First will be a cell phone

Followed by adding your bank account information.

Then verification (note this section changes often, so this picture may be out of date)

Lastly, document upload (note this section changes often, so this picture may be out of date)

Step 5: Rejoice! I know that was painful, but at least its over. Move on to the next section to buying and purchasing a Bitcoin / Ethereum.
5. Gemini: Purchasing Bitcoin and Ethereum with a bank account
The interface on Gemini is definitely tailored towards investors and day traders, but don’t be scared as we will walk you through it.
Step 1: Login to www.gemini.com. You should navigate to the Buy section and select BTC/USD trading pair or ETH/USD trading pair. The url will look something like this: https://exchange.gemini.com/buy/btcusd . Below is an example.

Step 2: Fill in the side sections (example is above).
- Make sure the currency pair is correct (ie. BTC <-> USD)
- The order type is set to Limit. It is way safer than selecting Market
- The price should auto fill to the last price. If it doesn’t in the top left corner, you will see the last price. You have some wiggle room to change this. Think of this as an auction. You are telling people, you are willing to purchase Bitcoin/Ethereum at that price point. Be careful with this number though, you may over pay for a virtual currency if you aren’t careful (i.e. asking 100,000 for a bitcoin instead of 10,000)
- The quantity you want to purchase. This will adjust the total you end up paying. Note: Unlike stocks, you can purchase fractions of Bitcoin / Ethereum.
Step 3: Select buy. What will happen is that your order will now be placed on the order books. If someone wants to buy it at the price you selected, then it will be sold and transferred to you. If it takes too long and you really want it now, you may want to cancel the order and try it again at a different price point.
Step 4: Voila! If all went well you now purchased Bitcoin or Ethereum. If you are interested in purchasing other cryptocurrencies, then continue on to the next section.
Congrats! You bought your first cryptocurrency
If you want to buy cryptocurrencies other than Bitcoin or Ethereum (there are a ton of them), feel free to swing by to Part 2 and we will show you how to trade Bitcoin and Ethereum for other cryptocurrencies.
If you like this type of content, feel free to follow our blog posts and sign up for our weekly Lunafi Crypto Newsletter on our website! You can also find us on Twitter, Facebook and LinkedIn.
