Building a CustomView -TicTacToe
Part 1

This will be a series of posts on how to build a simple TicTacToe Custom View in Android. The series will try to cover -:

Drawing on canvas (Part 1)
Custom views — creating your own views by extending an existing view, e.g. Button or by extending the View class
Why?
Building custom views or viewGroups are not necessarily always required. But here are a few good reasons:-
- To build something totally cool(animation or UI) that is not currently provided by standard widgets.
- Make it modular or a reusable component.
- For Performance. Avoiding deeply nested hierarchies by creating Flat or Composite views.
Things required
Components we will need:-
- Canvas: The Canvas class holds the “draw” calls and finally write it in a bitmap which is finally displayed. It operates on a Bitmap. In easy words its a class that contains methods for drawing basic shapes (line, circle, arc) and complex geometry using Path object.
- Paint: It tells canvas how to draw. Style, colour, text related stuff(font, textSize). Think of it as a paintbrush which you can use to pick any colour from the pallet.
- Path: For drawing complex geometries. (we will not use it)
- Bitmap: Holds the Pixel. A simple wrapper for collection of pixels.(we will indirectly use it)
Drawing starts with a canvas but how will we get our canvas? This part is easy. We will get our canvas by extending View class and overriding theOnDraw(canvas:Canvas) method.
We got our Canvas. Now we will see how to navigate our canvas.
Navigating the Canvas
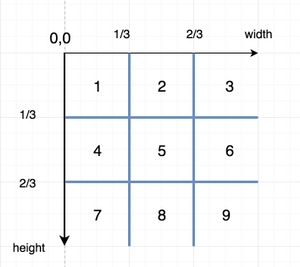
This is how our canvas will look on a graph paper.

- Position of Custom View does not matter inside parent.
- Top-Left Coordinate of a view will always be at (0,0).
- X increases on going right.
- Y increases on going bottom.
Now to draw something on canvas we need a Paint object. It basically tells how to draw.
One important thing is to avoid object allocations inside
OnDraw()method as it is called many times and this will impact the performance.
When ever we want to redraw our custom view we will be calling invalidate(); or invalidate(Rect rect);. Latter just call the invalidate thing on the rectangle area provided and saves CPU cycles.
Drawing TicTacToe Lines
We create our Paint object outside of onDraw and set basic properties. This object will be used for drawing horizontal lines and vertical lines of the view.
private val paint = Paint()paint.color = ContextCompat.getColor(context, R.color.colorPrimary) paint.isAntiAlias = true
paint.style = Paint.Style.STROKE
paint.strokeWidth = resources.displayMetrics.density * 5//line width
We have hardcoded our paint.strokeWidth to 5 based on the density of the device. But this will be passed through an attribute in coming posts.
Drawing a line on canvas is pretty straightforward. We have to pass coordinates of our start point and stop point.The Last parameter is our paint object that we created above.
drawLine(float startX, float startY, float stopX, float stopY, Paint paint)Now we just have to find our start and stop coordinates inside our view. We know the height (getHeight()) of the view and width (getWidth()) of the view. These vertical lines will divide the view into three equal parts. Using this we can calculate our coordinates for lines.

The Same logic is used for drawing horizontal lines. Check the code below.
I will skip the explanation. Finally to draw these lines we call these methods inside onDraw().
...
override fun onDraw(canvas: Canvas) {
    super.onDraw(canvas)
    drawVerticalLines(canvas)
    drawHorizontalLines(canvas)
}
Defining Individual Square Sections inside
Now we have to divide our view into nine squares as they will have to behave as separate individuals like a button inside a parent.

- There are 9 square sections where our text(X or O) can appear when the user touches them.
- We will Use Rect to store the coordinates of 9 squares in a 2d array. Later we will use it to identify where the user has touched.
- We will also use the rects inside our array to centre text(X or O) inside them.
Let’s understand what’s a Rect.
Rect holds four integer coordinates for a rectangle. The rectangle is represented by the coordinates of its 4 edges (left, top, right bottom).
Rect(int left, int top, int right, int bottom)This is how you create a Rect. It just holds 4 coordinates of your square/rectangle and provides methods that will make your life easier. Like this method
boolean contains(int x, int y) // passed coordinates are inside our //rectangle or notWe will later use above method to find out whether the user has touched our rectangle or what rectangle he has touched in our view.
One array to store Rects and other to store value(X or O) of those Rects. Kotlin multidimensional arrays are Pain Points. In the Code above we are simply initialising and populating our arrays with values. The values inside for loop are calculated based on the image above.
Drawing text inside Square Sections
Now the next task is to draw text “X” or “O” inside one of the squares inside our view. We take the first rect from our array and try to draw text in the centre of it. So we find the centre coordinates(rect.exactCenterX() and rect.exactCenterY()) of our rect which is easy and pass it to drawText.
drawText(String text, float x, float y, Paint paint)We will call our drawTextInsideRectangle(rect) method when we detect touch on that rect but for testing it now, we will hardcode and pass first rect from our array and call it inside onDraw(canvas: Canvas).
override fun onDraw(canvas: Canvas) {
    super.onDraw(canvas)
    drawVerticalLines(canvas)
    drawHorizontalLines(canvas)
    drawTextInsideRectangle(canvas, squares[0][0], "X")
}
This is not at the centre of our first rect. What did we do wrong? Drawing text is a little challenging because of the way it is drawn by canvas.
How the text gets drawn

- The canvas treats the x, y coordinates passed as the coordinate for the left bottom of the text to be drawn not the centre of it. Check the green dot.
- It looks like the text is drawn bottom-up from the coordinate.
- To adjust this we will have to bring half of the character below the green dot and half of the character from right to left of the green dot. We will do this by calculating the height and width of our text character.

Paint.measureText()calculates the width of the text.Paint.fontMetrics.ascentreturns the height of the text above baseline. Check Image on left.
After this adjustment, our text shows up at the centre of our rect. Check out the result.

You can check the whole project here:
Thank you so much for your time. Your comments and suggestions are welcome.
