What is git commit, push, pull, log, aliases, fetch, config & clone

Git is a powerful tool, but it has a reputation of baffling newcomers. It’s doesn’t help that most people are simply thrown in at the deep end and expected to swim.
With the right knowledge, anyone can master it. Once you start to understand it, the terminology will make more sense and you’ll (eventually) learn to love it.
Why another guide?
There are plenty of “git tutorials” out there already, but most of them simply tell you to copy/paste specific things to do one-off tasks. Anyone with a keyboard can copy/paste, to really understand how git works and what it can do for you, you need a slightly deeper understanding. If you want to know about Git, I have already written a blog so have a look at the below link.
Let’s start, Git is a version control system (software) and GitHub is a source code hosting service. Git is a version control system for tracking changes in computer files and coordinating work on those files among multiple people.
Lets Now, Understand the working of Git
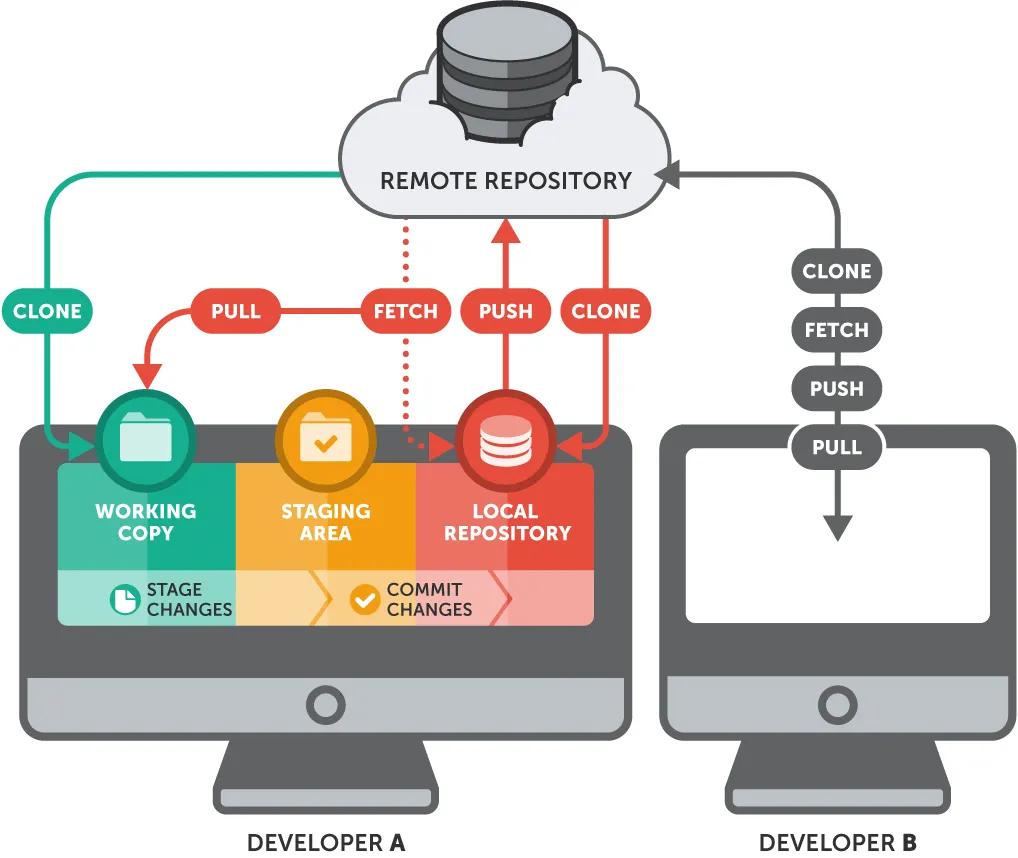
A file in git goes through the following stages:

The Working Tree
The Working Tree is the area where you are currently working. It is where your files live. This area is also known as the “untracked” area of git. Any changes to files will be marked and seen in the Working Tree. Here if you make changes and do not explicitly save them to git, you will lose the changes made to your files. This loss of change occurs because git is not aware of the files or changes in the Working Tree until you tell it to pay attention to them. If you make changes to files in your working tree git will recognize that are modified, but until you tell git “Hey pay attention to these files,” it won’t save anything that goes on in them.
How can you see what is in your Working Tree? Run the command git status. This command will show you two things: The files in your Working Tree and the files in your Staging Area. It will look like something in the image below if you don’t have anything in your Staging Area.
e.g: Let’s create two text files in a folder of any drive, and add some content to it and try to execute the git status command.

So, First, you need to run git init command, because it will create a new git repository and then after you can perform git status the command to check to your in Working Tree. You can see that the untracked files are shown in red color. If you don’t run the git init command you will get an error, which looks like something in the image below.

So, It’s necessary to initialize our project with git. To run git commands.
The Staging Area ( Index ):
The Staging Area is when git starts tracking and saving changes that occur in files. The saved changes reflect in the .git directory. That is about it when it comes to the Staging Area. You tell git that I want to track these specific files, then git says okay and moves them from you Working Tree to Staging Area and says “Cool, I know about this file in its entirety.” However, if you make any more additional changes after adding a file to the Staging Area, git will not know about those specific changes until you tell it to see them. You explicitly have to tell git to notice the edits in your files.
How can you see what is in your Staging Area? Run the command git status like before. It will look something like the image below.

How do you add files to your Staging Area? Running the command git add [filename] will add a specific file to the Staging Area from your Working Tree. If you want to add everything from the Working Tree, then run the command git add . The dot (.) operator is a wildcard meaning all files.
git add . : Stages new and modified files, without deleting.
git add -a : Stages all files.
git add -u : Stages modified and deleted, without new.
Suppose, you modified a file that is not yet staged but after some time you think to revert the changes of a modified file. How do you do? There is a command in git is :
git checkout file-nameTo remove the file from the staging area the command is :
git rm --cached file-name

The Local Repository:
The Local Repository is everything in your .git directory. Mainly what you will see in your Local Repository are all of your checkpoints or commits. It is the area that saves everything (so don’t delete it). That’s it.
How do you add items from your Staging Area to your Local Repository? The git command is git commit -m “commit message” taking all the changes in the Staging Area, wraps them together and puts them in your Local Repository. A commit is simply a checkpoint telling git to track all changes that have occurred up to this point using our last commit as a comparison. After committing, your Staging Area will be empty.

How is git commit command works internally?
Let’s have a look at the working of git commit command.

The above image shows the working of git commit command. In which the four blocks represent the commit with the unique SHA commit key. Suppose, you are on the master branch and you did a commit now git internally will create a block (node) of a commit you did. In git, we have a pointer called HEAD (It is the reference to the commit in the current branch in our case i.e master). When you commit something the HEAD will be pointed to our commit in our case the commit hash key is b2e3 . If you made another commit now HEAD will move and point to commit having a hash key 7d06 means the parent of the 7d06 commit is b2e3 because it holds the reference of the previous commit. As you see our last commit is 9ba7 and the parent of this commit is 3c09 and our HEAD is pointing to 9ba7 commit.
Use of -a, -m or -am flags in git commit command
git commit: The git commit command captures a snapshot of the projects currently staged changes. Committed snapshots can be thought of as “safe versions” of a project. Git will never change them unless you explicitly ask it to. Prior to the execution of git commit, The git add command is used to promote or “stage” commands git commit and git add are two of the most frequently used. The git command will launch a text editor prompting you for a commit message. After you’ve entered a message, save the file and close the editor, To close the editor type:wqto create the actual commit.git commit -a: Commit a snapshot of all changes in the working directory. This only includes modifications to tracked files ( those that have been added withgit addat some point in their history).git commit -m “commit message”: A shortcut command that immediately creates a commit with a passed commit message. By defaultgit commitwill open up the locally configured text editor, and prompt for a commit message to be entered. Passing the -m option will forgo the text editor prompt in favor of an inline message.git commit -am “commit message”: A power user shortcut command that combines the -a and -m options. This combination immediately creates a commit of all the staged changes and takes an inline commit message.
Amend your last commit
Git has a number of awesome features; Not least of all is the ability to amend the previous commit. If you ever find that you accidentally left something out of your last commit, be it a file or an extra change to a file that you just committed, don’t worry. It can easily be fixed.
for e.g: This is what our working tree (directory) looks like:

Let’s make modifications in the “index.txt” file and after you add the file to the staging area and commit.

After some time you realized that you made a mistake in the “index.txt” file. Now, what you will do? As usual, you correct the mistakes and commit the file it will another commit when you view using git log command.

As you see, we make another commit.

When viewing the commit history you can see we have two commits which is a bit confusing for the other developer when working with complex projects. So, here comes the git commit --amend command.
Let’s say, you again modify the file then add to the staging and commit it.

The command git commit --amend -m “commit-msg” where -m is a flag used for the commit message. Let’s have a view of our commit history.

As you see, amend command doesn’t create another commit history is just overrides the previous commit. So, that’s the use of git commit --amend.
Revert commit changes.
If you want to revert a commit you have made you have to use :
git reset --hard HEAD^ command it will only revert the top commit means the latest commit.

For e.g. In the image above, you can see the latest commit as “added more courses” but we want to revert this commit. See in the image below.

As you see, the pointer means the HEAD (It is the reference to the last commit in the currently check-out branch.)is pointing to another commit now. i.e the “added more courses” commit is reverted back.
We have another command same as git reset --hard HEAD^ called git reset --soft HEAD^ but in this command, we have used --soft option means it will reset the commit but don’t reset the content in that commit file.
for e.g: This is what your working tree (directory) looks like.
Let’s make some modifications to the “login.txt” file. Firstly, let’s see the contents of the login.txt file using git show :file-name command.

After that, you will add the file in the staging area and commit it.
Now, to view the commit history use the command git log.

Imagine a situation, where your teammates say why you commit the “login.txt” file it’s under processing. Now, what will you do? You have learned about git reset --hard HEAD^ to revert the commit, but the problem with this command is it will revert the commit with the file contents. But, in this scenario, we don’t want to revert the contents of the file. So, here comes the git reset --soft HEAD^ command.


As you see, the “login.txt” file contents were not reverted.
Understanding Git Log
Git logs allow you to review and read a history of everything that happens to a repository. The history is built using git log a simple tool with a ton of options for displaying commit history. A Git log is a running record of commits. A full log has the following pieces:
- A commit hash (SHA1 40 character checksum of the commit contents). Because it is generated based on the commit contents it is unique.
- Commit Author metadata: The name and email address of the author of the commit.
- Commit Date metadata: A date timestamp for the time of the commit.
- Commit title/message: The overview of the commit as written in the commit message.

This is a snippet of the log, showing one commit. We have a commit SHA1 hash, the author, the date, and the commit message, explaining what happened in the commit. This layout is the default look of the log.
Git has something called Commit Limiting to make it easier to narrow down hundreds or thousands of commits to the ones you want to review.
Git is using SHA-1 hash in order to check files, the probability of having a hash conflict is near zero. So have fun !!
Git Log Flags
You can customize the information presented by git log using flags.
The --oneline flag causes git log to display :
- one commit per line.
- the first seven characters of the SHA.
- the commit message.
git log --oneline
The --stat flag causes git log to display :
- the files that were modified in each commit.
- the number of lines added or removed.
- a summary line with the total number of files and lines changed.
git log --stat
The --patch or -p flag causes git log to display :
- the files that you modified.
- the location of the lines that you added or removed.
- the specific changes that you made.
git log --patch or git log -p or git log -p -1

In git log -p -1, where -1 means to show only one commit detail you can write -2 or -3 as per your requirement.
View a specified number of commits by author
To start git log at a specific commit, add the SHA :
git log |7752b22| -> adeed jsut random SHAThis will display the commit with the SHA 7752b22 and all of the commits made before that commit. You can combine this with any of the flags.

The --graph flag enables you to view yours git log as a graph. To make things interesting, you can combine this command with --oneline option you learned from above.
git log --graph --oneline or git log --graph --decorate
One of the benefits of using this command is that it enables you to get an overview of how commits have merged and how the git history was created.
There are many other options you could use in combination with --graph. Couple of them are --decorate and --all .
Directory Restricted Log :
The default log is great for grabbing a quick look at what just happened in the repository. But it takes up a lot of space and you can only see a handful of commits at once.
When I’m developing a project, I sometimes only want to know what happened in a specific directory. Let’s say I’m working on some CSS and only want to know about changes in my CSS directory. I can get much more specific with the git log and restrict it only to a specific directory.

This will only return commits that had changed in the CSS directory.
Log by branch :
We can use a similar syntax as directory restrictions and build a log for just one branch. We only need to specify the branch we want to see.
git log <branch-name>Git Configuration
The git config command is a convenience function that is used to set Git configuration values on a global and local project level. These configuration levels correspond to the text file called .gitconfig . Executing the git config will modify a configuration text file. We’ll be covering common configuration settings like email, username, and editor. We’ll be discussing Git aliases, which allow you to create shortcuts for frequently used Git operations. Becoming familiar with git config and the various Git configuration settings will help you create a powerful, customized Git workflow.
The most basic use of git config is to invoke it with a configuration name, which will display the set value at that name. Configuration names are dot delimited strings composed of a ‘section’ and a ‘key’ based on their hierarchy. For example user.name

In this example, the name is a child property of the user configuration block. This will return the configured name if any, that Git will associate with locally created commits.
git config levels and files
Before we further discuss git config usage, let’s take a moment to cover configuration levels. The git config command can accept arguments to specify which configuration level to operate on. The following configuration levels are available:
- --local
By default, git config will write to a local level if no configuration option is passed. The local level configuration is applied to the context repository git config gets invoked in. Local configuration values are stored in a file that can be found in the repo’s .git directory: .git/config
- --global
The global level configuration is user-specific, meaning it is applied to an operating system user. Global configuration values are stored in a file that is located in a user’s home directory. ~/.gitconfig on UNIX systems and C:\Users\<username>\.gitconfig on windows.
Thus the order of priority for configuration level is the local, global.
Writing a value
Expanding on what we already know about git config, let’s look at an example in which we write a value:
git config --global user.name “your_name”git config --global user.email “your_email@example.com”

This example writes the value thesparkler to the configuration name user.name. It uses the — global flag so this value is set for the current operating system user.
Git Aliases
You may be familiar with the concept of aliases from your operating system command-line; if not, they’re custom shortcuts that define which command will expand to longer or combined commands. Aliases save you the time and energy cost of typing frequently used commands. Git provides its own alias system. A common use case for Git aliases is shortening the commit command. Git aliases are stored in Git configuration files. This means you can use the git config command to configure aliases. Aliases can be created in a local or global scope. To better understand Git aliases let us create some examples.
git config --global alias.co ---> checkoutgit config --global alias.br ---> branchgit config --global alias.ci ---> commitgit config --global alias.st ---> status
The previous code example creates globally stored shortcuts for common git commands. Creating the aliases will not modify the source commands. So git commit will still be available even though we now have the git ci alias. These aliases were created with the --global flag which means they will be stored in Git’s global operating system level configuration file. On Linux systems, the global config file is located in the User home directory at /.gitconfig. These demonstrate that the aliases are now equivalent to the source commands.

As you see, I’ve used git st the command to see my project status. So that’s the beauty of using git aliases.
git push
The git push command is used to upload local repository content to a remote repository. Pushing is how you transfer commits from your local repository to a remote repository. It’s the counterpart to git fetch but whereas fetching imports commits to local branches, pushing exports commits to remote branches. Remote branches are configured using the git remote command. Pushing has the potential to overwrite changes, caution should be taken when pushing.
git push <remote> <branch>
Push the specified branch to <remote>, along with all the necessary commits and internal objects. This creates a local branch in the destination repository. To prevent you from overwriting commits, Git won’t let you push when it results in a non-fast-forward merge in the destination repository.
git push <remote> --forceSame as the above command, but force the push even if it results in a non-fast-forward merge. Do not use --force flag unless you’re absolutely sure you know what you’re doing.
git push <remote> --allPush all of your local branches to the specified remote.

The above diagram shows what happen when your local master has progressed past the central repository’s master and you publish changes by running git push origin master. Notice how git push is essentially the same as running git merge master from inside the git repository.
After adding a feature, making changes or other tasks in the local repository, you may use the push command for uploading these changes to the remote repository (e.g GitHub) so other team members can see it and may update their project accordingly.
A simple example of using the push command can be:
git push origin masterWhere origin is the remote repository name (the default name). You may replace it with your repository name that was assigned at the time of the creation of the repository.
Note: The git push -u the command is equivalent to -set-upstream. The -u flag is used to set origin as the upstream remote in your git config. As you push a branch successfully or up to date, it adds an upstream reference.
As you push the local branch with git push -u the option, that local branch is linked with the remote branch automatically. The advantage is, you may use git pull without any arguments.
This is followed by providing the branch name. I used a master that you may replace with your branch name.

As you see, we got an error because we don’t have a remote repository. So, first of all, lets us create a remote repository on the GitHub website with the name git-tutorials. This is empty at this stage.


With this, we have created our remote repository. GitHub also provides some basic git commands as you see in the image above and also with HTTPS and SSH protocol.
To add your project to GitHub, use the git remote add command on the terminal, in the directory your repository is stored at.
git remote add <remote-name><remote URL>The git remote add command takes two arguments:
- A remote name, for example, “origin”
- A remote URL, Which you will see in the image below.

After that, you can run the git push command to push your code to the GitHub repository.


Our project is successfully pushed to the GitHub repository.
Git Pull

The git pull command is used to fetch and download content from a remote repository and immediately update the local repository to match the content. Merging remote upstream changes into your local repository is a common task in Git-based collaboration workflows. The git pull command is actually a combination of two other commands, git fetch followed by git merge. In the first stage of operation, git pull will execute a git fetch scoped to the local branch that HEAD ( means the reference to the current commit) is pointed at. Once the content is downloaded, git pull will enter a merge workflow. A new merge commit will be created and HEAD updated to point at the new commit.
For e.g: If someone from your team made some changes in a file or created some file on a remote repository. Let’s say he/she created a file named as portfolio.txt but you don’t know what he/she changes on the remote repository. Let’s say you have created another file named as service.txtand that after you commit the file and when you try to push that file on your remote repository git will not allow you to push your code because the remote repository contains work that you do not have locally. So, In this case, the git pull command is used to fetch and download content from a remote repo to local repo.


Now, you’ll create another file in the local repository (in your system).
After creating the “service.txt” file you will add the file to staging area using git add “service.txt” command after that you will commit that file using git commit -m “added service page” command and after that, you will push that file on remote repository using git push origin master command.

In the above image, you see that we got an error while performing git push the command. Now, to solve this error new need to run git pull origin master command.

In the above image, you see that your file is successfully pushed to the master branch because we use git pull origin master the command to up-to-date our local repository from a remote repository.

Note: About Merge Conflicts
Merge conflicts happen when you merge branches that have competing commits, and Git needs your help to decide which changes to incorporate in the final merge.
Git can often resolve differences between branches and merge them automatically. Usually, the changes are on different lines, or even in different files, which makes the merge simple for computers to understand. However, sometimes there are competing changes that Git can’t resolve without your help. Often, merge conflicts happen when people make different changes to the same file, or when one person edits a file and another person deletes the same file. If you have a merge conflict on the command line, you cannot push your local changes to GitHub until you resolve the merge conflict locally on your computer.
To resolve merge conflicts run merge conflict resolution tools. The command is: git mergetool
Git Fetch

When we use git fetch the command we fetch the commits of a remote repository into our local repository. The fetched commits are saved as remote branches separate from the local branches. So, this helps in reviewing the commits before integrating them into the local working branches.
Fetch branches
For e.g.: let’s create a new file named “news.txt” in a different branch named ‘newsBranch’.


Then after creating a pull request as you see in the above image. “Now you might be thinking what is pull request”. So, Pull requests let you tell others about changes you’ve pushed to a branch in a repository on GitHub. Once a pull request is opened, you can discuss and review the potential changes with collaborators and add follow-up commits before your changes are merged in the base branch.


In the above image, you can see the new branch is added named ‘newsBranch’.

So, To work on “newsBranch” we need to switch from the master branch to the “newsBranch” branch. The command to switch branch is :
git checkout [branch-name].
We got an error, says newsBranch doesn’t match any file doesn’t match any branch or doesn’t exist a branch like this but I cannot create a branch called newsBranch and then pull and push from my remote repository because that branch already exists. I cannot absolutely do that I need to fetch this branch before being able to work on it so in order to fetch the branch so let’s simply write git fetch origin and then git checkout newsBranch perfect so this was really easy because with the fetch origin we specify to the origin that is our git repository on GitHub to fetch all the branches that we currently gonna have on our local environment. If we wanted to fetch just a specific branch you can just specify git fetch [remote-name][branch-name]. But if you just write git fetch origin, git is going to recognize automatically all the branches that you currently don’t have on your local git repository but our presence they exist on our remote repository so now we are on the git content and if we check in your system the news.txt file is there that we don’t have in our master branch.

We use git fetch [remote-name] the command to fetch all the branches commits and files of the remote connection.
View remote branches
To view the remote branches that were fetched we use the git branch -r command.

As the fetched commits are saved as remote branches and not integrated into our local branches it gives an opportunity to review the changes and decide whether we want to merge the fetched changes in our local branches.
Fetch and Merge
Let say other developers have committed changes and pushed those changes to the central repository which then got merged to the master branch.
Now we want to fetch those changes from the master branch. So we will run the git fetch command.
git fetch origin masterSo, we now have the origin/master branch with us as a remote branch and it is not yet merged into the master branch of our local repository.
After reviewing the changes in the remote branch we can merge it into our local branch using git merge command.
git merge origin/newsBranchNote : Local branch : master (on local system)
Remote Tracking branch : origin/newsBranch (on local system)
Remote branch : master (origin master on GitHub or remote server)
git fetch : updates remote-tracking branch from remote branch
e.x : updates (origin/master) from (origin master)
git merge : merges remote-tracking branch into local branch
e.x : merge (origin/master) into (master)
Git clone
git clone is a Git command-line utility that is used to target an existing repository and create a clone, or copy of the target repository. The command for cloning the repository is :
git clone <repository-link>for e.x. : Let’s say you want to clone the TensorFlow repository.

In the above image, It’s a TensorFlow repository and we want to clone it means to download it in our system. We have to use the link to clone this repository.

If you found this blog useful, please help by tapping the 👏 button as many times as you’d like so others can find it too. Clap is enough because I don’t drink coffee :D
Thank you.