C++ Path Tracing Renderer
C++ Ray Tracer and Path Tracer scene renderer for simple 3D scenes
Project Description
This project was developed for my Master’s 3D Programming Class in 2020 by me along with two other classmates. Our initial assignment was to build a Turner Whitted Distributed Ray Tracer capable of rendering basic scenes so we could learn the fundamentals of physically-based rendering and establish a base to improve upon in the following assignments.
The code is available on Github if you want to take a look: https://github.com/fmbnicola/P3D-RayTracer


Throughout the semester we ended up applying several techniques such as anti-aliasing, soft shadows, and a depth-of-field effect as well as a few acceleration structures to improve performance. Ultimately we implemented a path tracer algorithm that gave us pretty good results.
The main references for this project were smallpt by Kevin Beason, the scratchapixel website, and the book Physically Based Rendering by Matt Pharr, Wenzel Jakob, and Greg Humphreys. These are fantastic resources and extremely valuable for anyone looking to learn to emulate our results.
Turner Whitted Ray Tracing
Our first hurdle was building a Turner Whitted Ray-Tracing Algorithm capable of rendering 3D scenes featuring spheres, triangles, planes, and multiple light sources by employing the Blinn Phong shading model and other ray tracing practices such as global illumination (for reflections and refraction) as well as hard shadows.

Geometry Intersections and Shading
Below you can see the different stages of development as we started to implement basic geometry intersection shadow casting and shading, finally adding secondary rays to get reflections for specular materials.

Anti-aliasing and Depth-Of-Field
To increase realism and make the quality of the resulting images a little better we implemented anti-aliasing (notice how each pixel is visible before we apply it and how much smoother it is afterward) as well as a depth of field effect that mimics the way real cameras work. Both of these effects are achieved by introducing jittering during the ray’s sampling process.


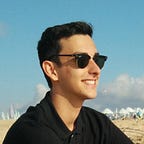
Soft Shadows
In the first image, we have a very hard shadow, this is because we are using a point light from which only one ray is cast. In real life, light sources have a surface like any other object (light bulbs for instance) this means that by modeling our lights as a set of multiple points we can instantly get much better shadows with, of course, a small performance penalty.

Ray-Tracer Final Results
This video documents the results we obtained, shows detailed comparisons between the same scenes rendered with different amounts of samples and presents a benchmark with and without acceleration structures.
You can also read this report where we go into a bit more detail about the methods employed and how we handled some of the issues we encountered.
Monte Carlo Path Tracing
Excited with the results we obtained previously we decided to delve into implementing the Monte Carlo Path Tracing Algorithm employing the Blinn global illumination with BRDFs allowing us to achieve diffuse and specular materials, reflections, and refraction.

Global Illumination
The path tracer algorithm revolves around the idea of global illumination. This is achieved by, when intersecting with a diffuse object, instead of simply returning its color, we cast rays in a random direction (in the normal hemisphere) in order to take into account other objects’ contributions.
Because this algorithm has some randomness when considering diffuse and refractive materials, a lot of noise is introduced, as the pixel colors are averages of the collected colors. To simply mitigate this, we can collect a lot of samples per pixel, which increases the convergence of the colors to the real pixel color.


Path-Tracer Final Results
Just like before we present the following video in which we document the results obtained, show detailed comparisons, and present a benchmark with and without the acceleration structure (BVH in this case).
A report for this part of the project is also available for further reading.
Closing Thoughts
Having the opportunity to work on this project was certainly a fantastic experience and I feel like I was able to learn a lot about the inner-workings of realistic computer rendering.
It gave me an even deeper respect for what can be achieved today by combining modern hardware and advanced algorithms (like the marvel that is real-time ray tracing) and it has certainly provided me with better context to think about and explore computer graphics as a whole.
Thank you for reading. I hope you enjoyed this showcase! 😎