Using AI and OpenVINO™ to Dig Up Dinosaur Bones
Authors: Robert Chesebrough, Raymond Lo, and Zhuo Wu

All over the world, you can walk into a museum and see huge displays of dinosaur specimens, but have you ever stopped to wonder how paleontologists go about finding them?
Funny enough, a good friend and co-worker of ours, Bob Chesebrough, a Technical Evangelist at Intel, actually goes out and searches for undiscovered dinosaur bones with his sons in their free time. He showed us exactly what it takes to go about this, and how we can use AI and OpenVINO™ to dramatically simplify the process.
Bob explained to us that paleontologists and archaeologists must first find the places whose geological history indicates not just the creation of fossils but the chances of finding them. Traditionally, this is done by scanning aerial images to spot certain terrain textures, or colors and orientation of rock formations, and then building “likelihood maps” like this one (Figure 1):

You can see in the picture all the locations where dinosaur bones are likely to be found. As you can imagine, doing this by hand even by an expert takes a lot of time and effort. But since Bob already knows all about the power of AI, he wondered if he could develop an AI model that could create these maps automatically. And he did!
In his first attempts, he found that the software worked well, but it took too long to create a map in the field, which is problematic when you are out in the field and relying on laptop batteries. Then he wondered if it would help if he used a drone to take high-resolution aerial photographs, but unfortunately found that would not work because it would still require him to go home and upload those images.
So he teamed up with us (Raymond Lo and Dr. Zhuo Wu) along with other AI evangelists at Intel to come up with a solution that allows him to create such maps from any combination of footage in just minutes (normally this would take hours).
We are so excited to show you what we did and how we used OpenVINO, but before we go on, please note that while hunting for dinosaur bones sounds like a fun and exciting hobby, in the US and most other places, the actual collection of dinosaur bones is strictly regulated — if not outright forbidden. So if you try this for yourself — and you do find fossils — we strongly encourage you to just take pictures and report the finding to your local authorities.
The Hunt Is On!
Now let’s get started! First, we will explain the different phases and then we will dive in.
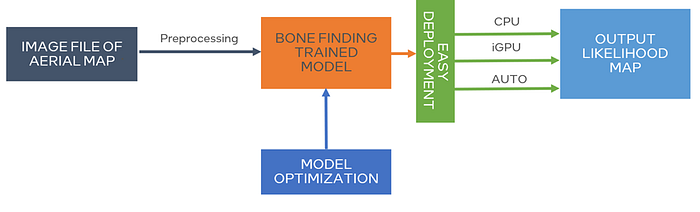
The general process to create likelihood maps is described in detail here (Figure 2), and consists of:

Phases 1 and 2: Collecting data and classifying them, which includes getting the GPS coordinates of actual findings of fossils in a known dinosaur bone bed (New Mexico, in the example), and clustering them based on their proximity to one another. We did this with the Intel® Extension for the machine learning library Scikit-learn.
Phase 3: Labeling the data. We take the clusters and the Intel® Deep Neural Network Library, and apply it to aerial images of the same locations labeled as “no bone” or “bone very likely” or “bone possible”, and join those images into one bone likelihood map of that area.
Phases 4 and 5: Training the data and building a model by transforming the labeled aerial images into tensors, each with a class name corresponding to a probability score or confidence level (e.g., 0 for “Definitely no bones”, 1 for “Bones are possible,” and 2 for “Found bones”), to build a Residual Neural Network (ResNet) with PyTorch.
Phase 6: Last, but not least, the scoring phase creates bone likelihood maps of other places by using the model prepared in the previous steps to analyze aerial photos with the OpenVINO inference engine!
Show Me the Code
The code that implements the process above is available as a series of Jupyter Notebooks. Here, we describe the most important parts, as shown in Figure 3, to convert the PyTorch model to the OpenVINO Intermediate Representation (IR) format and analyze the images.
Loading the OpenVINO inference engine takes only one instruction:
from openvino.runtime import CoreAfter loading all the necessary libraries, the notebook defines the paths for the trained bone-finding model previously created in PyTorch format, and the locations of two new models to create one in ONNX format, and the other in the OpenVINO IR format, for reasons that we will explain in a moment:
DIRECTORY_NAME = “models”

BASE_MODEL_NAME = DIRECTORY_NAME + f”/bc_resnet18_simple_NOIPEX_6Epochs_StateDict_gold”

# Paths where PyTorch, ONNX and OpenVINO IR models will be stored
model_path = Path(BASE_MODEL_NAME).with_suffix(“.pt”)
onnx_path = model_path.with_suffix(“.onnx”)
ir_path = model_path.with_suffix(“.xml”)
After generating the ONNX model, this instruction builds the command that converts it to the OpenVINO IR format with FP16 precision, using the OpenVINO Model Optimizer:
# Construct the command for Model Optimizer
mo_command = f”””mo
      --input_model “{onnx_path}”
      --input_shape “[1,3, {IMAGE_HEIGHT}, {IMAGE_WIDTH}]”
      --data_type FP16
      --output_dir “{model_path.parent}”
      “””
mo_command = “ “.join(mo_command.split())
After running the inference (not shown here) on a test image with the ONNX model, the process is repeated on the same image, but using the OpenVINO model, because executing both models on the OpenVINO inference engine shows how to run model inferencing on CPU or GPU devices interchangeably.
# Load the network in Inference Engine
core = Core()
model_ir = core.read_model(model=ir_path)
compiled_model_ir = core.compile_model(model=model_ir, device_name=”CPU”)

# Get input and output layers
output_layer_ir = compiled_model_ir.output(0)

# Run inference on the input image
res_ir = compiled_model_ir([x_test2])[output_layer_ir]
The first few lines of code above load the OpenVINO inference engine, pass to it the OpenVINO IR model, and then extract its input and output layers. The last line of code is the one that actually runs the inference engine on the same image (“x_test2”) previously analyzed with the ONNX model.
Next, the program prints out the result of the inference; that is the class (0, 1, or 2) to which that image belongs, and then proceeds to repeat the process with the PyTorch model.
The final part of the code does two things:
- It runs both the OpenVINO and PyTorch models to classify a few hundred images and make an approximate comparison of the performances of the three models used.
- It merges all those images in one map, like the one of Figure 1, and concludes by comparing the PyTorch results with the OpenVINO ones, to verify that there was no loss in accuracy. For brevity’s sake, here we include only this self-explanatory snippet:
if “GPU” in core.available_devices:
  num_images = 2000

compiled_model_onnx_gpu = core.compile_model(model=model_onnx, device_name=”GPU”)
#warm up
compiled_model_onnx_gpu([input_image])
The great thing about using OpenVINO is not just the acceleration we can get but the ability to optimize the model to the hardware of your choosing and make the most of whatever hardware it finds available!
Next Steps
And there you have it! You are now a modern-day treasure hunter capable of using OpenVINO to create and update likelihood maps for your bone-hunting trip.
This is a great example of how OpenVINO makes AI more accessible to everyone no matter what they are doing.
You can easily repurpose this method to any situation where you need to detect certain areas from aerial photographs such as critical fields like fire prevention, renewable power generation, or even life on other planets!
If you’d like to learn more, I invite you to watch my full demo, or Bob’s demo where he helps guide you on your next dinosaur hunt! To learn more about how to build your own AI applications, check out our OpenVINO developer resources and get started today.
Notices & Disclaimers
Intel technologies may require enabled hardware, software or service activation.
No product or component can be absolutely secure.
Your costs and results may vary.
© Intel Corporation. Intel, the Intel logo, and other Intel marks are trademarks of Intel Corporation or its subsidiaries. Other names and brands may be claimed as the property of others.
