Creating your reactive REST API with Kotlin and Ktor part II
Introduction
We begin the second part of this tutorial on creating a reactive REST service.
In the first part, we discussed the benefits of applying reactivity in our services and created our first endpoint using Ktor.
This second part will focus on services: configure our reactive database, validate requests, and apply new techniques for error handling, storage, and real-time changes with web sockets. Finally, we will test our results.

These tutorials aim to show you everything you will learn through the tracks on Hyperskill. Hyperskill is the perfect place to delve deeper, expand your knowledge, and learn more about what is presented in this tutorial. It is the ideal platform for learning Kotlin technologies and using Ktor. Feel free to join and continue your learning journey. Remember that this code is pedagogical and shows many of the contents you will learn in Hyperskill in a didactic and easy-to-read way. It is not intended to create the best production code in real environments. We know that many things can be done better, but they are exaggerated in the code so that, as a student, you can analyze the possibilities.
This part is a bit long because we created the whole structure of amazing features of our service. Take it easy and check Hyperskill for more cool features for your Kotlin and Ktor services. Please feel free to experiment and modify what can improve your self-coding with different examples and reach your goals.
DTO and Mappers
Our first point is to improve requests and responses. To achieve this, we will introduce an interesting pattern: DTO (Data Transfer Object). DTO (Data Transfer Object) is a design pattern used for transferring data between different components or layers of an application. It encapsulates data, providing a standardized structure for communication and decoupling it from underlying data models. DTOs optimize performance by reducing the amount of data transferred and allowing fine-grained control over the exchanged information. They enhance code organization and maintainability and facilitate the evolution of data structures.

Thanks to DTOs, we can encapsulate requests and responses by mapping entities or different data types between them. For instance, imagine you have a specific date format (quite common) but store it in a different format. With DTOs, you can request the date as a string and store it in the appropriate format. Additionally, you can validate the data to ensure correctness before processing it. We may not need all the data from our “Racket” entity (or POKO, Plain Old Kotlin Object) to create or update it.
Moreover, we don’t necessarily have to send all the data either. Each request and response may require specific information. This is where DTOs provide us with more freedom in the process. Although not mandatory, depending on the problem, it is recommended to use DTOs to achieve better flexibility and control over the data exchange process. We use DTO as Serializable objects with Kotlin and not our POKO Entity.
@Serializable
data class RacketRequest(
   val brand: String,
   val model: String,
   val price: Double,
   val numberTenisPlayers: Int = 0,
   val image: String = DEFAULT_IMAGE,
)


@Serializable
data class RacketResponse(
   val id: Long,
   val brand: String,
   val model: String,
   val price: Double,
   val numberTenisPlayers: Int,
   val image: String,
   @Serializable(with = LocalDateTimeSerializer::class)
   val createdAt: LocalDateTime,
   val updatedAt: String,
   val isDeleted: Boolean = false
)
If we have a POKO class and several DTO classes, the next step is to use a mapper between them. We will use extension functions that map from RacketRequest to Racket and from Racket to RacketResponse in a RacketMapper file in Mappers Package.
fun RacketRequest.toModel() = Racket(
   brand = this.brand,
   model = this.model,
   price = this.price,
   numberTenisPlayers = this.numberTenisPlayers,
   image = this.image
)

fun Racket.toResponse() = RacketResponse(
   id = this.id,
   brand = this.brand,
   model = this.model,
   price = this.price,
   numberTenisPlayers = this.numberTenisPlayers,
   image = this.image,
   createdAt = this.createdAt,
   updatedAt = this.updatedAt.toString(),
   isDeleted = this.isDeleted
)

fun List<Racket>.toResponse() = this.map { it.toResponse() }
In this example, we are overengineering things a bit. Still, we gain flexibility for future expansions and the ability to adapt requests and responses to our needs. You can learn all these details in our Hyperskill tracks.
Validations and Status Pages
One of our fundamental problems is ensuring that the received information is correct in the problem domain or according to the information requirements. For example, it doesn’t make sense for our racket to have a negative price or for us to have an empty brand or model. We could fill our code with conditionals to ensure this task and throw exceptions, but Ktor has several plugins to help us in this mission.
To ensure the correctness of incoming information, we can utilize the RequestValidation plugin in Ktor. This plugin allows us to validate the body of incoming requests. Whether validating a raw request body or specific properties of a request object, the RequestValidation plugin has got us covered. We can further enhance our validation capabilities if the ContentNegotiation plugin is also installed with a serializer. In case a request body fails validation, the plugin raises a RequestValidationException. We can handle this exception using the StatusPages plugin, allowing us to gracefully handle validation errors in our application.
We add the following dependencies in our build.gradle.kts file and sync the project.
// Content Validation
implementation("io.ktor:ktor-server-request-validation:$ktor_version")
// Server Status Pages
implementation("io.ktor:ktor-server-status-pages:$ktor_version")
Now, we configure the plugins; in the Application main file, we add two new lines:
fun Application.module() {
   configureSerialization() // Configure the serialization plugin
   configureRouting() // Configure the routing plugin
   configureValidation() // Configure the validation plugin
   configureStatusPages() // Configure the status pages plugin
}
In our Plugin Package, we add the following: Validation.kt
fun Application.configureValidation() {
   install(RequestValidation) {
       racketValidation()
   }
}
In our StatusPages.kt file:
fun Application.configureStatusPages() {
   install(StatusPages) {
       exception<RequestValidationException> { call, cause ->
           call.respond(HttpStatusCode.BadRequest, cause.reasons.joinToString())
       }
   }
}
With the first plugin, we establish all the validation rules. In the second one, we define how we will respond by default for each exception that occurs in Ktor. To avoid programming all the validation rules in the same file, we will create a package called “Validations’’ and place each entity’s validation in it. Similarly, we can do the same with the Status Pages.
Let’s present the validation rules for the Racket entity. If the validation fails, it will throw a RequestValidationException, and the response will return a Bad Request (400) status code thanks to the Status Pages.
fun RequestValidationConfig.racketValidation() {
   validate<RacketRequest> { racket ->
       if (racket.brand.isBlank() || racket.brand.length < 3) {
           ValidationResult.Invalid("Brand must be at least 3 characters long")
       } else if (racket.model.isBlank()) {
           ValidationResult.Invalid("Model must not be empty")
       } else if (racket.price < 0.0) {
           ValidationResult.Invalid("Price must be positive value or zero")
       } else if (racket.numberTenisPlayers < 0) {
           ValidationResult.Invalid("Number of tennis players must be positive number or zero")
       } else {
           // Everything is ok!
           ValidationResult.Valid
       }
   }
}
Now we can show an example using Postman to test it. Now we can see that once the Request DTO reaches our route (endpoint) in a POST or PUT request, the Validation middleware will automatically act. If any of the specified constraints are not met, we will receive a RequestValidationException. This exception will be handled by the Status Pages system, which will retrieve the exception message and the indicated error code.

Also, we can use this idea to generate a Bad Request response when the id parameter (for find, update, or delete) is not a valid number.
// When we try to convert a string to a number and it fails we respond with a 400 Bad Request
exception<NumberFormatException> { call, cause ->
   call.respond(HttpStatusCode.BadRequest, "${cause.message}. The input param is not a valid number")
}
And apply it in our route. If a NumberFormatException appears, it will be handled, and the Status page does its magic.
call.parameters["id"]?.toLong()?.let { id ->
   racketsService.findById(id)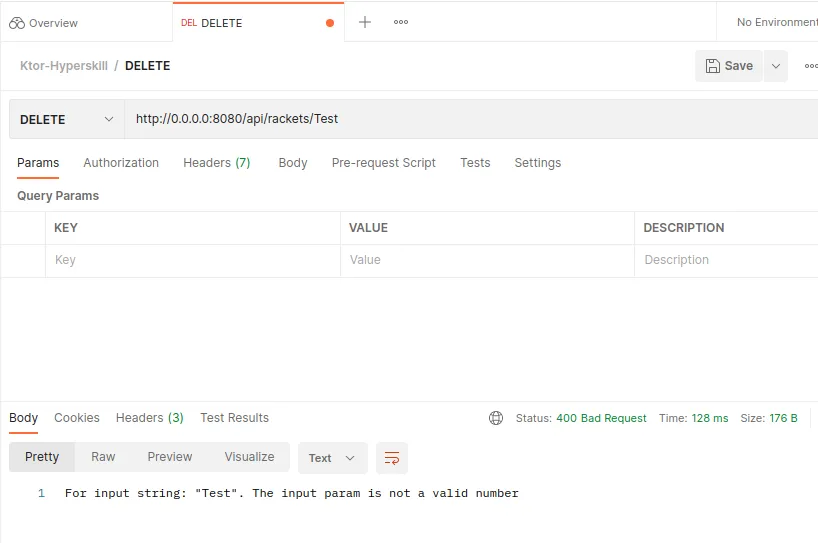
Database Reactive Storage
We know that having in-memory storage is tedious. Let’s implement our repository to work with a reactive database. Now this is a new alternative; what does it give us?
The main difference between JDBC (Java Database Connectivity) and R2DBC (Reactive Relational Database Connectivity) lies in their approach and functioning.
JDBC is a traditionally used API in Java environments for interacting with relational databases synchronously. It follows a blocking approach, meaning each database operation blocks the execution thread until it completes. It can result in limited scalability, especially in applications that require high performance and concurrency.
On the other hand, R2DBC is a reactive API designed for asynchronous and reactive interaction with relational databases. It allows non-blocking database operations, meaning the main execution thread is not blocked. Instead, it uses notifications and callbacks to handle events efficiently. This enables better scalability and improved performance in applications that require high responsiveness and handling of multiple concurrent requests.

Remember, the choice between JDBC and R2DBC depends on the specific requirements of the application and the preference for a synchronous or reactive approach. JDBC is a synchronous API that blocks execution threads, while R2DBC is a reactive API that enables non-blocking operations and more efficient handling of concurrent requests. But this is a full reactive API, so we select a reactive database approach. We can learn more about this question or specific alternative in Hyperskill’s tracks.
The first step is to select a library to help us to code with a reactive database. We will use Kotysa. Kotysa is a light ORM that offers the idiomatic way to write Kotlin type-safe SQL for Kotlin using JDBC or R2DBC approach. In Reactive mode, it provides a SQL client API using suspend functions and Flow from kotlinx.coroutines. We will use it as a Relational Database. We will use H2 because we can use it like a memory database for this development process.
Again, we add the following dependencies in our build.gradle.kts file and sync the project.
implementation("org.ufoss.kotysa:kotysa-r2dbc:$kotysa_version")
implementation("io.r2dbc:r2dbc-h2:$h2_r2dbc_version")
Configure the app
Our first step is to configure our application for database usage. To do this, we will add options to our application.conf file to connect to our database, such as the connection URL, username, and password. We include a special key to init the data en in dev mode.
database {
   driver = "h2"
   protocol ="mem"
   user = "sa"
   user = ${?DATABASE_USER}
   password = ""
   password = ${?DATABASE_PASSWORD}
   database = "r2dbc:h2:mem:///rackets;DB_CLOSE_DELAY=-1"
   database = ${?DATABASE_NAME}
   ## Init database data
   initDatabaseData = true
}
Defining Tables and Entities
The next step is to define our table structure and the row entity to map the data. We can use our original POKO racket model. Again, this is optional but recommended. Like DTOs, this allows us to map data between our POKO model and our Entity in case of data incompatibilities. We have chosen this approach because we don’t want null values in the ID field, but Kotysa requires them to determine whether it should generate an auto-incrementing key. This behavior might change in future versions. In a new Package called Entities, we code the Racket Table and Racket Entity
bject RacketTable : H2Table<RacketEntity>() {
   // Autoincrement and primary key
   val id = autoIncrementBigInt(RacketEntity::id).primaryKey()
   // Other fields
   val brand = varchar(RacketEntity::brand)
   val model = varchar(RacketEntity::model)
   val price = doublePrecision(RacketEntity::price)
   val numberTenisPlayers = integer(RacketEntity::numberTenisPlayers, "number_tenis_players")
   val image = varchar(RacketEntity::image, "image")
   // metadata
   val createdAt = timestamp(RacketEntity::createdAt, "created_at")
   val updatedAt = timestamp(RacketEntity::updatedAt, "updated_at")
   val isDeleted = boolean(RacketEntity::isDeleted, "is_deleted")
}

data class RacketEntity(
   val id: Long?,
   val brand: String,
   val model: String,
   val price: Double,
   val numberTenisPlayers: Int = 0,
   val image: String = DEFAULT_IMAGE,
   val createdAt: LocalDateTime = LocalDateTime.now(),
   val updatedAt: LocalDateTime = LocalDateTime.now(),
   val isDeleted: Boolean = false
)
And we add the following methods to our Racket Mapper.
fun RacketEntity.toModel() = Racket(
   id = this.id ?: Racket.NEW_RACKET,
   brand = this.brand,
   model = this.model,
   price = this.price,
   numberTenisPlayers = this.numberTenisPlayers,
   image = this.image,
   createdAt = this.createdAt,
   updatedAt = this.updatedAt,
   isDeleted = this.isDeleted
)

fun List<RacketEntity>.toModel() = this.map { it.toModel() }

fun Racket.toEntity() = RacketEntity(
   id = if (this.id == Racket.NEW_RACKET) null else this.id,
   brand = this.brand,
   model = this.model,
   price = this.price,
   numberTenisPlayers = this.numberTenisPlayers,
   image = this.image,
   createdAt = this.createdAt,
   updatedAt = this.updatedAt,
   isDeleted = this.isDeleted
)
Coding the Database Service Client
In this initial version, we will create a Customer Service Database that is in charge of creating said client, creating the tables, and starting the data. You can find it in the Package: Services -> Database. This client will load the configuration and database parameters of our application.conf file, we inject the dependence in the constructor.
class DataBaseService(
   private val dataBaseConfig: ApplicationConfig = ApplicationConfig("application.conf")
) {

   private val connectionFactory by lazy {
       val options = ConnectionFactoryOptions.builder()
           .option(ConnectionFactoryOptions.DRIVER, dataBaseConfig.property("database.driver").getString())
           .option(ConnectionFactoryOptions.PROTOCOL, dataBaseConfig.property("database.protocol").getString())
           .option(ConnectionFactoryOptions.USER, dataBaseConfig.property("database.user").getString())
           .option(ConnectionFactoryOptions.PASSWORD, dataBaseConfig.property("database.password").getString())
           .option(ConnectionFactoryOptions.DATABASE, dataBaseConfig.property("database.database").getString())
           .build()
       ConnectionFactories.get(options)
   }

   private val initDatabaseData by lazy {
       dataBaseConfig.propertyOrNull("database.initDatabaseData")?.getString()?.toBoolean() ?: false
   }

   // Our client
   val client = connectionFactory.coSqlClient(getTables())

   init {
       logger.debug { "Init DataBaseService" }
       initDatabase()
   }

   // Our tables
   private fun getTables(): H2Tables {
       // Return tables
       return tables().h2(RacketTable)
   }

   fun initDatabase() = runBlocking {
       logger.debug { "Init DatabaseService" }
       createTables()
       // Init data
       if (initDatabaseData) {
           initDataBaseDataDemo()
       }
   }


   // demo data
   suspend fun initDataBaseDataDemo() {
       clearDataBaseData()
       initDataBaseData()
   }

   // Create tables if not exists
   private suspend fun createTables() = withContext(Dispatchers.IO) {
       logger.debug { "Creating the tables..." }
       launch {
           client createTableIfNotExists RacketTable
       }
   }

   // Clear all data
   private suspend fun clearDataBaseData() = withContext(Dispatchers.IO) {
       logger.debug { "Deleting data..." }
       launch {
           client deleteAllFrom RacketTable
       }
   }

   // Init data
   private suspend fun initDataBaseData() = withContext(Dispatchers.IO) {
       logger.debug { "Saving rackets demo data..." }
       launch {
           racketsDemoData().forEach {
               client insert it.value.copy(id = Racket.NEW_RACKET).toEntity()
           }
       }
   }
}
Updating the repository to use our Database storage
Finally, we updated our racket repository to use the database storage system. We inject our database dependence in the constructor.
class RacketsRepositoryImpl(
   private val dataBaseService: DataBaseService
) : RacketsRepository {

   override suspend fun findAll(): Flow<Racket> = withContext(Dispatchers.IO) {
       logger.debug { "findAll" }
       return@withContext (dataBaseService.client selectFrom RacketTable)
           .fetchAll().map { it.toModel() }
   }

   override suspend fun findById(id: Long): Racket? = withContext(Dispatchers.IO) {
       logger.debug { "findById: $id" }
       return@withContext (dataBaseService.client selectFrom RacketTable
               where RacketTable.id eq id)
           .fetchFirstOrNull()?.toModel()
   }

   override suspend fun findAllPageable(page: Int, perPage: Int): Flow<Racket> = withContext(Dispatchers.IO) {
       logger.debug { "findAllPageable: $page, $perPage" }
       val myLimit = if (perPage > 100) 100L else perPage.toLong()
       val myOffset = (page * perPage).toLong()
       return@withContext (dataBaseService.client selectFrom RacketTable
               limit myLimit offset myOffset)
           .fetchAll().map { it.toModel() }
   }

   override suspend fun findByBrand(brand: String): Flow<Racket> = withContext(Dispatchers.IO) {
       logger.debug { "findByBrand: $brand" }
       return@withContext (dataBaseService.client selectFrom RacketTable)
           .fetchAll()
           .filter { it.brand.contains(brand, true) }
           .map { it.toModel() }
   }

   override suspend fun save(entity: Racket): Racket = withContext(Dispatchers.IO) {
       logger.debug { "save: $entity" }
       if (entity.id == Racket.NEW_RACKET) {
           create(entity)
       } else {
           update(entity)
       }
   }

   private suspend fun create(entity: Racket): Racket {
       val newEntity = entity.copy(createdAt = LocalDateTime.now(), updatedAt = LocalDateTime.now())
           .toEntity()
       logger.debug { "create: $newEntity" }
       return (dataBaseService.client insertAndReturn newEntity).toModel()
   }

   private suspend fun update(entity: Racket): Racket {
       logger.debug { "update: $entity" }
       val updateEntity = entity.copy(updatedAt = LocalDateTime.now()).toEntity()
       (dataBaseService.client update RacketTable
               set RacketTable.brand eq updateEntity.brand
               set RacketTable.model eq updateEntity.model
               set RacketTable.price eq updateEntity.price
               set RacketTable.numberTenisPlayers eq updateEntity.numberTenisPlayers
               set RacketTable.image eq updateEntity.image
               where RacketTable.id eq entity.id)
           .execute()
       return updateEntity.toModel()
   }

   override suspend fun delete(entity: Racket): Racket {
       logger.debug { "delete: $entity" }
       (dataBaseService.client deleteFrom RacketTable
               where RacketTable.id eq entity.id)
           .execute()
       return entity
   }

   override suspend fun deleteAll() {
       logger.debug { "deleteAll" }
       dataBaseService.client deleteAllFrom RacketTable
   }

   override suspend fun saveAll(entities: Iterable<Racket>): Flow<Racket> {
       logger.debug { "saveAll: $entities" }
       entities.forEach { save(it) }
       return this.findAll()
   }
}
Coding our services.
The next step is enriching the API service, so we encapsulate our repository as a service that includes different functionalities besides saving info in a database.
Cache
The cache system is recommended for servers for the following reasons:
- It improves overall performance by storing frequently accessed data closer to the processor, reducing latency.
- It helps to reduce the load on the server’s main memory, allowing faster access to critical data.
- Caching minimizes network traffic by serving content directly from the cache, reducing the need for repeated data requests.
- It enhances scalability by efficiently handling increased user requests and optimizing server resources.
We use a reactive cache, Cache4k, to add it to our build.gradle.kts file and sync the project:
// Cache 4K for in-memory cache
implementation("io.github.reactivecircus.cache4k:cache4k:$cache_version")
To use our cache service, we will create CacheService with parameters obtained from application.conf. In our RacketServiceImpl, the algorithm to use our cache: If we request a racket, we search for it in the cache, and only if it doesn’t exist, we obtain it in the database (we subsequently add it to the cache for future searches), if it doesn’t exist we return an error. We update the cache with the new data if we add or modify a racket. And if we delete a racket, we invalidate it in the cache.
Here is a prototype of findById, but we need to add more things ;)
verride suspend fun findById(id: Long): Racket {
   logger.debug { "findById: search racket by id" }
   // find in cache if not found find in repository
   return cacheService.rackets.get(id)?.let {
       logger.debug { "findById: found in cache" }
       it
   } ?: run {
       racketsRepository.findById(id)?.let { racket ->
           logger.debug { "findById: found in repository" }
           cacheService.rackets.put(id, racket)
           racket
       } ?: throw RuntimeException("Racket not found")
   }
}
Railway Oriented Programming
Railway Oriented Programming (ROP) is a functional programming concept for handling errors and composing sequential operations. It organizes operations into a sequence of steps, where each step either succeeds and continues to the next step to reach the happy path or fails and branches to an error-handling path. The advantages of ROP:
- Improved error handling: ROP provides a structured approach to handling errors, making tracking and predicting failures easier.
- Composability: ROP allows the composition of multiple operations into a single sequence, making it easier to reason about and maintain code.
- Separation of concerns: ROP encourages separating business logic from error-handling code, leading to cleaner and more maintainable code. ROP provides a structured approach to handling errors and allows for explicit branching based on success or failure. In contrast, exceptions can handle exceptional cases or unexpected errors.
- Testability: ROP facilitates unit testing by allowing each step to be tested individually and enabling easier mocking or stubbing of dependencies.

To use this programming technique, we add the following lines to our gradle.build.kts and sync the project to use the kotlin-result library:
// Result for error handling Railway Oriented Programming
implementation("com.michael-bull.kotlin-result:kotlin-result:$result_version")
We create the Errors structure for Racket’s operation.
sealed class RacketError(val message: String) {
   class NotFound(message: String) : RacketError(message)
   class BadRequest(message: String) : RacketError(message)
}
Now we can use it in our service and route. For example, we have an example to find a racket with our service:
override suspend fun findById(id: Long): Result<Racket, RacketError> {
   logger.debug { "findById: search racket by id" }
   // find in cache if not found find in repository
   return cacheService.rackets.get(id)?.let {
       logger.debug { "findById: found in cache" }
       Ok(it)
   } ?: run {
       racketsRepository.findById(id)?.let { racket ->
           logger.debug { "findById: found in repository" }
           cacheService.rackets.put(id, racket)
           Ok(racket)
       } ?: Err(RacketError.NotFound("Racket with id $id not found"))
   }
}
And how to search for a racket by an id in our route.
// Get one racket by id --> GET /api/rackets/{id}
get("{id}") {
   logger.debug { "GET BY ID /$ENDPOINT/{id}" }
   call.parameters["id"]?.toLong()?.let { id ->
       racketsService.findById(id).mapBoth(
           success = { call.respond(HttpStatusCode.OK, it.toResponse()) },
           failure = { handleRacketErrors(it) }
       )
   }
}
We use the mapBoth to separate the happy result from the error. We can handle all the errors thanks to an extension function handleRacketErrors, where we pass the error, and at this point, we perform the correct response from each type of error. So our code is spotless compared to the first version.
private suspend fun PipelineContext<Unit, ApplicationCall>.handleRacketErrors(
   error: RacketError,
) {
   // We can handle the errors in a different way
   when (error) {
       // Racket Errors
       is RacketError.NotFound -> call.respond(HttpStatusCode.NotFound, error.message)
       is RacketError.BadRequest -> call.respond(HttpStatusCode.BadRequest, error.message)
   }
}
Real-time notifications with WebSockets
WebSocket is a communication protocol that provides full-duplex communication between a client and a server over a single, long-lived connection. It enables real-time, bi-directional communication between the two endpoints. We can use WebSocket when:
- Real-time data is required: WebSocket is suitable for applications that need instant updates or frequent data exchange between the client and server.
- Interactive applications: It is ideal for applications that involve real-time collaboration, chat systems, gaming, or any scenario where instant communication is vital.
- Reduced latency: WebSocket eliminates the need for continuous polling or frequent requests, reducing network overhead and improving responsiveness.
- Efficient resource utilization: It allows for simultaneous, persistent connections, reducing the overhead of establishing new connections for each interaction and enabling efficient resource utilization on the server.
So we perform our notification system when we add, update or delete a racket. We can use the Observer pattern (look at the repository’s commits), but in this case, we use a Reactive State using the StateFlow or SharedFow Kotlin Coroutines. The Observer pattern is useful for real-time notifications to a list of subscribers, while StateFlow in Kotlin provides reactive data flow with automatic notification of relevant changes. Observer suits smaller subscriber lists and infrequent changes, whereas StateFlow is ideal for leveraging Kotlin’s reactive capabilities and handling larger-scale data flows. The choice depends on the system’s complexity, the subscriber list size, change frequency, and required responsiveness. Consider your specific needs when selecting the appropriate approach.
So, we create a Notification Dto, and in our racket service, we create the reactive state and a function to modify it.
/ Real Time Notifications and WebSockets
// We can notify use a reactive system with StateFlow
private val _notificationState: MutableStateFlow<RacketNotification> = MutableStateFlow(
   RacketNotification(
       entity = "",
       type = NotificationType.OTHER,
       id = null,
       data = null
   )
)
override val notificationState: StateFlow<RacketNotification> = _notificationState

private suspend fun onChange(type: NotificationType, id: Long, data: Racket) {
   logger.debug { "onChange: Notification on Rackets: $type, notification updates to subscribers: $data" }
   // update notification state
   _notificationState.value = RacketNotification(
       entity = "RACKET",
       type = type,
       id = id,
       data = data.toResponse()
   )
}
For example, if we delete a new racket in our service, we can update the state:
override suspend fun delete(id: Long): Result<Racket, RacketError> {
   logger.debug { "delete: delete racket" }
   // find, if exists delete in cache and repository and notify
   return findById(id).andThen {
       Ok(racketsRepository.delete(it).also { res ->
           cacheService.rackets.invalidate(id)
           onChange(NotificationType.DELETE, id, res)
       })
   }
}
But, we need to interact as a web service in our route. We include the dependence in our build.gradle.kts file and sync the project.
// WebSockets
implementation("io.ktor:ktor-server-websockets:$ktor_version")
We configured the WebSocket Plugin (Plugins Package), and we need to add the configuration to Application.module like other plugins.
We create a route for our WebSocket in our route and react to the change of the Notification State consuming the StateFlow or SharedFlow.
// WebSockets Real Time Updates and Notifications
webSocket("/$ENDPOINT/notifications") {
   sendSerialized("Notifications WS: Rackets - Rackets API")
   val initTime = LocalDateTime.now()
   // Remember it will autoclose the connection, see config
   // Now we can listen and react to the changes in the StateFlow
   racketsService.notificationState
       // Sometimes we need to do something when we start
       .onStart {
           logger.debug { "notificationState: onStart to ${this.hashCode()}" }
           // Sometimes we need to filter any values
       }.filter {
           // we filter the values: we only send the ones that are not empty and are after the init time
           it.entity.isNotEmpty() && it.createdAt.isAfter(initTime)
           // we collect the values and send them to the client
       }.collect {
           logger.debug { "notificationState: collect $it and sent to ${this.hashCode()}" }
           sendSerialized(it) // WS function to send the message to the client
       }
}
Now we can test it in Postman, thanks to WebSocket functionality:

Storage files
The next stage is to create a storage service to upload files, for example, the image of each racket. In application.conf we use a special key value to indicate the upload directory to save the files.
So we will code in this service two methods, one to save an image and another to retrieve it. We also create Error and use Result (ROP):
override suspend fun saveFile(
   fileName: String,
   fileUrl: String,
   fileBytes: ByteArray
): Result<Map<String, String>, StorageError> =
   withContext(Dispatchers.IO) {
       logger.debug { "Saving file in: $fileName" }
       return@withContext try {
           File("${uploadDir}/$fileName").writeBytes(fileBytes)
           Ok(
               mapOf(
                   "fileName" to fileName,
                   "createdAt" to LocalDateTime.now().toString(),
                   "size" to fileBytes.size.toString(),
                   "url" to fileUrl,
               )
           )
       } catch (e: Exception) {
           Err(StorageError.BadRequest("Error saving file: $fileName"))
       }
   }

override suspend fun getFile(fileName: String): Result<File, StorageError> = withContext(Dispatchers.IO) {
   logger.debug { "Get file: $fileName" }
   return@withContext if (!File("${uploadDir}/$fileName").exists()) {
       Err(StorageError.NotFound("File Not Found in storage: $fileName"))
   } else {
       Ok(File("${uploadDir}/$fileName"))
   }
}
So, in our route we can use a patch petition to update the racket image using multipart request:
// Update a racket image --> PATCH /api/rackets/{id}
patch("{id}") {
   logger.debug { "PATCH /$ENDPOINT/{id}" }

   call.parameters["id"]?.toLong()?.let { id ->
       val baseUrl =
           call.request.origin.scheme + "://" + call.request.host() + ":" + call.request.port() + "/$ENDPOINT/image/"
       val multipartData = call.receiveMultipart()
       multipartData.forEachPart { part ->
           if (part is PartData.FileItem) {
               val fileName = part.originalFileName as String
               val fileBytes = part.streamProvider().readBytes()
               val fileExtension = fileName.substringAfterLast(".")
               val newFileName = "${System.currentTimeMillis()}.$fileExtension"
               val newFileUrl = "$baseUrl$newFileName"
               // Save the file
               storageService.saveFile(newFileName, newFileUrl, fileBytes).andThen {
                   // Update the racket Image
                   racketsService.updateImage(
                       id = id,
                       image = newFileUrl
                   )
               }.mapBoth(
                   success = { call.respond(HttpStatusCode.OK, it.toResponse()) },
                   failure = { handleRacketErrors(it) }
               )
           }
           part.dispose()
       }
   }
}
Now we can test with Postman to send a file and update a racket or get this file.


Our Final Route
Finally, we have our route that calls the services we will use. We emphasize the ROP approach and how we handle all errors by creating clean and readable code that concatenates options based on the happy path or uses web sockets with a reactive state to perform a real-time notification system.
Testing
Testing the racket repository
We are now entering a crucial and essential part: testing our code. To do this, we will make use of JUnit. JUnit is a widely used open-source testing framework for Java applications. It provides a simple and convenient way to write and execute unit tests for individual units of code, such as methods or classes. JUnit offers various annotations, assertions, and test runners to facilitate the creation and execution of tests. We will extend the configuration to use a special library to test suspended functions. We add the following dependencies in our build.gradle.kts file and sync the project.
// Testing
testImplementation("io.ktor:ktor-server-tests-jvm:$ktor_version")
// testImplementation("org.jetbrains.kotlin:kotlin-test-junit:$kotlin_version")
// JUnit 5 instead of JUnit 4
testImplementation("org.junit.jupiter:junit-jupiter-api:$junit_version")
testImplementation("org.junit.jupiter:junit-jupiter-engine:$junit_version")
// To test coroutines and suspend functions
testImplementation("org.jetbrains.kotlinx:kotlinx-coroutines-test:$coroutines_test_version")
In this initial stage, they are not the best tests of a repository, but they are illustrative for what we want. We can see the use of assertions to check the indicated CRUD operations. So in the test folder, you can find the test files.
class RacketsRepositoryImplTest {
   val dataBaseService = DataBaseService(ApplicationConfig("application.conf"))
   val repository = RacketsRepositoryImpl(dataBaseService)

   @BeforeEach
   fun setUp() = runTest {
       // Clean and restore database with data
       dataBaseService.initDataBaseDataDemo()
   }

   @Test
   fun findAll() = runTest {
       val rackets = repository.findAll().toList()
       assertAll(
           { assertEquals(4, rackets.size) },
           { assertEquals("Babolat", rackets[0].brand) },
           { assertEquals("Babolat", rackets[1].brand) },
           { assertEquals("Head", rackets[2].brand) },
           { assertEquals("Wilson", rackets[3].brand) }
       )
   }

   @Test
   suspend fun findById() = runTest {
       val racket = repository.findById(1)!!
       assertAll(
           { assertEquals(1, racket.id) },
           { assertEquals("Babolat", racket.brand) }
       )
   }

   @Test
   fun findByIdNotFound() = runTest {
       val racket = repository.findById(-100)
       assertNull(racket)
   }

   // . . .

   @Test
   fun saveNewRacket() = runTest {
       val racket = Racket(brand = "Test Brand", model = "Test Model", price = 100.0)
       val newRacket = repository.save(racket)
       assertAll(
           { assertEquals("Test Brand", newRacket.brand) },
           { assertEquals("Test Model", newRacket.model) },
           { assertEquals(100.0, newRacket.price) }
       )
   }

   // . . .

   @Test
   fun delete() = runTest {
       // Save a new racket
       val racket = Racket(brand = "Test Brand", model = "Test Model", price = 100.0)
       val newRacket = repository.save(racket)
       val deleted = repository.delete(newRacket)
       val exists = repository.findById(newRaquet.id)
       assertAll(
           { assertEquals("Test Brand", deleted.brand) },
           { assertEquals("Test Model", deleted.model) },
           { assertEquals(100.0, deleted.price) },
           { assertNull(exists) }
       )
   }
}
Running our tests, we obtain

Testing the racket service
For testing our service, we test with doubles so that we will use mocks. Testing with mocks involves creating mock objects that mimic the behavior of real dependencies. These mock objects are programmed to respond to method calls and allow expectations to be set on their interactions. Using mocks, developers can isolate the code being tested, control the behavior of dependencies, simulate various scenarios, and verify interactions with the tested code.
We will use the MockK library, so we must add the following library to a sour project in the build.gradle.kts file and resync our project
// MockK to test with mocks
testImplementation("io.mockk:mockk:$mockk_version")
We create the class to test the service methods. We extended the class with @ExtendWith(MockKExtension::class) to perform tests with JUnit and create the mocks with @MockK annotation and @InjectMockK to inject the mock as a dependency of the class for testing.
So, we create each test where we simulate the mock behavior to respond to method calls and allow expectations to test the service methods with JUnit. We can verify the number of calls to a dependency.
Here is an example
@ExtendWith(MockKExtension::class)
class RacketsServiceImplTest {

   @MockK
   lateinit var repository: RacketsRepositoryImpl
   @MockK
   lateinit var cache: CacheService
   @InjectMockKs
   lateinit var service: RacketsServiceImpl

   val rackets = racketsDemoData().values

   @Test
   fun findAll() = runTest {
       // Given
       coEvery { repository.findAll() } returns flowOf(rackets.first())
       // When
       val result = service.findAll().toList()
       // Then
       assertAll(
           { assertNotNull(result) },
           { assertEquals(1, result.size) },
           { assertEquals(rackets.first(), result.first()) }
       )
       // Verifications
       coVerify(exactly = 1) { repository.findAll() }
   }

  // ...

   @Test
   fun save() = runTest {
       // Given
       coEvery { repository.save(any()) } returns rackets.first()
       coEvery { cache.rackets.put(any(), rackets.first()) } just runs // returns Unit
       // When
       val result = service.save(rackets.first())
       // Then
       assertAll(
           { assertNotNull(result) },
           { assertEquals(rackets.first(), result.get()) }
       )
       // Verifications
       coVerify { repository.save(any()) }
       coVerify { cache.rackets.put(any(), rackets.first()) }
   }

  // ...

   @Test
   fun delete() = runTest {
       // Given
       coEvery { cache.rackets.get(any()) } returns null
       coEvery { repository.findById(any()) } returns rackets.first()
       coEvery { cache.rackets.put(any(), rackets.first()) } just runs
       coEvery { repository.delete(any()) } returns rackets.first()
       coEvery { cache.rackets.invalidate(any()) } returns Unit
       // When
       val result = service.delete(1)
       // Then
       assertAll(
           { assertNotNull(result) },
           { assertEquals(rackets.first(), result.get()) }
       )
       // Verifications
       coVerify { cache.rackets.get(any()) }
       coVerify { repository.findById(any()) }
       coVerify { cache.rackets.put(any(), rackets.first()) }
       coVerify { repository.delete(any()) }
       coVerify { cache.rackets.invalidate(any()) }
   }

   // ...
}
Running our tests, we obtain

What ‘s next?
You can test with Postman, and why not, try our validation process. You can follow the messages or the logger to understand the sequence or the methods.
We have continued our tutorials to be able to code our reactive REST API, gradually understanding each of its components. But we still have a lot to do in the final tutorial. Please don’t stop following the rest of the Hyperskill Medium publications, where we will see more details of what you can learn in our tracks. We will code this example:
- Using Koin to inject our dependencies.
- Security connections with SSL
- Authentication and Authorization with JWT
- Test our endpoints.
- Document our Service with Swagger and OpenAPI
- Deploy with Docker
You have the code of this project in https://github.com/joseluisgs/ktor-reactive-rest-hyperskill. The code of this part is this link: https://github.com/joseluisgs/ktor-reactive-rest-hyperskill/releases. Please don’t forget to give a star or follow me to be aware of new tutorials and news. You can follow it commit-by-commit and use the Postman backup file to test it. Remember, this is not a code to use in a real environment or production environment. It is a didactic project for you to experiment, analyze and improve or adapt to your way of programming. It is about presenting concepts and seeing how they work. Any suggestions or proposals you can make an issue or pull request.
However, we still have many sections to cover and content for you to delve into and reinforce on Hyperskill through different topics and tasks that will help you improve as a developer in Kotlin technologies. The following tracks offered by JetBrains Academy on Hyperskill can be a perfect starting point. All the information and explanation of concepts and techniques are shown in these articles. Don’t miss them!
These tracks will provide you with hands-on experience using cutting-edge tools and teach you how to build server-side applications, ensure persistent data storage in databases, and effectively test the functionality of your applications using modern tools.
We encourage you to leave any questions or feedback in the comments section below this blog post. Additionally, you can follow us on social media platforms such as Reddit, LinkedIn, Twitter, and Facebook to stay informed about our latest articles and projects.