Live streaming of stereo fisheye camera video with Jetson Nano
Here are the steps to set up two Picam360 cameras as stereo cameras and live stream the VR3D video.

Hello, my name is GAKU from the Picam360 developer community.
It’s been a while since I’ve posted anything. In this post, I will show you the steps to set up two Picam360 cameras as stereo cameras.
What is a stereo camera?
A stereo camera is a camera that can see three-dimensional images using the same principle as the human eye. Because we see with two eyes, we are able to see things in three dimensions. It’s the same with cameras: if you shoot two cameras side by side and look at the images from each camera with your left and right eyes, you will see a three-dimensional image.
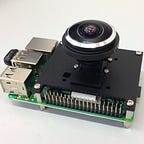
Items used in this project
- Camera: PICAM360–4KHDR x 2 (8MP, WDR model can be used.)
- Server Device: Jetson Nano
- Viewer: PViewer on Android
Software license required
A software license is required to use the stereo camera, and will be provided to customers who purchase two or more Picam360 cameras. If you need a license, please contact us from <here>.
Use a Wi-Fi antenna that meets the requirements
If you are connecting two cameras, you need to be careful in selecting the Wi-Fi antenna to use. Use an antenna that matches the requirements listed in the Wi-Fi antenna section of <Getting Started with Picam360 on the Jetson Nano — 1: Items for Getting Started, and Notes>. We recommend the Intel Dual Band Wireless-AC 8265 M.2 Wi-Fi card. It is certified by Nvidia to work.
Installation of cameras
The distance between the two cameras should be the same as the distance between the two eyes of a human being to give a natural feeling to the image. If the object is always far away, you can increase the distance between the cameras to get a 3D effect.
You can get the design data for the 3D printable Picam360 camera holder from <this page>.
If you don’t have a 3D printer, you can use plastic boards or other materials to make your own.

Set up the Jetson Nano
Please go through the normal setup first, the setup procedure for the Jetson Nano can be found in the following article I posted earlier.
Please set up the software in the environment described in <Verified Environment>. It may not work in other environments.
The Raspberry pi is <here>. Once the normal setup is complete, the next step is to configure the stereo camera.
Start Picam360 with Jetson Nano — 1: Items for Getting Started, and Notes
Camera calibration
Calibration flow of the two cameras:
Calibrating /dev/video0 -> Calibrating /dev/video1Connect the camera for the left eye to the port with the smaller number, and connect the one for the right eye to the port with the larger number than the one for the left eye.
The following figure shows the Jetson Nano from the back. The numbers are the order in which the OS reads the ports at startup, so if two cameras are connected and booted, the one with the smaller port number will be recognized as video0 and the one with the larger port number as video1. Connect the camera for the left eye to the port with the smaller number, and connect the camera for the right eye to the port with the larger number than the one for the left eye.

This order is important because calibration files are generated for each camera. For example, if you switch the connection port after the setup is complete, the calibration information for a different camera will be applied. Therefore, make sure that the camera is always connected to the same port.
It is a good idea to mark the camera and port in this way.

The calibration process is the same as normal calibration, only the numbers are different.
Left camera
Follow the normal procedure for calibration. However, note the number of the command to start calibration and the command for the process of copying the file.
The number at the end of the calibration mode start command is 0.
$ pserver --calibrate=640x480@30:/dev/video0The file name for the process of copying the file is lens_params0.json.
$ mv -f lens_params.json ~/pserver/lens_params0.jsonRight camera
Follow the normal procedure for calibration. However, note the number of the command to start calibration and the command for the process of copying the file.
The number at the end of the calibration mode start command is 1.
$ pserver --calibrate=640x480@30:/dev/video1The file name for the process of copying the file is lens_params1.json.
$ mv -f lens_params.json ~/pserver/lens_params1.jsonYou should now have lens_params0.json and lens_params1.json in ~/pserver.
$ ls ~/pserver
# lens_params0.json and lens_params1.json should be present in the displayed list
Modify the configuration file
Go to <Verified Environment> and copy the File ID of the configuration file for the stereo camera (node-pserver config file).
Replace the FILE_ID part of the following command with the ID you have copied and execute it. The configuration file will be downloaded.
$ cd ~/pserver
$ curl -Lo jetbot-vr180x2-config.json https://drive.google.com/u/3/uc?id=FILE_ID&export=download
# e.g.: curl -Lo jetbot-vr180x2-config.json https://drive.google.com/u/3/uc?id=1LPxTrGARjiowZ3jPxtD433YKSK7BHU5o&export=download
If the command execution does not finish after 10 seconds, press Ctrl+c to terminate it. The file should be created.
Open the configuration file that you downloaded.
$ nano jetbot-vr180x2-config.jsonChange the input camera information in this section.
"params" : {
    "APP.SIZE" : "1440x720",
    "APP.CAM0" : "3840x2880@15:/dev/video0",
    "APP.CAM1" : "3840x2880@15:/dev/video1"
},
Value by camera
[PICAM360–4KHDR] 3840x2888@15
[PICAM360-CAMPT8MP] 3264x2448@15
[PICAM360-CAMTWDR] 2048x1536@15
Rewrite the app_key in the following section with your activation key.
"license" : {
    "app_key" : "your_app_key",
    "sku" : "P360SWLIC-STEREO-V1",
    "iface" : "wlan0"
},
e.g.:
"app_key" : "10a01566-aca8-416d-9166-b8d5e45b49f5",Replace iface with the name of the interface that will be used for the Internet connection: wlan0 for a wifi Internet connection, or eth0 for a wired connection.
e.g.:
"iface" : "wlan0"Ctrl+o, Ctrl+x to save and close the file.
Activate license, View live video
Instructions on how to start the Jetson Nano server software and connect to it from the viewer can be found in the article below.
Connect from a smartphone.
Since the configuration file name is different from that of the single camera, replace the file name part of the pserver startup command with the following and execute it.
$ export DISPLAY=:0 && pserver -c ~/pserver/jetbot-vr180x2-config.jsonThe license will be activated online when the viewer connects to pserver. The license for stereo cameras (P360SWLIC-STEREO-V1), which is provided to users who purchase two or more cameras, is a perpetual license. Once authenticated, it can be used offline thereafter.
If the license is recognized successfully, you will see “license valid!” in the psever log. psever log is the log that is displayed in the console when psever is started and connected from the viewer.

After connecting from the viewer on your phone, open the menu and activate STEREO.

With VR goggles for your smartphone, you can enjoy 3DVR easily and affordably.

With Oculus Quest2, you can experience higher quality images. We have recently completed an application for Oculus Quest2. I’ll be introducing it on this blog soon.
That’s it for this post. See you soon.
Picam360 Link:
- Web Site: https://www.picam360.com
- Web Store: https://store.picam360.com
- Twitter: https://twitter.com/picam360
- Facebook: https://www.facebook.com/Picam360/