DIY: Dream Catcher by Khushbu Garg

Hello All,
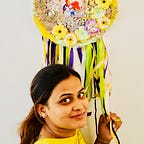
This is Khushbu here, today I would like to share my new project ‘’Dream Catcher” with all of you.
Supplies Used:
# Cardboard
# I-craft chipboards
# Distress Tool
# Papericious modelling paste
# Orgenza and satin Ribbon 1/4" and 1/2" wide (few random Colors blue, purple, white, off white)
# Little birdie fairy dust (peacock)
# Tubby craft jet black ink pad
# Distress Ink (evergreen bough)
# Bob & Betty ornate annie paperback
# Tim holtz stencil (burlap THS007)
# Acrylic color (Turquoise Blue)
# Some Mulberry flowers and leaves
# An old stamp from my stash

Step.1: I cut a 10” diameter from cardboard and pasted 10” pattern paper from the pack.
Step.2: I cut second 9.5” diameter pattern paper and distressed its edges using distress tool and distress ink (Evergreen Bough) .This was pasted over my base using double sided tape.

Step.3: Using texture paint and stencil, I created the texture over it. Then, I used my acrylic color and water spray bottle over the texture for coloring my base.
Step.4: After drying, I stamped it with black and evergreen bough at random places. Also using my brush, I sprinkled some acrylic color over my base.

Step.5: I fussycut some pattern papers and some flowers from the same paper pack and distressed them using evergreen boughs.
Step.6: Furthermore, I used these fussycut pieces, chipboards, mulberry flowers and leaves to decorate my base.
Step.7: I made 1 hole on the upper part and 4 holes on the bottom and then tie knots on all the holes using orgenza and satin ribbons. After that, I sprinkled little birdie fairy dust over my dream catcher to give it a shiny finishing touch.

Please do let me know if this was helpful.
Feel free to shower your love, likes and shares!!
Regards,
Khushbu Garg ❤
Happy Crafting!!
Keep following Prika for more amazing DIY Ideas and Inspirations!!
Applied for Challenge: