Getting Started with PyTorch Distributed

It has been more than a decade since AlexNet won ImageNet 2012 which is a deep learning based model. This has opened new avenues initially for the vision domain and more recently in the language domain in the form of Transformer Models. Despite achieving state-of-the-art results in the vision and language domain the size of deep learning models in terms of trainable parameters is increasing linearly. For reference, you can see a line chart below that contains the year on the x-axis and model parameters on the y-axis.

To translate what it means by increasing the model parameters is directly proportional to having more amount of GPU memory for storing model weights, gradients, and training batches. Previously a single consumer-grade GPU was sufficient to train deep learning models however recently the memory footprint of the models has increased therefore a large number of GPUs spread across multiple nodes (virtual machines) are required to train or fine-tune the models. This training strategy comes under the umbrella of Distributed Computing (Training).
In order to fulfill the memory requirement of these models custom hardware solutions have been provided by Nvidia, AWS, GCP, Azure, and other cloud-based providers. However, these hardware costs are hard on the pocket. Therefore, in this article, we are going to start with building a single standalone PyTorch Training Pipeline and then convert it to various Distubted Training Strategies keeping in mind to build cost-efficient training jobs. Lastly, we are going to discuss tips on how to optimize cloud costs while training Deep Learning models.
Distributed Computing Definitions
Before we get into PyTorch distributed we first need to build a basic understanding of some common terminologies of Distributed Computing.
Nodes
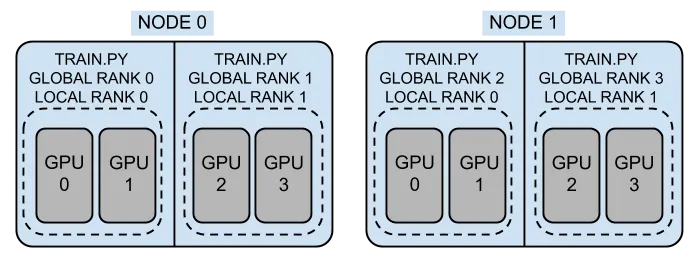
Nodes are physical or virtual machines that are being used in training jobs. For reference in the visual shared above the training process is using two nodes having node ids 0 and 1. The only pre-requisite for communication between the nodes used in the training job is that they should be connected via high-speed LAN in order to reduce latency.
World Size
World size is the number of processes invoked during the training job. Generally, each process is assigned one GPU therefore considering the above visual the world size for the above training job is 4.
Local Rank
To simplify the concept of local rank we can say that local rank is a process id with respect to a given node. For example, in Node 0 the local rank would be 0 and 1. Where for Node 1 the local rank would be 0 and 1.
Global Rank or Rank
The global rank is the process id with respect to the training job. For example in the visual above the Global Ranks are 0, 1, 2, and 3.
Training Script Overview
Now we have an understanding of the basic terminologies of Distributed Computing we now move toward writing distrusted training pipelines.
We will first create a standalone PyTorch training script after that we will convert it to Data Parallel and last we convert that script to Distributed Data Parallel (DDP).
We are going to use the ResNet-50 model and train it on the CIFAR-10 dataset. The images are upsampled to 336x336 dimensions using built-in PyTorch transformations. The batch Size is set to 64 and the learning rate throughout the training is set to 0.01.
Dependencies and Hardware
The code shared in the subsequent sections has been tested on AWS Ec2 g5.12xlarge instance that has 4 x A10 GPUs (96 GB), 192 GB RAM, and 48 vCPUs. Detailed specs of the Ec2 Instance used can be seen here.
We used Python 3.9 and PyTorch version 1.13.1 for writing and testing our code. So in order to replicate and run the code seamlessly please use the exact same version of Python and PyTorch.
Standalone PyTorch Training
The code snippet below contains a training script for a ResNet-50 model that uses the CIFAR-10 dataset. The Dataset is downloaded using torchvision and the Dataset is wrapped using torch Dataloader. The ResNet-50 model is loaded using Torch Image Models (timm) library that contains more than 1000 pre-trained ImageNet models.
Next, the model is loaded onto GPU on cuda:0 device. The optimizer is Adam and Loss Function is Cross Entropy Loss. The training loop is set for 5 epochs as seen in the code below.
import time
import torch
import torchvision
import timm

from torchvision import transforms
from tqdm import tqdm

import torch.optim as optim
import torch.nn as nn

BATCH_SIZE = 64
EPOCHS = 5
WORKERS = 48
IMG_DIMS = (336, 336)
CLASSES = 10

MODEL_NAME = 'resnet50d'

transform = transforms.Compose([
    transforms.ToTensor(),
    transforms.Resize(IMG_DIMS),
])

data = torchvision.datasets.CIFAR10('./',
                                    train=True,
                                    download=True,
                                    transform=transform)
data_loader = torch.utils.data.DataLoader(data,
                                          batch_size=BATCH_SIZE,
                                          shuffle=True,
                                          num_workers=WORKERS)

model = timm.create_model(MODEL_NAME, pretrained=True, num_classes=CLASSES)


device = torch.device('cuda:0')
model = model.to(device)

loss_fn = nn.CrossEntropyLoss()
optimizer = optim.Adam(model.parameters(), lr=0.01)

start = time.perf_counter()
for epoch in range(EPOCHS):
    epoch_start_time = time.perf_counter()

    model.train()
    for batch in tqdm(data_loader, total=len(data_loader)):
        features, labels = batch[0].to(device), batch[1].to(device)

        optimizer.zero_grad()

        preds = model(features)
        loss = loss_fn(preds, labels)

        loss.backward()
        optimizer.step()

    epoch_end_time = time.perf_counter()
    print(f"Epoch {epoch+1} Time", epoch_end_time - epoch_start_time)
end = time.perf_counter()
print("Training Took", end - start)
To start the training job run the following command in the terminal:
python train.pyDataParallel PyTorch Training
Until now we have been able to train the ResNet-50 model using a single device. But imagine that your virtual machine has four GPUs and you are using just one so it would be underutilizing the provisioned resources. Therefore we now convert our existing code to be able to run on multiple GPU devices this will not only utilize all the resources but will also speed up the training process by reducing the training time required to train the model.
To run the code on multiple GPUs we need to wrap our ResNet-50 model around the DataParallel model which is part of the torch.nn module. In addition to wrapping the model with DataParallel, we also need to specify device_ids in which we assign GPUs Ids on which we want model training to happen. The changes required to be done to the standard PyTorch script are:
device_ids = [i for i in range(torch.cuda.device_count())]
model = nn.DataParallel(model, device_ids=device_ids)
The complete code snippet for the training model on multiple GPUs can be seen below. Please note that previously we were able to train the model using a batch size of 64 but now since the model is wrapped in DataParallel we can use a larger batch size of 224 for training. This enables fast model training and reduced training times.
import time
import torch
import torchvision
import timm

from torchvision import transforms
from tqdm import tqdm

import torch.optim as optim
import torch.nn as nn

BATCH_SIZE = 224
EPOCHS = 5
WORKERS = 48
IMG_DIMS = (336, 336)
CLASSES = 10

MODEL_NAME = 'resnet50d'

transform = transforms.Compose([
    transforms.ToTensor(),
    transforms.Resize(IMG_DIMS),
])

data = torchvision.datasets.CIFAR10('./',
                                    train=True,
                                    download=True,
                                    transform=transform)
data_loader = torch.utils.data.DataLoader(data,
                                          batch_size=BATCH_SIZE,
                                          shuffle=True,
                                          num_workers=WORKERS)

model = timm.create_model(MODEL_NAME, pretrained=True, num_classes=CLASSES)

device_ids = [i for i in range(torch.cuda.device_count())]
model = nn.DataParallel(model, device_ids=device_ids)

device = torch.device('cuda')
model = model.to(device)

loss_fn = nn.CrossEntropyLoss()
optimizer = optim.Adam(model.parameters(), lr=0.01)

start = time.perf_counter()
for epoch in range(EPOCHS):
    epoch_start_time = time.perf_counter()

    model.train()
    for batch in tqdm(data_loader, total=len(data_loader)):
        features, labels = batch[0].to(device), batch[1].to(device)

        optimizer.zero_grad()

        preds = model(features)
        loss = loss_fn(preds, labels)

        loss.backward()
        optimizer.step()

    epoch_end_time = time.perf_counter()
    print(f"Epoch {epoch+1} Time", epoch_end_time - epoch_start_time)
end = time.perf_counter()
print("Training Took", end - start)
To start the training job run the following command in the terminal:
python train_dataparallel.pyDistirbutedDataParallel PyTorch Training
Before explaining how to convert your PyTorch training script to the DistributedDataParallel training job. I would first tell you that if you have multiple GPUs available with you then it is always better to use DistributedDataParallel instead of DataParallel because DistributedDataParallel is more optimized than DataParallel.
A short excerpt from PyTorch documentation on how DistributedDataParallel is different from DataPrallel can be seen below:
The difference between
DistributedDataParallelandDataParallelis:DistributedDataParalleluses multiprocessing where a process is created for each GPU, whileDataParalleluses multithreading. By using multiprocessing, each GPU has its dedicated process, this avoids the performance overhead caused by GIL of Python interpreter.
For a detailed reading of why DistributedDataParallel should be used then please refer to this article.
There are two major things that are needed to be done for converting your PyTorch code to DistributedDataParallel. Call the init_process_group function with nccl backend and wrap the ResNet-50 model around the DistributedDataParallel module. In addition to this, we are going to use local_rank as the device_id instead of using all the devices as we used in DataParallel. Local_rank is the process id assigned to the multi-processing job and each process is assigned one GPU with it.
Also if you want to log metrics, save checkpoints or do logging on tensorboard then please do it on global_rank 0 which can also be called a leader process. Apart from this, you can go through this article for best practices of DistributedDataParallel.
Please refer to Distributed Computing Definitions section in case you want a refresher on the discussed concepts. The code snippet for DistributedDataParallel can be seen below.
import os
import time
import torch
import torchvision
import timm

from torchvision import transforms
from tqdm import tqdm

import torch.optim as optim
import torch.nn as nn

from torch.nn.parallel import DistributedDataParallel as DDP
import torch.distributed as dist
from torch.utils.data.distributed import DistributedSampler

dist.init_process_group("nccl")

local_rank = int(os.environ["LOCAL_RANK"])
global_rank = int(os.environ["RANK"])

BATCH_SIZE = 256 // int(os.environ["WORLD_SIZE"])
EPOCHS = 5
WORKERS = 48
IMG_DIMS = (336, 336)
CLASSES = 10

MODEL_NAME = 'resnet50d'

transform = transforms.Compose([
    transforms.ToTensor(),
    transforms.Resize(IMG_DIMS),
])

data = torchvision.datasets.CIFAR10('./',
                                    train=True,
                                    download=True,
                                    transform=transform)
sampler = DistributedSampler(data)
data_loader = torch.utils.data.DataLoader(data,
                                          batch_size=BATCH_SIZE,
                                          shuffle=False,
                                          sampler=sampler,
                                          num_workers=WORKERS)

torch.cuda.set_device(local_rank)
torch.cuda.empty_cache()
model = timm.create_model(MODEL_NAME, pretrained=True, num_classes=CLASSES)

model = model.to('cuda:' + str(local_rank))
model = DDP(model, device_ids=[local_rank])

loss_fn = nn.CrossEntropyLoss()
optimizer = optim.Adam(model.parameters(), lr=0.01)

start = time.perf_counter()
for epoch in range(EPOCHS):
    epoch_start_time = time.perf_counter()

    model.train()
    for batch in tqdm(data_loader, total=len(data_loader)):
        features, labels = batch[0].to(local_rank), batch[1].to(local_rank)

        optimizer.zero_grad()

        preds = model(features)
        loss = loss_fn(preds, labels)

        loss.backward()
        optimizer.step()

    epoch_end_time = time.perf_counter()
    if global_rank == 0:
        print(f"Epoch {epoch+1} Time", epoch_end_time - epoch_start_time)
end = time.perf_counter()
if global_rank == 0:
    print("Training Took", end - start)
To start the training job run the following command in the terminal using the torchrun utility. In the command below nnodes are the number of nodes or VM instances that are going to be used in my case I have used only one. The nproc-per-node value is set to 4 as the VM I was using had four GPUs installed in it.
torchrun --nnodes=1 --nproc-per-node=4 train_ddp.pyThere are various other utilities for launching distributed training however we are using torchrun as it comes with the following advantages:
- Worker failures are handled gracefully by restarting all workers.
- Worker
RANKandWORLD_SIZEare assigned automatically. - The number of nodes is allowed to change between minimum and maximum sizes (elasticity).
A detailed explanation of torchrun utility can be read here.
The code for this tutorial can be found on the Github Repo.
Best Practices for Optimizing Training Pipelines
I will be sharing suggestions in the form of bullet points that can help improve in optimizing training jobs which can be: reducing memory footprint, optimizing data loader, faster training, etc.
- Use floating point 16 (fp16) or mixed precision for training your models
- Set num_workers= num_gpus*4 for DataLoading
- Set prefetch_factor value for DataLoading
- Enable persistent_workers
- Check GPU utilization to be 100% before starting the training job. GPU utilization can be profiled using various tools personally I use nvitop
- Increase batch size until you use all the GPU memory
- Use SyncBatchNorm if you are doing distributed training and have a small batch size
References:
- https://github.com/nauyan/PyTorch-Distributed-Tutorials
- https://proceedings.neurips.cc/paper_files/paper/2012/file/c399862d3b9d6b76c8436e924a68c45b-Paper.pdf
- https://proceedings.neurips.cc/paper_files/paper/2017/file/3f5ee243547dee91fbd053c1c4a845aa-Paper.pdf
- https://github.com/huggingface/pytorch-image-models
- https://www.nvidia.com/en-us/data-center/products/a10-gpu/
- https://pytorch.org/docs/stable/notes/cuda.html#use-nn-parallel-distributeddataparallel-instead-of-multiprocessing-or-nn-dataparallel
- https://pytorch.org/docs/stable/elastic/run.html
About Syed Nauyan Rashid
- LinkedIn Profile: https://www.linkedin.com/in/nauyan/
- GitHub Profile: https://github.com/nauyan
About Red Buffer
- Website — redbuffer.ai
- LinkedIn Page — linkedin.com/company/red-buffer
