DIY Aluminum Race Sim Cockpit Setup for FANATEC 4/4 (Assembling)

I rewrote this based on my Japanese article.
<The Previous article>
<My Homepage>
In July 2020, I ordered Fanatec products. And soon after I ordered the items, I bought a racing seat as below.

And I had played iRacing on this funny system, seat with a toolbox.

The FANATEC items I bought in June 2020.

Adjusting the height of the monitor
As you can imagine, I soon realized that this toolbox & seat system didn’t work well due to less rigidity and bad posture, so I started to design the cockpit which is made of aluminum frames. The frames and metal fittings reached my home from a Japanese hardware company in the middle of August.
I’ll summarize how I built the SIM cockpit.
I also write Japanese articles on Japanese web service, where I posted a lot: Japanese ver
A large package had come!
I imagined this package was not so heavy as I thought the aluminum was light. But, it was heavy unexpectedly. When a delivery man came to my apartment, I saw the sweat on his face. (Not only because of the heaviness, but it was also in summer in Japan)
The length of the parcel seems 150cm, as the longest parts were 130cm. The width was about 25cm, as there were 3 “40x80mm pillars.”

Let’s DIY!
These are the longest parts of the cockpit for Fanatec racing tools.

Generally, we need a lot of parts to fix the cockpit. And there’re 2 types of bolts included, which lengths are little different. Not distinguishing the bolts, may cause you a little trouble later. You have to dismantle the cockpit to find suitable bolts.
The reason is I ordered two types of brackets, which thicknesses are different. Though a shorter bolt can be applied to both of the brackets, a longer one cannot be used right bracket in the photo below.

Pre-insert nut
You have to insert these nuts into the frames to avoid bothersome work later.

If you realize that you forgot to insert this, you’ll disassemble a lot of parts and pillars.

The mount for the Fanatec CSW V2.5
The vertical pillar will support Fanatec CSW V2.5. Once I uploaded this picture below, Twitter followers replied “Low!” and “I concern about the height.” And I also concerned about this design, though I managed to design with deep consideration and I’m not big guy. (I’m 165 cm tall.)

Anyway, we couldn’t judge at that time, whether this height of the pillars are comfortable or not. Let’s see!

I wrote this article about the review of the CSW V2.5.
Maybe someone thinks “Is the width enough? and Vertical pillar seems too low. This could be a failure.” At that time, I also didn’t have confidence that my design went well.

The pedals in this picture are below.

How to fix the pedals
With L angle, bolts which were included in the FANATEC CSL ElITE PEDALS box, I attached the pedals to the cockpit. I also used the bolts and nuts from a hardware shop. As the width of the 40x40mm frames was narrow (46cm), I had struggled to tighten the bolts and nut. I suggest you design the cockpit wider.


How to fix the seat
I found a used side fixing angles below and ordered this, which was around 30 dollars. (in Japan)

I fixed the seat with this metal angles.

From the back. I used only 4 brackets, which has a projection like below, to fix the 40x40 pillars. Because the parts have a projection to make its position. The angle which supports 40x80 parts don’t have projection.


This is my cockpit in progress.

Fixing the table for the Fanatec Wheel Base(CSW V2.5)

Though it seems low, it’s suitable for me.
But I suggest extending the vertical pillars and the two arms which support the table.
Make a hole into the table in order to fix the wheelbase
I marked the position for the drill hole with the CSW V2.5 blueprint.

The liquid in the below picture is the silicone oil which I had for the motorcycle and car.


I used the drill and a very cheap drill bit. In Japan, the left orange one can be purchased only for 1 dollar. I spent a lot of time to penetrate one hole. It takes about 20 mins with my sigh. The reason for the difficulty was maybe because the drill bit was for wood.
We should consider the position we make a hole.

I penetrated the frame!

Before I received the package of the frames, I went to a hardware shop to get a bolt and plain washer. The bolt is M6 x 50㎜, which is made of stainless. I remember it was about 0.6 dollars. Though the combination of stainless and aluminum makes the aluminum rusty, I didn’t care because the nuts and the bolts, I purchase from the frame’s company, were also the stainless to fix the aluminum frames.

I actually confirmed that the bolt which was included in the Fanatec CSW V2.5 package was M6 and pitch 1.0 like below.

We are allowed to penetrate by 12mm through the Fanatec CSW V2.5. Considering the thickness of the aluminum frame is 40mm, and the washer is 1mm, only the 50 mm length bolt is preferable. It’s out of the design if you use a bolt of 40mm or 60㎜.

As the frame is made of aluminum, though I bought the washer to spread the stress of the bolt, it seems no problem without a washer because the frame seems tough.
The fitting seems perfect!


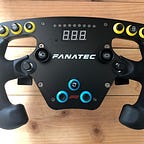
My Fanatec controllers (at this time)
Adjusting the height of the monitor for setup
The height of the monitor seems a little bit high due to my table.

I did simple DIY.

Done!


Total Cost except for the Fanatec products
Aluminum pillars, angles, bolts, nuts, 300 dollars (30,000 Japanese yen)
Racing seat 200 dollars (20,000 Japanese yen)
Total about 500dollars
My Twitter
https://twitter.com/maskiracing
My DIY SIM Cockpit Setup

I carelessly take down the TV though I bound it. Please fix the display tightly.
So I’m using VR (Oculus Quest 2) now.
<My Homepage>
<My Articles>