Mimicking google’s “pop” filter using canvas blend modes
Many photo imaging apps have filters which increase boldness and clarity of the image, for example, Instagram's “flux”, apple photos’ definition, or Google's “pop”. I used the HTML canvas API to produce a similar effect.
There are many techniques used to selectively add or remove contrast from an image. I used a version of unsharp masking similar to that described here: https://www.cambridgeincolour.com/tutorials/local-contrast-enhancement.htm.
The basic technique is as follows:
- Blur a copy of the image
- Subtract the blurred parts from the original image, leaving the details behind
- Recombine the details with the original image.
Most of the manipulation will be done using canvas blend modes. If you need to brush up on those, you can do that here. We’ll be using the overlay blend mode, which will brighten our image if the source material is bright, and darken it where it is dark. Overlaying with gray does nothing.
We’ll also make use of the “color” blend mode, which applies the color we choose over our image, and the “difference” blend mode, which, when used with white, inverts our image.
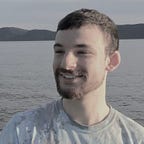
Unsharp Masking- Similar to google’s “pop” effect.
Here’s an overview of the steps I used:
- Resize the image to a reasonable size. (5 megapixels, in our case)
- Grayscale the image; We want to manipulate the brightness aka “luminosity”values, not alter the color.
//1. Resize The Image
let megaPix=image.naturalWidth*image.naturalHeight;
if(megaPix>5000000){
greyCanvas.width=image.naturalWidth*(5000000/megaPix);
greyCanvas.height=image.naturalHeight*(5000000/megaPix);}
else{
greyCanvas.width=image.naturalWidth; greyCanvas.height=image.naturalHeight;}// Draw the image on the canvas
greyContext.drawImage(image,0,0,greyCanvas.width,greyCanvas.height);2//Convert the image to black and white
greyContext.globalCompositeOperation="color";
greyContext.fillStyle="Gray";
greyContext.fillRect(0,0,greyCanvas.width,greyCanvas.height);
3. Create a copy. It should be smaller, because we are blurring it, which can be slow on large images
4. Call your blurring function. I used Mario Klingemann’s stackBlur algorithm. Check out his demo.
// 3. Create a copy
blurCanvas.width=greyCanvas.width/4;
blurCanvas.height=greyCanvas.height/4;
blurContext.drawImage(greyCanvas,0,0,blurCanvas.width,blurCanvas.height);//4. Blur the copy
stackBlurCanvasRGB('blurCanvas', 0, 0, blurCanvas.width, blurCanvas.height, 10);
/// feel free to experiment with the last number: try 20, or 30 and see how it changes the result
5. Invert the blurred image using the difference blending mode.Blending with white has the effect of changing all the whites to black, and all the blacks to white.
blurContext.globalCompositeOperation="difference";
blurContext.fillStyle="white";
blurContext.fillRect(0,0,blurCanvas.width,blurCanvas.height);
6. Add the inverted blurred image to the grey image, similar to subtracting the blurred image from the gray image. To do so,we will combine two images at 50% opacity. The two images will come close to canceling each other out to a neutral gray, but the differences between them will be preserved. What do you get when you subtract the blurry parts of an image away? The details!
// Create Mask
greyContext.globalCompositeOperation="source-over"
greyContext.globalAlpha=0.5;
greyContext.drawImage(blurCanvas,0,0,greyCanvas.width,greyCanvas.height);
greyContext.globalAlpha=1;
7. Take this newly merged image, and overlay it on top of the original,enhancing the contrast in the details.Overlaying our canvas with neutral gray (the color of the general image) does nothing, but the light and dark patterns of the details will be intensified.
/// draw original image to a third canvas
canvas3.width=greyCanvas.width;
canvas3.height=greyCanvas.height;
context3.globalAlpha=1;
context3.drawImage(image,0,0,canvas3.width,canvas3.height);//overlay it on the original -do it twice for extra strength
context3.globalCompositeOperation="overlay";
context3.drawImage(greyCanvas,0,0,canvas3.width,canvas3.height);
context3.drawImage(greyCanvas,0,0,canvas3.width,canvas3.height);
context3.globalCompositeOperation="source-over";
We’re done! This filter adds a bit of “pop” to our images! Note that I’m overlaying it twice to produce a more noticeable effect, in practice, you’d probably want to overlay only once. (just like you might not want your filter turned all the way up.)
See the finished example here

Bonus: Instagram’s Flux Filter
We can create an effect similar to instagram’s “flux” with a simple tweak: instead of merging the blurred canvas to with the greyCanvas, overlay it directly on the display canvas. This drains the image of contrast,but not color. Then, add contrast and color by overlaying the image on top of itself. I also made the blur radius larger (30 instead of 15).
// 4. Blur the copy
stackBlurCanvasRGB('blurCanvas', 0, 0, blurCanvas.width, blurCanvas.height, 30);//Do step five then skip 6
//7. Draw original and then overlay
context3.globalAlpha=1;
context3.drawImage(image,0,0,canvas3.width,canvas3.height);
context3.globalCompositeOperation="overlay";
context3.globalAlpha=0.8;
context3.drawImage(blurCanvas,0,0,canvas3.width,canvas3.height);
context3.globalAlpha=0.5;
context3.drawImage(canvas3,0,0,canvas3.width,canvas3.height);
This gives us more of a saturation effect, in addition to enhancing local contrast.
See example here