Computer Vision for Beginners (part 1)
Slide into the hot topic that is computer vision using python. We will start from a python library called OpenCV to bump us up to the speed of today’s image analysis game.

We live in a world full of scenarios and events that keep happening all around us. We are able to comprehend the world around us because of audio-visual stimuli, but mostly visual stimuli. The human eye is one of the most sophisticated camera’s in nature which helps in capturing these stimuli. Think of it in this way that, whatever you are seeing right now is just a video shot by your eye. If you break down a video, you will find that, it is nothing but a collection of images taken consecutively. Hence the processing and understanding of each of these images is what our brain does to make sense of our surroundings. Now lets take a small step towards teaching a machine what our brain can comprehend so quickly.
‘A picture is worth a thousand words’
— Fred R. Barnard
Introduction to OpenCV
OpenCV is a library of programming functions mainly aimed at real-time computer vision. Originally developed by Intel, it was later supported by Willow Garage then Itseez. The library is cross-platform and free for use under the open-source BSD license. Basically its your buddy that will help you with augmenting your images.
Overview
OpenCV has a lot of functionalities and for that reason we will be looking as just some of the basics in this part of my series of articles.
- Reading/writing/displaying an image
- Looking at images at an atomic level
- Drawing/writing on images
- Image thresholding
But before we jump into it, you should also check out matplotlib library for image analysis. This comes in handy when using python Notebook.
Lets first import the required libraries
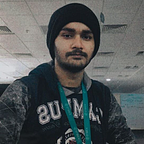
Lets use an image of Robert Sheehan who plays Klaus Hargreeves in ‘The Umbrella Academy’. I’m sure he won’t mind ;)

Reading/Writing/Displaying an Image
Lets try to read the image and display it. Note: You can use matplotlib to display an image as well.
The image is named klaus_hargreeves.jpg which is stored in Downloads in this case. You can give the path to your image.
We use cv2.imread() to read the image. This function also has another parameter called flags. You can check it out in this. cv2.imshow() is used to display the image. The first parameter it takes is name_of_the_frame and the second is the image.
cv2.waitKey() is used to accept keystroke input from user and cv2.destroyAllWindows() terminates all the frames that are currently active.

Result
Beside this text you can see a frame named ‘Frame_name’ which displays the image we had read before.
Now lets save/write this image with another name. The original image name is ‘klaus_hargreeves.jpg’. Now lets save the image as just ‘klaus.jpg’
cv2.imwrite() takes name that you want to save the image with and the image that you want to save. If there exists a file with the same name it will overwrite the file.
Looking at Images at an Atomic Level
Now lets look what an image looks like in an atomic level. There are basically 3 types of images :
- Color Image
- Black and White Image
- Binary Image
We can know more about these images by using the following commands.
Image Type

Images like everything we do in computers are just a bunch of numbers in a specific structure i.e. in the form of a numpy array of n-dimensions.
Image Shape

Since the image was a color image it has a height of 200 pixels and width of 200 pixels and the last number of the tuple is the number of channels of the image in case its 3 because a color image has Red, Blue and Green channels.

The same image being read as black and white gives us a 2D numpy array of 200 X 200 and only one channel which is self explanatory.
Pixel Level View of Image

If we print the color image we get the output beside this text. Each row represents a pixel and each value in the line is representing the intensity of BGR colors, i.e. Blue, Green and Red color respectively. Each of these values range from 0 to 255. We can access and change each color intensity. It is similar to changing a value in an array, by using indexes.
Note: OpenCV reads images in BGR format, while matplotlib works with RGB format. So there will be color difference in the imshow() functions of OpenCV and matplotlib.

If we print the black and white image we can see it as an array in which each row represents a row of the image. Each value in the rows is pixel intensity. Each value can range from 0 to 255.
Binary images are even simpler. As the name suggests the only values allowed are 0 and 1. So its just a 2D array of 0’s and 1's.
Cropping an image
Now lets us just crop the actor’s face and see how it works. I manually calculated the range of x-coordinate and y-coordinate where the face in the image was present.

We can do cropping by array slicing. The image is cropped as img[Ystart : Yend , Xstart : Xend]. The first pair is always Y coordinate range and the second pair is X coordinate range.
Drawing/Writing on Images
Lets vandalize this photo by writing his name on it and drawing some graffiti on it.
Before we do any such manipulations, we can observe that all of them take img.copy() as a parameter. We can use img as well but it might create a problem if you do not want to make changes to the original image. img.copy() will pass the copy of the image as the argument rather than the original image hence the original image remains unaltered. From the code we can observe that, these different functions take different parameters to operate. These parameter are available for these operations but not limited to these parameters only. You can check out the documentation for a large number of variations in the operations.

Write Text on Image
The parameters are as such, image, text to write, bottom left coordinate of text, font, font scale/size, color, thickness, line type.
Draw Rectangle
The parameters are as such, image, (xmin, ymin), (xmax, ymax), color, thickness.
Draw Circle
The parameters are as such, image, center, radius, color, thickness
Draw Line
The parameters are as such, image, (xmin, ymin), (xmax, ymax), color, thickness.
Another function allows us to draw polygons. You should check it out yourself and experiment with any image. Its quite interesting.
USE CASE:
Face detection using haar cascade
We manually drew a rectangle on the face in the image, but in computer vision we will try to automate the process. This is because it is a hit and trail method when we want to isolate the ROI (Region of Interest) manually.
The above code can be used to detect faces. This code uses haar-cascades to detect faces and OpenCV to create a bounding box around the face. Find this repo for full implementation in Jupyter notebook.
We read a picture of the Steve Jobs and now Voila, we have found out his face. NOTE: The haar-cascade face detection works well on frontal faces since the XML file used for it is trained for detecting frontal faces only.

Image Thresholding
Lets now look at thresholding. Before we do thresholding it is advisable to convert the image into grayscale or black & white image.
There are basically 2 functions for thresholding, cv2.threshold() and cv2.adaptiveThreshold(). Find the application above in the code, tune the parameters and see the changes. The above code gives us the following result.

The ‘Gray’ frame displays the grayscale image, ‘t1’ and ‘t2’ frames display the results for set of parameters for cv2.threshold(), ‘t3’ displays the result for set of parameters for cv2.adaptiveThreshold()
Conclusion
So we went through some basic operations on images that we do in our day-to-day computer vision tasks like reading, writing and displaying an image, pixel level image manipulations, thresholding and so on. We will look into more functionalities in the next parts of this series of articles.
Hope you had a fun and informative session in this article :)