Swift: Pretty in print() Pt. 2
Logs are fashion, and you’re the designer
In the previous post, I spoke about how using emojis inside your print logs helps you better mentally absorb much them as you’re reading through the forrest of other log messages. However the implementation I provided was terrible and did not make a strong enough case for you to implement emojis in your own code.
This post is going to follow through with that promise I made and show you how to implement logs with emojis at a cost that is only a fraction dearer than the print function.
Budget restraints
For the rest of this post, you’re gonna see that we’re breaking Swift naming conventions, and not for lack of a good reason either. To keep the cost of a print alternative down, we really need to reduce the amount of keys pressed to achieve the same goal, which includes the the necessity for capital letters and title casing. However, if by the end of the post your obsessive compulsion is still scatching away at your inner conscience, you should defintiely rename things as you please.
Introducing log
enum log { }We’re using an enum instead of a class or struct for a couple of reasons. One of those reasons is because we don’t need to instantiate a log, ever. We’re choosing cases over functions because we want to make sure we’re writing a safe logging implementation. You’ll see what I mean by safe in just a moment.
Cases with associated values
enum log {
    case ln(_ line: String)
    case url(_ url: String)
    case obj(_ any: AnyObject)
}
For those who don’t know, ln (line) was once used in Swift, println() was the original before print() took over in Swift 2.0 and became the primary use for logging. I’ve also thrown in some other examples types to demonstrate expandability of log.
We’ve included an associated value for our case because there needs to be input when we want to log something, right? You will also notice that we’ve omitted the external parameter name from the arguements, this is because we’re using the case’s name to describe the argument.
Let’s look at what we have so far:
print(log.ln(“Hello World”))
// ln("Hello World")print("Hello World")
// "Hello World"
Mmm, it’s getting there but it’s definitely nowhere near being a viable candidate for supplementing or even replacing print. Here’s why:
- It’s still too expensive with it’s cost of key strokes
- There’s extra jargen surrounding the original message
- Looks yucky
- It doesn’t even contain any emojis
- Just sucks all over
So now we need a way to fix up these five things, to get you on board the train to the logging promised land.
Custom operator
postfix operator / { }I’m going to assume that not many of you have ever needed to implement a custom operator before. Which is fine, neither had I until recently, but there’s really not much to it.
Our custom operator is going to be postfix, because we want it trailing the end of the logging code and we need only one input target, which will be on the left hand side of the operator.
I’ve chosen the / symbol because it’s the closest to commenting syntax without actually creating a comment and also because it’s one of the few operator characters left that doesn’t require a shift key to access it.
…I’m really starting to feel like a politician with all these budget cuts.
Implementation
postfix func / (target: log) {
    switch target {
    case ln(let line):
        log("✏️", line)
    case url(let url):
        log("🌏", url)
    case obj(let object):
        log("🔹", object)
}
The implementation is a lot like the declaration but we’ve provided a body and added the constraint of making that target argument’s parameter type to be of the log enum, this is partially what I meant by writing “safer code”. The other “safer code” aspect is the fact that we made log an enum instead of a class or struct because enum’s switch statements must be exhaustive. Each time we add a new emoji logging type, we must also include it in the operator’s switch statement.
private func log<T>(emoji: String, _ object: T) {
    print(emoji + “ “ + String(object))
}
And finally we have the log function, which is incredibly simple. It’s private because we don’t want it to be accessed by anything outside of the .swift file it was written in, and it takes in a generic type as it’s second argument because we want to be able to pass anything to it.
As you can see it’s simply just a print statement that combines the emoji and the object with a little spacing.
In action
log.ln(“Pretty”)/
✏️ Prettylog.url(url)/
🌏 http://www.andyyhope.comlog.obj(date)/
🔹 2016–04–02 23:23:05 +0000Maybe i should use a screenshot here instead?
So there you have it, in just two extra key-strokes/characters we’ve managed to make particular types stand out from the rest of ours and other third party logs which can clog up the console. But we’re not completely done yet…
Performance improvements
An uncommon piece of knowledge amongst a lot of developers is that calling print can actually partially decrease your app’s performance. Having plenty of prints scattered throughout your code during debug is totally fine but you should really be removing them before you’re archiving your app for the AppStore.
“Are you saying I have to comment out all my prints before submitting and then uncomment them each time?” — You
Precompiler flags
Xcode allows us to create additonal profiles within each of our projects. By default Xcode provides new projects with two profiles, Debug and Release.
Debug is the default profile for when you run your app with the simulator or a connected device via USB, and Release is when you archive your app into a bundle for the AppStore.
We’re going to wrap our print code inside a Debug pre-compiler flag so that we don’t have to comment/uncomment/add/remove all our prints each time we archive our bundle. Instead we’re gonna tell the compiler “Yo! Only run this code if we’re not in release mode, k.”
Build Settings
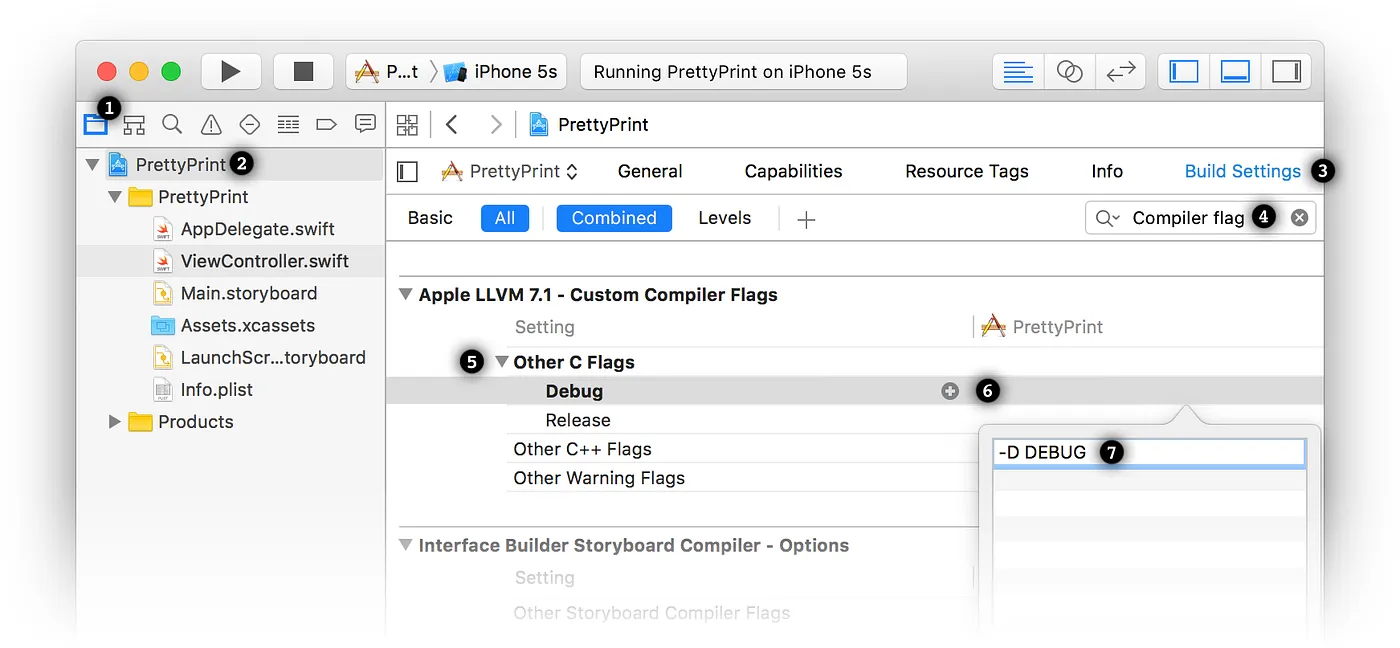
- Press the Project Navigator icon
- Press your Project’s name
- Press Build Settings
- Search for “Compiler Flag”
- Expand “Other C Flags” row
- Press “+” button
- Enter “-D DEBUG”
Finally we’re gonna wrap our actual print function inside the precompiler flag we just set.
private func log<T>(emoji: String, _ object: T) {
    #if DEBUG
        print(emoji + “ “ + String(object))
    #endif
}
Voila! now you’re prints will only run when you’re developing your code. You can test this by changing your build configuration scheme to Release and running your app, although don’t forget to change it back to Debug!
Framework, Carthage or Cocoapod support
Perhaps you liked what you read here and thought “This would be great if Andyy provided this as a …”, but in fact it would be detrimental to log’s functionality.
Reason being, if I provided one of the three, each time you wanted to log something, you would have to import the framework into the Swift file before use, which would be silly because you would then have something extra to manage each time you’d wanna use this dope logging trick. It’s pretty much why a lot of the NSLog replacements didn’t really work well in Objective-C.
import Log // This looks like 💩Explore and play
I’ve provided a playgrounds for you to test out what you’ve just read as well as a log.swift file you can just drop into your project/s to use. Inside the example code are a few extra logging cases you may find useful in your daily development life. Enjoy!
Example code can be found on Github
Like always, if you like what you’ve read today or have even chosen to implement it, please send me a tweet. I love hearing from readers, it really makes my day!
If you like what you’ve read today you can check our my other articles or want to get in touch, please send me a tweet or follow me on Twitter, it really makes my day. I also organise Playgrounds Conference in Melbourne, Australia and would to see you at the next event.