Part 2: 7 Simple Steps to Create and Build Your First ROS Package
Overview
In this article, we will discuss the following:
- catkin Build System
- Understanding catkin Workspace
- 7 Simple Steps to create and build our first ROS Package
Make sure you follow the article and try the steps mentioned hands-on so that you can get a first hand experience.
Also, stay till the end because there is some bonus content I’ll be sharing with you all which will make your ROS package creation and build simpler!
1. catkin Build System
Before we start creating and building our first ROS package, it is essential for us to understand what the catkin build system is.
catkin is the official build system of ROS and the successor to the original ROS build system called rosbuild.
catkin is responsible for generating ‘targets’ from raw source code that can be used by an end user. These targets may be in the form of libraries, executable programs, generated scripts, exported interfaces (e.g. C++ header files) or anything else that is not static code.
In ROS terminology, source code is organized into ‘packages’ where each package typically consists of one or more targets when built.
So, to check if catkin is installed or not, just type catkin on your terminal and press the Tab key double time. You should be able to see this.

By default, catkin is installed whenever you install ros but if it is not installed, you can run the following command:
$sudo apt-get install ros-melodic-catkin
// Please change 'melodic' to the ROS distro that you have installed
Using the catkin build system, we will be creating, initializing and compiling the ROS workspaces and the ROS packages.
2. Understanding catkin Workspace
Now that we have understood the catkin build system, we will understand the catkin workspace and its components so that it becomes easier for us to store our files, modify, build and maintain clean & accessible directory structure.
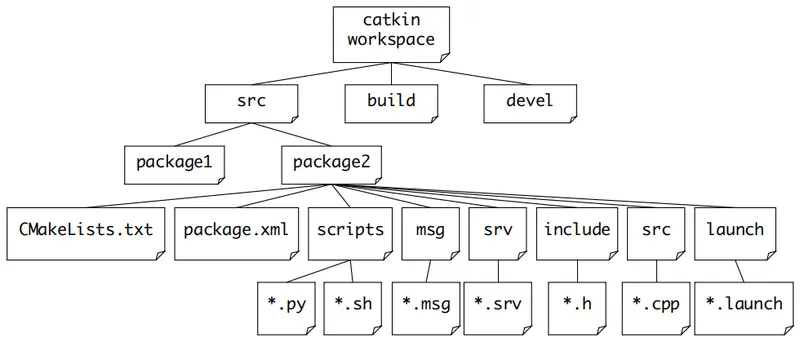
As you can see in the above diagram, a typical catkin workspace contains up to four different spaces (source space, build space, development space and install space) where each space serves a different role in the software development process.
- Source space: The source space contains the source code of catkin packages. This is where you can extract/checkout/clone source code for the packages you want to build. Each folder within the source space contains one or more catkin packages and each package has its set of ROS Computational Graph components**. The root of the source space contains a symbolic link to catkin’s boiler-plate ‘toplevel’ CMakeLists.txt file. This file is invoked by CMake during the configuration of the catkin projects in the workspace. It can be created by calling catkin_init_workspace in the source space directory.
- Build space: The build space is where CMake is invoked to build the catkin packages in the source space. CMake and catkin keep their cache information and other intermediate files here.
- Development space: The development space (or devel space) is where built targets are placed prior to being installed. The way targets are organized in the devel space is the same as their layout when they are installed. This provides a useful testing and development environment which does not require invoking the installation step.
- Install space: Once the targets are built, they can be installed into the install space by invoking the install target, usually with make install. The install space does not have to be contained within the workspace.
** Note: Please refer my previous article about the ROS Computational Graph if want to know more about the components of the same. Link is provided below.
3. Creating and building our ROS Package
Essentially, ROS packages are catkin packages which means that they should follow a particular directory structure and contain a couple of files that identify them as a ROS package and help us build the code in the packages.
ROS packages reside in directories called catkin workspaces and therefore, we would have to create and initialize a catkin workspace first.
Note: catkin packages can be built as a standalone project but catkin also provides the concept of workspaces, where you can build multiple, interdependent packages together all at once.
And by the end of these 7 steps, you will be able to create and build your own ROS Package. So lets get started!
Step 1: Create a catkin workspace and a source folder
Lets create a catkin workspace by the name ‘catkin_ws’ and then create a source folder inside this workspace. All our ROS packages will reside in this source folder!
$mkdir catkin_ws       //create a workspace called 'catkin_ws'
$mkdir catkin_ws/src   //create a source folder inside the workspace
$cd catkin_ws/         //move inside the catkin workspace
Step 2: Initialize the catkin workspace
Once we have created the workspace and the source folder, we will have to initialize our current directory as a catkin workspace. This is done by moving inside the src folder and running the catkin_init_workspace command.
$cd src/                 //move inside the src folder
$catkin_init_workspace   //initialize the workspace
After this, when we list out the contents of the directory, we notice that a new file called CMakeLists.txt is present inside the src folder as shown above.
This means that our empty workspace is ready to go through its first compilation.
Step 3: Compile your workspace
To compile our workspace, we will navigate to the root of our catkin workspace and use the catkin_make command to start the build process.
$catkin_make //compile the workspaceYou will see a bunch of compiler debug messages on your screen but you don’t need to worry about that (unless there’s an error! xD)

Once the workspace was successfully built you will find two new folders called build and devel in the root of your workspace.

Please feel free to explore the contents of these directories. But note that we won’t be modifying anything in these two directories (build and devel).
Now that we have created and initialized our catkin workspace, Lets create our first ROS Package!
Step 4: Create our new ROS Package
To create a new ROS package, we use the command catkin_create_pkg followed by the name of the package and then followed by the package dependencies — std_msgs, roscpp and rospy.
- std_msgs indicates that we will be using standard message types like int 8, int 64, string or float
- roscpp indicates usage of C++ code
- rospy indicates usage of Python code
//Package Name: ros_package
//Dependencies: std_msgs, roscpp, rospy$catkin_create_pkg ros_package std_msgs roscpp rospy

Once we execute the catkin_create_package command, a skeleton ROS package will be created for us.
We will then find a new package called ros_package inside our source folder and a bunch of other files (ex: CMakeLists.txt, package.xml, etc.) inside our package as shown above.
- CMakeLists.txt -This file contains information about how to build our ROS package
- package.xml -This file contains meta information about our package like the description, version, dependencies, executables, etc.
Step 5: Build the workspace with the new empty package
To build the workspace with the new package, we would have to go to the root of the workspace and run the catkin_make command.
$catkin_make
As you can see, our ROS package was identified and built.
Step 6: Make the workspace visible to the file system
To make the workspace and its packages visible to the file system so that we can access these packages from anywhere, we would have to run the following command:
$source devel/setup.bashNow, lets try to find our package that we just created using the command rospack find <package_name>
$rospack find ros_package
We see that the file system was able to find our newly created ROS package!
Step 7: Create executable nodes within the package
First lets write a piece of code and then try to get the executable for it. For this, follow the steps given below:
7.1 Go to the src folder within the ROS package
$cd catkin_ws/src/ros_package/src7.2 Create a small C++ program called hello.cpp which prints out some message. A sample is given below.
#include<iostream>int main()
{
 std::cout<<”Hello!\n Simple Steps to create a ROS Package\n-Arsalan Anwar\n”;
 return 0;
}

7.3 Open the CMakeLists.txt file within the ROS package and add the following line:
add_executable(hello_node src/hello.cpp)Syntax: add_executable(<node_name> <path_to_cpp_script>)
- node_name: It can be any name that you wish to have for your executable node
- path_to_cpp_script: This is the path to the C++ script within the ROS package
7.4 Go to the root of the catkin workspace and build the workspace again by running the catkin_make command.
You will notice that your executable has been created under devel/lib/rospackage

7.5 Source the workspace and run the node from anywhere
Source the workspace by running the following command
$source devel/setup.bashThen, run the ROS node that we created by using the following command:
$rosrun ros_package hello_nodeSyntax: rosrun <package_name> <node_name>
- package_name: Name of the ROS package where the executable node resides in.
- node_name: Name of the executable node

As you can see, our node has been executed and we can see the message on the screen.
Congratulations!!! We have successfully created our first catkin workspace and our first ROS package!
Note: This is a basic ROS Package that we have created, you can add the functionality you require and build on the same.
Bonus Information:
Thanks for reading the article till the end! I hope you like it and as mentioned, here are some commands which you can use to save a lot of time while creating ROS packages!
- To enter your package from anywhere, use the command $roscd

2. To list the contents of the package from anywhere, use the command $rosls

3. Log of a ROS process is stored in the hidden directory .ros, to jump to it directly we can use roscd log.

Summary
Through this article, we have covered the following:
- catkin Build System
- Understanding catkin Workspace
- 7 Simple Steps to create and build our first ROS Package
- Some Bonus content
Resources
Feedback/Suggestions:
For any feedback or suggestions, please comment below or drop a mail at arsalan.anwar.7777@gmail.com or contact me via LinkedIn at www.linkedin.com/in/arsalananwar1998
