The Optimal Kestrel Build
There are a few Kestrel builds running around out there, from the double Sorrow Blade then Breaking Point build to a somewhat more novel pierce-based build. What follows is a somewhat rigorous analysis of which build is better in different situations.
This article is valid as of Vainglory patch 1.19.3. If it is updated to reflect new balance changes this byline will also be updated to reflect the new patch number.
Disclaimer: This article is about damage only. Different builds fit different play styles, and no conclusively correct build can be found in situations like this. However, in a skill based game such as Vainglory quantitative measures such as damage per hit and per second are one of the few objective means we have to analyze builds. Therefore that is what is used in this article.
The Builds and Model Assumptions
Four builds were analyzed here:
The Builds
- Sorrow Blade, Breaking Point, 3x Piercing Spear
- 2x Tyrant’s Monocle, Sorrow Blade
- 2x Sorrow Blade, Breaking Point
- 2x Sorrow Blade, Breaking Point, Piercing Spear
Model Assumptions
- In all builds using breaking point I assumed the breaking point had 25 stacks. This assumption was justified by conversations with high tier players who agreed that with Kestrel you should be able to build stacks easily in a fight while staying out of the action and survivng. As a check on this assumption, the last section of this article is dedicated to analyzing the best builds at different number of Breaking Point stacks. This check will also make this article relevant for lower and mid tier players like me who cannot consistently get 25 stacks on Breaking Point.
- In the analysis of Glimmershot damage, the crystal damage was left out of the damage calculation. This was done because no build has crystal power, and thus the only crystal damage dealt is the base damage from Glimmershot which is identical across all four builds. Thus it can be subtracted out from all builds without altering the results. As a result, the chart of Glimmershot damage is not total damage, but solely weapon damage.
- It is impossible to know how much armor an opponent will have. Thus, unlike many build analysis articles put forth elsewhere, damage will be presented as a chart of damage vs enemy armor instead of a straight number. This allows for analysis of builds in different situations using just one chart.
- Because we are analyzing full builds, it was assumed that the Kestrel in question is level 12.
- Becuase we assumed full Breaking Point stacks, it is also a safe assumption that Kestrel has a full 5 Adrenaline stacks for her heroic perk.
The Mathematical Model
Constant Values Used
In the model, various values were used. For the sake of transparency and peer review all values used are stated below:
- Kestrel at level 12 has an intrinsic weapon power of 130 and an intrinsic attack speed of 136%
- Kestrel’s attack cooldown is 1.3. EDIT: A previous version and the PDF attached below stated it as 1.4. I checked the difference and the qualitative conclusions drawn still hold. Since no exact intersection values were found, this small variation doesn’t invalidate anything that is written.
- Each Adrenaline stack gives Kestrel an additional 10% attack speed
- Sorrow Blade provides 150 weapon power and costs 3100 gold
- Piercing Spear provides 15 weapon power, 8% armor pierce and costs 900 gold
- Tyrant’s Monocle provides 50 weapon power, an additional 40% critical hit chance, an additional 20% critical hit damage, and costs 2750 gold
- Breaking Point provides 10 weapon power per stack, 50% additional attack speed, and costs 2500 gold
- The attack speed gain from stutter stepping is 18%. I have heard different values for this (mostly 16%, 17%, and 18%), so if I am wrong and you have proof please tell me on twitter at Vainglory theory (twitter link in on my medium profile page).
The Equations
Like the constant values above, the model equations used are provided here to assist in understanding the model and for peer reiew.
The equations below take into account the variables of weapon power (w), pierce (p), attack speed (s), chance of a critical hit (c), additional damage from a critical hit (d), the enemy’s armor (a).
Unmitigated damage dealt during a normal basic attack (Equation 1):

Unmitigated damage dealt during a critical basic attack (Equation 2):

We can then combine Equations 1 and 2 into a weighted average damage per hit dealt during a basic attack (Equation 3). This equation weights the critical damage and the normal damage by the chance of a critical hit:

In order to use this equation to get meaningful numbers for damage done to an enemy, we need to also have an equation to represent the mitigating factor of the enemy’s armor (Equation 4):

Finally, we can take Equations 3 and 4 and get a final form for the damage per hit equation by combining them and taking into account any pierce. Note that here pierce is a decimal, not a percent (Equation 5):

In order to take the damage per hit and convert it to damage per second, it needs to be multiplied by a conversion factor with units hits per second. To get this we first need take into account attack speed and find the effective attack cooldown, in units of seconds per attack. The 1.4 value is the base cooldown and has the same units of seconds per attack (Equation 6):

Converting Equation 6 to attacks per second is a simple matter of taking its inverse (Equation 7):

Combining equations 5 and 7 yields a complete form for the frequency of damage, in units of damage per second (Equation 8):

Finally, damage from Glimmershot must be analyzed. Glimmershot is just a basic attack with an additional 10% pierce and a 140% damage multiplier. Thus the equation is simply based on Equation 5, the damage per hit formula. Note that 0.1 is added to pierce because the pierce in this equation is the pierce from items (Equation 9):

Results
When looking at the results, it is important to remember that level 12 heroes have on average 80 to 90 armor inherently. Thus, high values of armor such as 140 or 150 can be achieved pretty easily with just a tier 2 armor.
Damage Per Hit
Plotting Equation 5 vs armor yields the following chart:

From the above chart it is clear that no build is better at all values of armor. What is clear is that at all low values of armor (under approximately 150 armor) build 4 is better by varying amounts. However at higher armor values (over ~150) build 1 becomes better. As armor increases, the amount by which build 1 is better increases.
Given the above chart, it is clear that which build to build is a decision that can be made on a game by game basis. The chart shows that if Kestrel’s opponent is building heavy armor or you expect them to complete a tier 3, build 1 is better. However, if Kestrel are snowballing or otherwise forcing her opponent to choose between offense or defense even in the late game build 4 is best. This is because when Kestrel are snowballing and forcing the oppnents to choose, they can either choose armor and make Kestrel’s build worse or they can choose offense and make your build better. If they choose defense Kestrel may do less damage but the opponent will not be doing damage to her. If they choose offense then they will not have 150 defense and thus build 4 is better anyway.
Damage Per Second
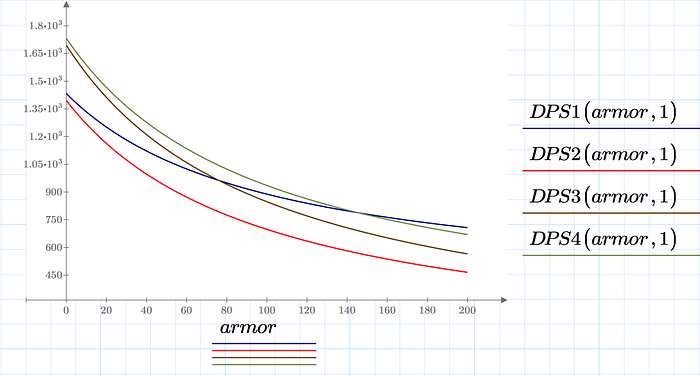
While the above analysis is interesting (and necessary for the subsequent Glimmershot analysis), in a game no hero does just one hit and is then done. Thus analyzing the damage per second done by any hero is necessary. As above, it is plotted versus armor. The second variable passed into the DPS equation is the number of Adrenaline stacks.
As stated in the model assumptions, this analysis was done at 5 Adrenaline stacks. However, as a matter of interest all values of Adrenaline were plotted.

The above chart clearly shows that like above, no single build is optimal at all values of defense. At values of armor less than about 150, build 4 is better and then after that build 1 is better. This makes sense since build 1 already did more damage per hit and has more attack speed, leaving no way for build 4 to overcome it in damage per second at higher armor values.
Below are four additional charts, at varying values of Adrenaline stacks. As expected they show that the pattern noticed at the full 5 stacks does not change as stacks decrease.


The above charts allow us to draw the same conclusion as we did from the per hit analysis. If a Kestrel is snowballing and preventing her enemy from coming to a complete build, build 4 is better. Otherwise, build 1 is better if the enemy has a full build including tier 2 or 3 defense.
Glimmershot Damage

The damage from Glimmershot is expected to follow the same general pattern as the per hit damage calculation. One difference is that the 10% pierce that Glimmershot gives along with the 1.4 damage amplification allows the higher weapon power build to be better until a larger value of armor. This is shown clearly in the chart above, where the same pattern of build 4 being better at lower armors values (below about 170 in this case) and then build 1 being better above that value is repeated.
Build Efficiency in Damage per Gold and Damage per Second per Gold
One of the important considerations when analyzing builds is the gold cost. While it is well established that a build that costs 3000 (approxiamtely one Sorrowblade) gold peforms better than one that costs 300 (a Weapon Blade) gold. Though the differences in the builds above are not that great, the gold cost is still an important consideration.
The costs of the builds are:
- Build 1 costs 8300 gold
- Build 2 costs 8600 gold
- Build 3 costs 8700 gold
- Build 4 costs 9600 gold
It is important to note that all of the builds are pretty equal in cost except for build 4, which takes the normal 3 tier 3 items of the other builds and adds a tier 2 item (piercing spear).
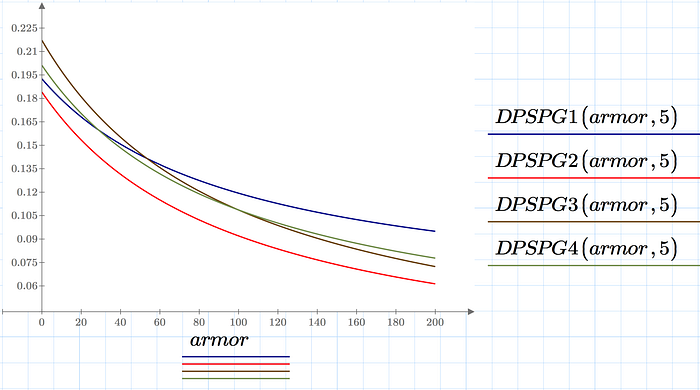
As with the charts above, Damage per Gold and Damage per Gold per Second are plotted versus armor.

From this it is clear that build 1, which is also the cheapest and also deals the most damage, optimizes damage per gold at any reasonable value of armor.

As above, damage per second per gold is optimized at any reasonable armor value by build 1. This was also expected given build 1 has the highest DPS and is also the cheapest.
Analysis at Varying Levels of Breaking Point Stacks
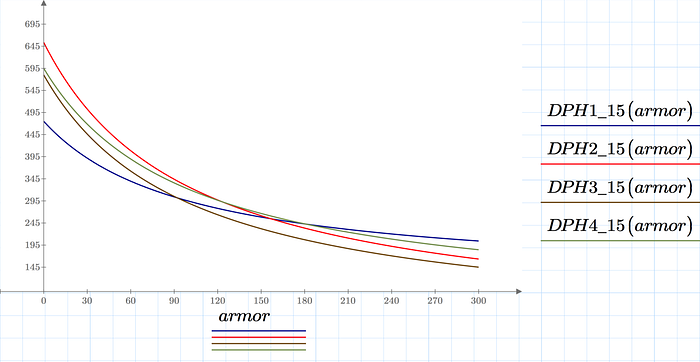
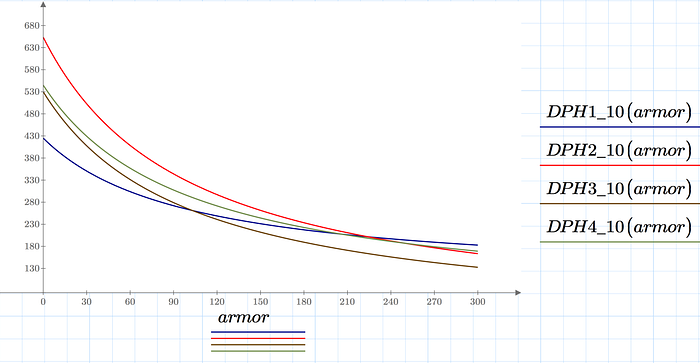
In order to analyze at which level of Breaking Point stacks build 1 becomes better would require a 3D plot. To avoid having to use such a plot, 5 plots have been made below at 5 different different Breaking Point stack levels. The number at the end of the DPH equation indicates the number of stacks.
Note that in the charts the armor axis is not the same scale for all of them. The scale had to change for the lower stack charts to capture all of the interesting line intersections. Also note that the charts below are for damage per hit. All builds except build 2 have the same attack speed, and thus the DPH analysis yeilds qualitiatively similar results as the DPS analyiss. Only at low Breaking Point stacks does build 2 dominate. At this point it does become relevant to also analyze DPS and see how the attack speed boosts the other builds.


From the above charts it is clear that as breaking point stacks decrease, the raw weapon power and crit of build 2 dominate the now weak Breaking Point containing builds. As stated above, at 25 Breaking Point stacks build 1 domiantes anywhere abvoe the reasonable armor value of about 150. But after losing just 5 stacks build 1 is better only after 170 or so armor. At 15 stacks, build 1 dominates only after 180 armor or so. Much below 15 stacks build 1 is only the best at high armor, making it nonviable unless the enemy is going incredibly tanky.
Another trend in the charts is how at medium levels of stacks build 4 actually could be the correct choice for an optimal build. At 20 stacks build 4 dominates at almost all reasonable armor values. At 15 stacks, build 4 is not necessarily the best but is very close to the best at all reasonable armor values. Thus, a medium skill player who can get up to 15 to 20 stacks reasonably well but has trouble maintaining the full 25 all of the time may opt to build build 4.
Below 10 stacks, it is clear that build 2 dominates due to its critical hit change and damage and non-stack dependant weapon power. Converting DPH to DPS may lower the armor value at which build 2 is better, but by 10 stacks or lower the armor value is so high (300 or above) that even cutting it by 2/3 still allows build 2 to be better at many reasonable armor values.
Conclusion
Hero builds are almost impossible to optimize across all play styles and game situations. What works for a very agressive high skill player may not work for an equally skilled more passive player, and a lower skill player may need a different, third, build. However, analyses like the one above can provide guidance to players who know their own style and skill limitations and who can choose between the builds based on that and based on the current game situation.
All math done above, and the source of all of the charts, can be found in a PDF generated via MathCAD, linked here. If you see a mistake in this, please tell me on twitter at Vainglory theory (twitter link in on my medium profile page).
Sponsors
This article was sponsored by TD and their sponsor, SteelSeries


