Binary Image classifier CNN using TensorFlow

Hello everyone.In this post we are going to see how to make your own CNN binary image classifier which can classify Dog and Cat images.
Prerequisite
1.Basic understanding of Neural Network and Convolutional Neural Network (Convolution Filters,MaxPooling,EdgeDetection)
2.Python,Numpy,MatplotLib,Keras
3.TensorFlow 2.0
4.Windows/Mac OS/Linux
5.Jupyter NoteBook.
If you are new to Deep Learning and TensorFlow don’t worry here are some resources to learn more about it.
Gathering Data
Visit this URL to download your Image Data set which has dog and cat images with seperate Train and Test Folders.
Once you downloaded it extract it.In our case we don’t need to use all of the images.We can use 4000 images for cats and 4000 images of dogs for Training and 1500 dog images and 1500 cat images for evaluvation.


Note: Keras ImageDataGenerator API uses sub-folder name to label the images
Implementation
Step 1: Open up you Jupyter notebook and create a blank Python3 notebook.
Step 2: Import the following Modules.
import tensorflow as tf
import numpy as np
from tensorflow import keras
import os
import cv2
from tensorflow.keras.preprocessing.image import ImageDataGenerator
from tensorflow.keras.preprocessing import image
import matplotlib.pyplot as plt
Step 3: Create the following objects
train = ImageDataGenerator(rescale=1/255)
test = ImageDataGenerator(rescale=1/255)

train_dataset = train.flow_from_directory("C:/Users/ksbal/Desktop/CodeBasicML/PetImages/Train/",
                                          target_size=(150,150),
                                          batch_size = 32,
                                          class_mode = 'binary')

  test_dataset = test.flow_from_directory("C:/Users/ksbal/Desktop/CodeBasicML/PetImages/Test/",
                                          target_size=(150,150),
                                          batch_size =32,
                                          class_mode = 'binary')
Description: Keras ImageDataGenerator makes it easy to label and load the large image datasets.Here we create two objects for ImageDataGenerator and also rescale the image such that their pixel values are normalized between 0 and 1 without affecting the image quality which will make it easier to train the CNN.Then we use these objects to call flow from directory method by specifying our path to Train and Test directory,target size which is important because real-world images can be in different size so what ever the input image size be it will be resized to 150X150 image.Then we specify batch size which simply means the number of samples that will be propagated through the network in a given time 32 is the default value for that function.Then here our classification result fall in one of the two classes i.e Dogs or Cats hence we specify class_mode as binary.
Data normalization is an important step which ensures that each input parameter (pixel, in this case) has a similar data distribution. This makes convergence faster while training the network.
You can also check your encoded class labels by running below code.

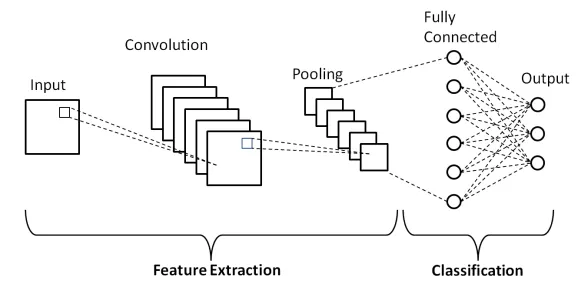
Defining our CNN Model Layers
model = keras.Sequential()

# Convolutional layer and maxpool layer 1
model.add(keras.layers.Conv2D(32,(3,3),activation='relu',input_shape=(150,150,3)))
model.add(keras.layers.MaxPool2D(2,2))

# Convolutional layer and maxpool layer 2
model.add(keras.layers.Conv2D(64,(3,3),activation='relu'))
model.add(keras.layers.MaxPool2D(2,2))

# Convolutional layer and maxpool layer 3
model.add(keras.layers.Conv2D(128,(3,3),activation='relu'))
model.add(keras.layers.MaxPool2D(2,2))

# Convolutional layer and maxpool layer 4
model.add(keras.layers.Conv2D(128,(3,3),activation='relu'))
model.add(keras.layers.MaxPool2D(2,2))

# This layer flattens the resulting image array to 1D array
model.add(keras.layers.Flatten())

# Hidden layer with 512 neurons and Rectified Linear Unit activation function
model.add(keras.layers.Dense(512,activation='relu'))

# Output layer with single neuron which gives 0 for Cat or 1 for Dog
#Here we use sigmoid activation function which makes our model output to lie between 0 and 1
model.add(keras.layers.Dense(1,activation='sigmoid'))
Description: Keras has an useful API which makes us easier to define the layers of our neural network.Here the input_shape is 150,150 which is our image size and 3 represents color channel RGB.If it is a gray scale image the we should specify it as 1.
Conv2D() : Neural networks apply a filter to an input image to create a feature map that summarizes the presence of detected features in the input.In our case there are 32,64,128 and 128 filters or kernels in respective layers and the size of the filters are 3X3 with activation fucntions as relu.
MaxPool2D() :Max pooling is a pooling operation that selects the maximum element from the region of the feature map covered by the filter. Thus, the output after max-pooling layer would be a feature map containing the most prominent features of the previous feature map.
Flatten() : This method converts the multi-dimensional image data array to 1D array.
#steps_per_epoch = train_imagesize/batch_size

model.fit_generator(train_dataset,
         steps_per_epoch = 250,
         epochs = 10,
         validation_data = test_dataset

         )
Description: Then we specify optimizer and loss function for our model and also metrics which we want to visualize while training.The role of optimizer is it measure how good our model predicted output when compared with true output if the loss is high then Optimizers are used to change the attributes of your neural network such as weights and learning rate in order to reduce the losses.There are several optimizers and loss functions available in TF.Here we use adam and binary_crossentropy.If it was a multi-class classification then we use sparse_categorical_crossentropy as loss function.
Training our Model
model.compile(optimizer='adam',loss='binary_crossentropy',metrics=['accuracy'])Description: We can train our mode by calling fit_generator() function which takes our training images and also our validation images as input for training and also for validation.And also we should specify epochs and steps per epoch.The most common way to choose steps per epoch is
no of train_images/batch_size.In our case it is 250 approximately.
It will take some time to train your model depending upon no of layers,Data-set size etc.Hence it is preferable to use GPU as hardware accelerator such that it speeds up the training process.
Difference between steps and epochs :A training step is one gradient update. An epoch consists of one full cycle through the training data. This is usually many steps.

Using our model to make Predictions
def predictImage(filename):
    img1 = image.load_img(filename,target_size=(150,150))

    plt.imshow(img1)

    Y = image.img_to_array(img1)

    X = np.expand_dims(Y,axis=0)
    val = model.predict(X)
    print(val)
    if val == 1:

        plt.xlabel("DOG",fontsize=30)


    elif val == 0:

        plt.xlabel("CAT",fontsize=30)
Description : Here we create a simple function which takes filename of the image (along with path) as input then load it using load_image method of keras which resize the image as 150X150 and plot it using matplot lib,convert it into a numpy array then we expand the dimension of that array and store it in another variable X.Which we pass as an input to predict method of model object.It returns a value which lies between 0 and 1 due to sigmoid activation function in output layer.Then if returned value is 1 then we add x axis label to our plotted image as Dog if it is 0 the we add x axis label to our plotted image as cat.
Now call the function by passing the path of the image.As you can see what ever may be the size of the image it is resized as 150x150 image.


Congratulations! you have made your first CNN.If you like this article give some claps.