CNN Model With PyTorch For Image Classification

In this article, we discuss building a simple convolutional neural network(CNN) with PyTorch to classify images into different classes. By the end of this article, you become familiar with PyTorch, CNNs, padding, stride, max pooling and you are able to build your own CNN model for image classification. The dataset we are going to use is Intel Image Classification dataset available on Kaggle.
So let’s begin, here is an outline of what this article going to cover:
- Preparing The Dataset
- Splitting Data and Prepare Batches
- Base Model For Image Classification
- Convolution, Padding, Stride, Pooling
- CNN Model For Classification
- Hyperparameters, Model Training, And Evaluation
Preparing the Dataset :
For training our model, we need a dataset which has images and label attached to it. But generally, the dataset available for image classification consists of images stored in corresponding folders. For example, our dataset consist of 6 types of images and they stored in corresponding folders.

To prepare a dataset from such a structure, PyTorch provides ImageFolder class which makes the task easy for us to prepare the dataset. We simply have to pass the directory of our data to it and it provides the dataset which we can use to train the model.
The torchvision.transforms module provides various functionality to preprocess the images, here first we resize the image for (150*150) shape and then transforms them into tensors.
So our first image in the dataset has a shape (3,150,150) which means the image has 3 channels (RGB), height 150, and width 150. The image has a label 0, which represents the “buildings” class.
The image label set according to the class index in data.classes.
So our dataset has 6 types of images in the dataset.
Exploring Images :
Our dataset consists of images in form of Tensors, imshow() method of matplotlib python library can be used to visualize images.
permute method reshapes the image from (3,150,150) to (150,150,3). The first image training data is of building as you can see below:

Splitting Data and Prepare Batches:
We can not pass the whole dataset into our model to train it, because our memory size is fixed and there is a high chance that our training data exceed the memory capacity of CPU or GPU, so we split the dataset into batches and instead of training the model on whole in a single phase. The batch size can be decided according to memory capacity, generally, it takes in power of 2. For example, the batch size can be 16, 32, 64, 128, 256, etc.
Here we take batches of size 128 and 2000 images from the data for validation and the rest of the data for training. To randomly split the images into training and testing, PyTorch provides random_split().
The data is divided into batches using the PyTorch DataLoader class. We create two objects train_dl and val_dl for training and validation data respectively by giving parameters training data and batch size into the DataLoader Class.
Visualizing the images:
To visualize images of a single batch, make_grid() can be used from torchvision utilities. It gives us an overall view of images in batch in the form of an image grid.

Base Model For Image Classification:
First, we prepare a base class that extends the functionality of torch.nn.Module (base class used to develop all neural networks). We add various functionalities to the base to train the model, validate the model, and get the result for each epoch. This is reusable and can be used for any image classification model, no need to rewrite this every time.
Convolution, Padding, Stride, Maxpooling;
Now understand the concept of convolution, padding, and max-pooling that help our neural network to learn the features from the images.
Convolution :
According to Wikipedia Convolution is a mathematical operation which can be performed on two functions to generate third function that shows how shape of one modified by other.
Here, the first function is the image tensor, and the second function is the matrix or tensor of the image with the same number of channels as our image called the kernel. Kernels are applied to the images to learn features from the images. Basically, the kernel performs dot product for each segment of the image and then sums the result and gives the output tensor. It can be understood easily by the following image:

Padding:
When we apply a kernel to the image tensor in convolution, it reduces the size of the output tensor for the image. It causes two problems, first, it shrinks the output and the second is that pixel on the corner of the image losses its importance.
To resolve these issues we increase the shape of the image by adding some extra pixels to the border of the image tensor. It helps to increase the size of the image, and the pixel value of boundaries of images shifted inside the tensor. The features learned from them conveyed to further layers in deep neural networks.
In the image below zero-padding added to the 2-D tensor.

Stride:
Stride controls the activity of the kernel, how the kernel moves across the image. For example, if the stride is set to (1,1), the kernel moves across the width and height by 1 pixel at a time. The first kernel moves across the width by 1 pixel, after completing the operation across the width it moves 1 pixel in height and again repeats the process. If the stride set (2,2) then the kernel moves across the image tensor by two pixels.
Pooling:
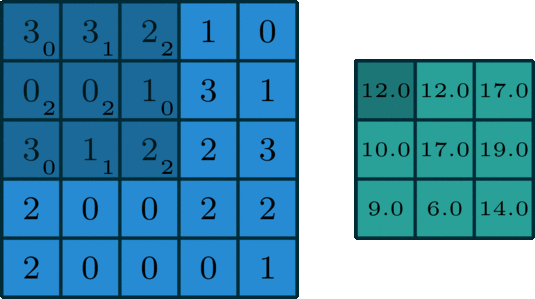
The pooling layer helps to summarise the result obtained by the convolution layer (also called feature map) in a lower dimension. There are various types of pooling like Max-Pooling, Average-Pooling, etc. Max-pooling often used, the image below described it more precisely:

CNN Model For Classification:
After knowing all these concepts now we define our CNN model, which includes all these concepts to learn the features from the images and train the model.
In this model, there are 3 CNN blocks, and each block consists of 2 convolution layers and 1 max-pooling layer. Relu activation function is used to remove negative values from the feature map because there can not be negative values for any pixel value. Stride(1,1) used and padding is also 1.
After applying convolution and extract features from the image, a flatten layer is used to flat the tensor which has 3 dimensions. The flatten layer converts the tensor to one-dimensional. Then 3 linear added to reduce the size of the tensor and learn the features.
Architecture of our CNN Model:
Hyperparameters, Model Training, And Evaluation:
Now we have to train the natural scene classification model on the training dataset. So that first defines the fit, evaluation, and accuracy methods.
Now we train our model for the different hyperparameters to get the best fit for the model. Here I train the model for 30 epochs, and a learning rate 0.001 and get 80% accuracy for the test data.
num_epochs = 30
opt_func = torch.optim.Adam
lr = 0.001#fitting the model on training data and record the result after each epoch
history = fit(num_epochs, lr, model, train_dl, val_dl, opt_func)
Results for each epoch :
Plotting the graph for accuracies and losses to visualize how the model improves its accuracy after each epoch:


To run the notebook on GPU and try out different hyperparameters or model you can check the following notebook on Kaggle:
References:
If you love this article feel free to show your support:

