Portrait Lighting 2

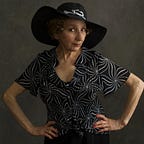
My photographer partner, Bruce Walker, is always ready to try out new lighting ideas. His latest idea was extremely high key lighting, using a single light, with me as the model, along with the grey cat, Gandalf.
I asked Bruce to do a little write up on it.
One light high key portrait setup
Here’s a way to use a single light to create a pleasant, airy portrait that looks like it was taken in a bright sunny space. The background will be pretty much pure white so you can readily use the images as headshots for a blog or the like. I will describe the basic idea behind this and the way I shot it, but I will also suggest less expensive gear alternatives and even a way to use just a sunny window instead so you don’t need even a studio strobe or flash to get the shot.
What we are doing here, in essence, is starting with a large light source, like a seven foot umbrella, aiming that at a white scrim or some diffusion material that will serve as our backdrop. By using an umbrella larger than our scrim we are letting a whole bunch of light skirt around the edges of the scrim. This provides our subject with both a hair light and rim light, and by adding large white reflectors in front of our smiling subject to either side, we are illuminating our subject with a large, soft and flattering blanket of light from the front.
Here’s an overhead view of how this works:
The subject is in the middle of our lighting setup. Behind her is my five foot wide by six and a half foot high white scrim (translucent diffusion fabric), and behind that is the seven foot umbrella. The umbrella is mounted on a stand so that a foot or so of it appears over the top of the scrim and a foot sticks out on either side too. I used a Paul C Buff Einstein studio strobe in the umbrella, but you could substitute one or more off-camera flashes instead.
In front of to either side of the subject we position two large white reflectors, angling them a bit to bounce light directly onto the subject. I used 3x6 foot sheets of foam core which I simply leaned against two chair backs. You could also use large 5-in-1 white reflectors, or silver reflectors if you want to add a bit more contrast and punch to the shot.
You aim your lens and shoot through the gap between the two front reflectors. Your lens will be pointing straight at a bright source of light (the backlit scrim) so it will be subject to veiling flare. That, along with the wrap around light reflected from all the white reflectors and scrim, will create a very soft, and a bit ethereal glow enveloping your portrait subject. To keep from including any of the lighting gear from appearing in the shot I used a medium telephoto lens for a relatively narrow field of view (FoV). A 125mm lens on a full-frame camera would do fine.
Setting the exposure correctly is a must to avoid overexposing the subject. The background will be slightly blown out because it’s likely to be a full stop or more brighter than your subject’s face. That’s okay though and it adds to the bright, airy look of the shots. I used a handheld flash meter to set the exposure in my setup. I held the meter near my subject’s face with the sensor dome pointed back at the camera position. This gave me F:5.6 at ISO 100. I set the camera shutter to 1/125th second which is its flash sync speed.
Of course you can use your camera’s rear display histogram to judge the exposure, but be aware that the large area of blown out white around the subject might throw you off because of the big spike on the right side of the histogram.

Alternatives
You can substitute different, possibly cheaper materials for much of this. For instance, you can get a large sheet of white translucent plastic from the dollar store. It’s sold as a picnic table cover in something like 5 x 8 foot sheets for about a dollar. Or you can use rip-stop nylon from the fabric store, sold by the yard or meter.
In place of the large white or silver umbrella (which are already quite affordable), you can use the corner of a white room. Just aim your light into the corner from a few feet out and place the diffusion and reflectors accordingly.
Finally, if the sun is streaming in through a tall window, you can simply tape up the diffusion over part of it and use that as your light source. Again, place the reflectors and your subject appropriately. If you do this you can use your camera’s automatic exposure controls because the light will be constant. You can even use a smartphone or point and shoot this way for really simple and cheap headshots.
My gear list
- Seven foot umbrella: Paul C Buff 86” soft silver PLM; https://www.paulcbuff.com/Light-Modifiers/PLM-Umbrellas/86-Soft-Silver-PLM-Umbrella.html
- Light: Paul C Buff Einstein E640; https://www.paulcbuff.com/Flash-Units/einstein-flash-unit.html
- Scrim: Selens 5-in-1 60x80 Inch Oval Reflector; https://www.amazon.ca/gp/product/B00V5O3PTI
- Reflectors: white foam core sheets from an art supply store.
- Light stand X 2: one for the strobe, and one used with a clamp to hold the oval reflector upright in position.
- Camera: Pentax 645Z (medium format)
- Lens: FA 645 150mm F:2.8
Shots taken at F:5.6, 1/125th second shutter, ISO 100.