How to create and add a UIView component — iOS Development without Storyboard (Objective-C)
Creating a UIView component and making it appear in your iOS app programmatically might be challenging at first, especially for people who are new to iOS development.
The same may happen for people who have used storyboards their entire iOS development journey. Maybe you want something harder that will make you sweat a bit, such as creating a UIView component programmatically. That is, creating and adding UIView purely in code!
Starter files
In this article, we will use this GitHub repository branch. You can clone it or just directly download it. If you want to clone, make sure to checkout to branch how-to-create-and-add-UIView-components. Or you can just run this code on your terminal:
# this will save on the current directory, so make sure you know what directory your terminal is pointing to
# to make it simple, you can run the next line first before cloning,
# cd ~/Desktop
# the line above will change the current directory to Desktop
git clone -b how-to-create-and-add-UIView-components https://github.com/blitzdex27/knowledge-base-resources-objective-c-series.git
The one you downloaded or cloned has directories named start and end. The start directory contains the starting files, which contain a blank non-storyboard iOS app. If you want to know how to create this non-storyboard app, you can refer to my previous article. Lastly, the end directory contains the already complete app files and code.
Let’s start by describing UIView as simple as possible.
What is a UIView?
UIView is one of the classes that UIKit provides for displaying rectangular components in the app. It is one of the most used classes of UIKit. Whenever we create a new iOS project, the first UIView you will encounter is inside the ViewController class. It is stored in its view property. This view is the one being managed by the ViewController. We will call it the main view in this article. You can access it using the following code from the ViewController:
self.view;Easy right? The keyword self refers to the instance of the class it belongs to, which is the ViewController itself. You can put the above code in the viewDidLoad method, but it will do nothing.
Open the starter project located on “start/UIViewDemo/”. You will notice that on the SceneDelegate.m, we have created an instance of ViewController using the following code:
[[ViewController alloc] init];Now, let’s go back to ViewController.m. Inside the viewDidLoad method, you can modify this view’s property, such as background color using the following code:
self.view.backgroundColor = UIColor.blueColor;Note: I already put this code on the starter project, so you will know where to start.
Run the app and you will see that the entire screen’s background has changed. That is our main view. The view of a ViewController occupies the whole screen by default.
Alright, that’s a built-in UIView component. Let’s proceed to the next section to know how we can make our own custom UIView.
Step 1 — Create an instance of a UIView and store its reference to a variable:
For simplicity, we will put all the code inside the viewDidLoad method.
UIView *greenView = [[UIView alloc] init];The alloc method allocates appropriate memory needed for storing a UIView instance. The init method initializes a new instance of UIView. Then we store the instance’s reference to a variable named, greenView, so we can access it later through this variable.
Let’s move on to step 2, where we’ll define the frame of the view.
Step 2 — Define the frame of the view
A frame is composed of origin and size. Origin is where the view will start extending its width and length. While the size is composed of width and length.
Let’s make our view with a size of 300 by 200 points, and not touch the origin for now.
greenView.frame = CGRectMake(0, 0, 300, 200);Step 3 — Add the view to the main view
We know that the whole screen in our app is occupied by the built-in view managed by the ViewController, the main view.
To make our greenView appear on the screen, we need to add it as a subview of the main view like so:
[self.view addSubview:greenView];Run the project again. What do you see? Just a blue screen, without our greenView.
The thing is, the greenView is actually there. We cannot see it because it has a default backgroundColor property value of UIColor.clearColor.
Let’s modify this property then:
greenView.backgroundColor = UIColor.greenColor;Our final code of ViewController.m should look like this:
#import "ViewController.h"

@interface ViewController ()

@end

@implementation ViewController

- (void)viewDidLoad {
    [super viewDidLoad];
    self.view.backgroundColor = UIColor.blueColor;

    // Step 1 - Create an instance of a UIView and store its reference to a variable:
    UIView *greenView = [[UIView alloc] init];

    // Step 2 - Define the frame of the view
    greenView.frame = CGRectMake(0, 0, 300, 200);

    // Step 3 - Add the view to the main view
    [self.view addSubview:greenView];

    // Step 3.1 - Modify background color
    greenView.backgroundColor = UIColor.greenColor;
}

@end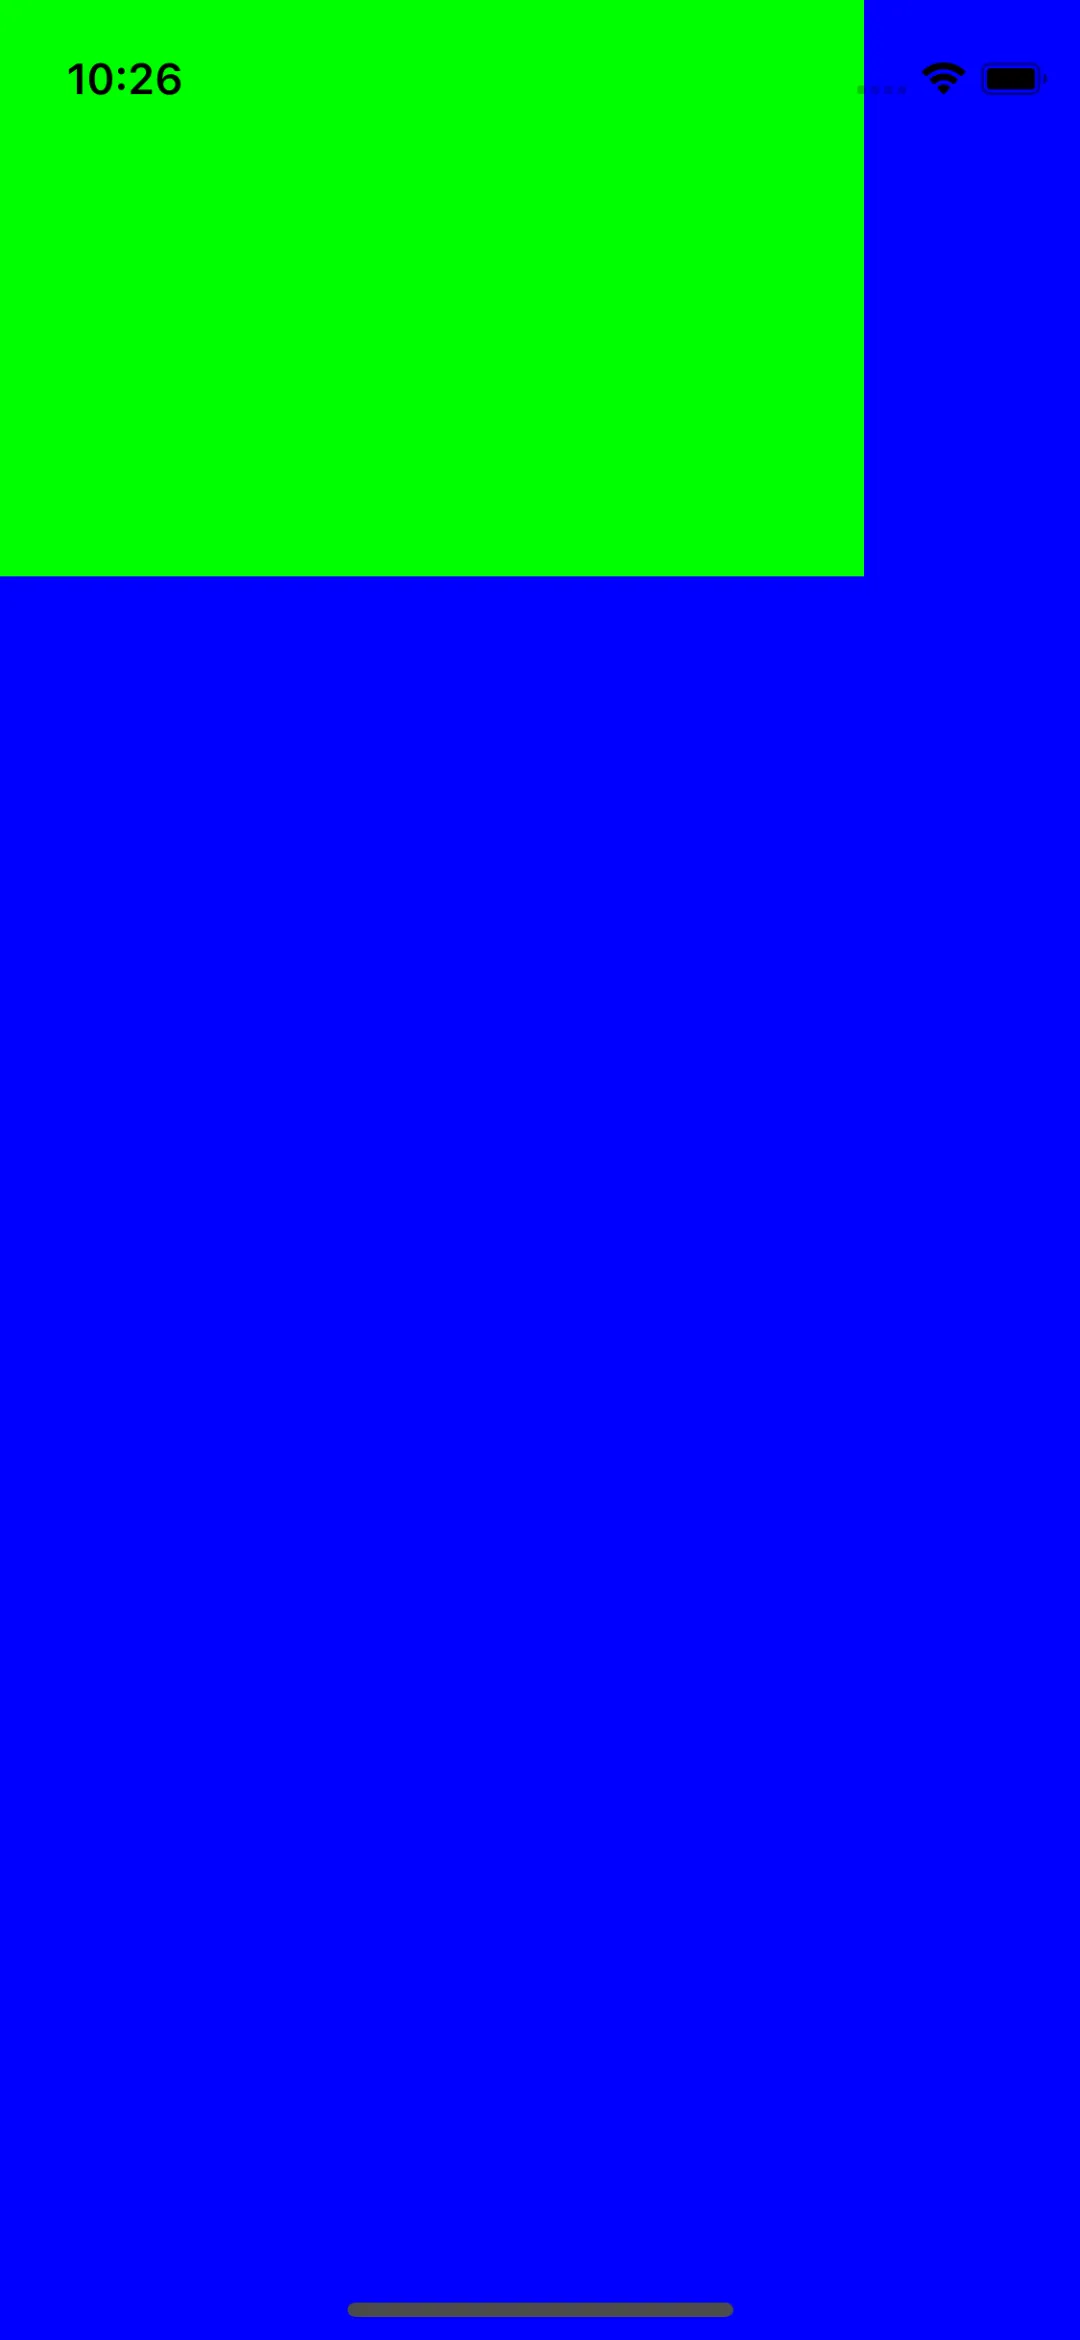
You will notice that our greenView is positioned on the top-left corner of the screen. There are several ways to center a view, but I will only introduce two such methods.
Centering view using the center property
We can use the center property of the main view to be the same as our greenView.
greenView.center = self.view.center;This is a very simple way of centering a view to a reference view. However, once the reference view position changes, the other view will not follow.
Centering view by calculating the frame
Normally, positioning components is done by defining the frame like so:
// Centering view by calculating the frame
CGFloat mainViewCenterX = self.view.frame.size.width / 2;
CGFloat mainViewCenterY = self.view.frame.size.height / 2;
CGFloat width = 300;
CGFloat height = 200;
CGFloat x = mainViewCenterX - width / 2;
CGFloat y = mainViewCenterY - height / 2;
greenView.frame = CGRectMake(x, y, width, height);
Run the app. The greenView should now be in the center.
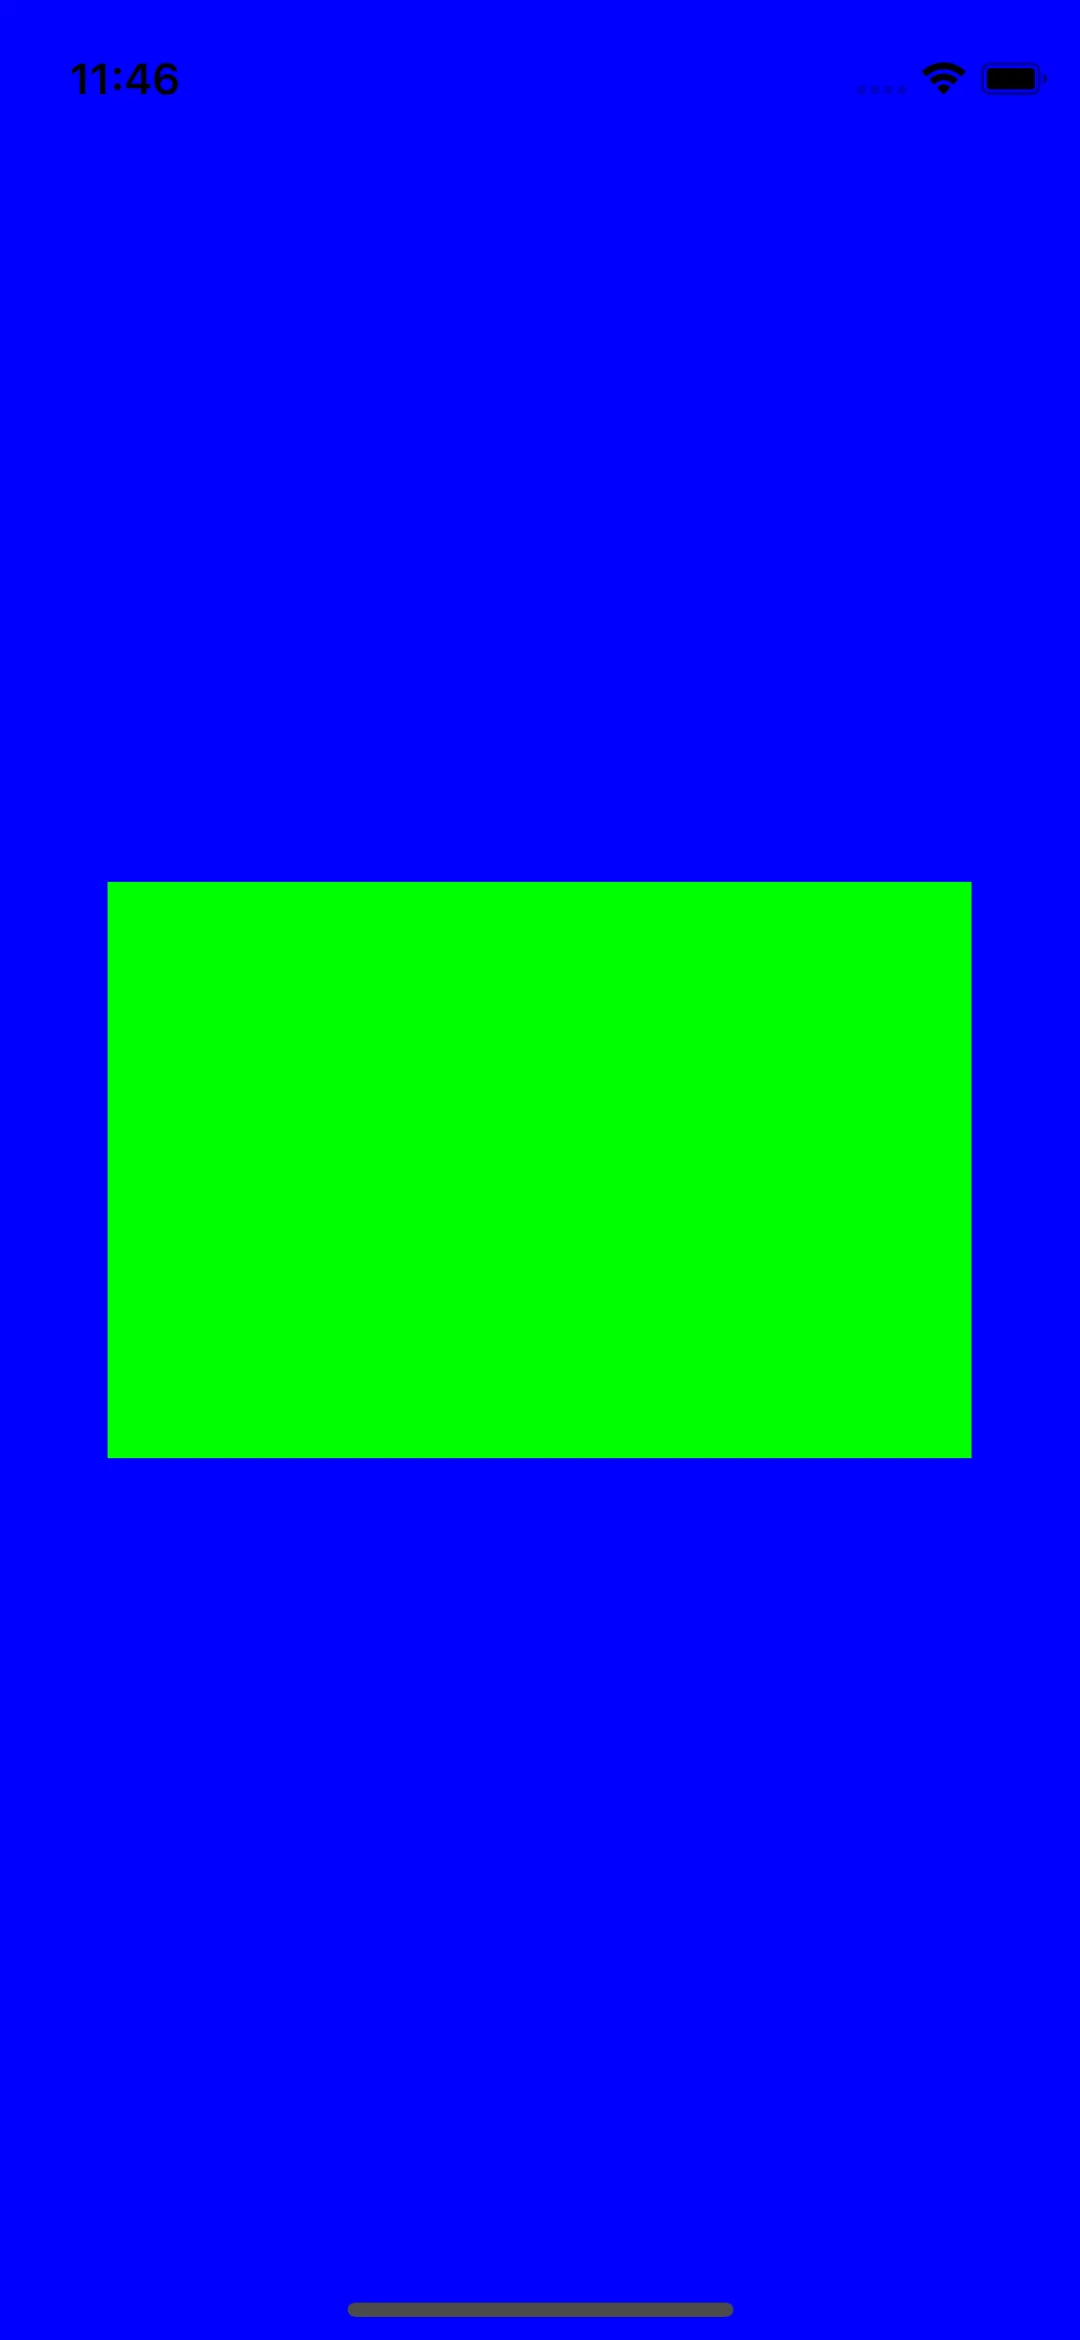
Also, take note that this is also static. Just like the other method that we introduced earlier.
Finally, we have the complete code like so:
#import "ViewController.h"

@interface ViewController ()

@end

@implementation ViewController

- (void)viewDidLoad {
    [super viewDidLoad];
    self.view.backgroundColor = UIColor.blueColor;

    // Step 1 - Create an instance of a UIView and store its reference to a variable:
    UIView *greenView = [[UIView alloc] init];

    // Step 2 - Define the frame of the view
    greenView.frame = CGRectMake(0, 0, 300, 200);

    // Step 3 - Add the view to the main view
    [self.view addSubview:greenView];

    // Step 3.1 - Modify background color
    greenView.backgroundColor = UIColor.greenColor;

    // Centering view by calculating the frame
    CGFloat mainViewCenterX = self.view.frame.size.width / 2;
    CGFloat mainViewCenterY = self.view.frame.size.height / 2;
    CGFloat width = 300;
    CGFloat height = 200;
    CGFloat x = mainViewCenterX -  width / 2;
    CGFloat y = mainViewCenterY - height / 2;
    greenView.frame = CGRectMake(x, y, width, height);
}

@end
Conclusion
In this tutorial, we learned how to create and add a UIView component programmatically in iOS development using Objective-C. We started by creating an instance of a UIView and defining its frame. Then, we added it as a subview of the main view and modified its background color. Finally, we centered the view using two different methods: by setting its center property and by calculating its frame. By following these steps, you can create and add custom UIView components to your iOS app without using a storyboard. I hope this tutorial was helpful and easy to follow for novice iOS developers!