Worker Threads : Multitasking in NodeJS
Deep Dive into Worker threads

This article is the fourth article of my Advanced NodeJS for Senior Engineers Series. In this article, I’m going to explain what, why and how they work in detail, and how to get the best performance using worker threads. Official documentation present at worker_threads. You can find the other articles of the Advanced NodeJS for Senior Engineers series below:
Post Series Roadmap

* The V8 JavaScript Engine
* Async IO in NodeJS
* Event Loop in NodeJS
* Worker Threads : Multitasking in NodeJS (This Article)*
* Child Processes: Multitasking in NodeJS
* Clustering and PM2: Multitasking in NodeJS
* Debunking Common NodeJS Misconceptions
Table of Content
* Why do we need worker threads at all?
* Prerequisite to understand what worker threads are
* Concurrency vs Parallelism
* Understanding Processes and Threads
* The Analogy
* What exactly worker threads are then?
* What goes on under the hood?
* What all there is to work with?
* isMainThread, threadId
* worker events
* worker options
* MessageChannel
* MessagePort & MessagePort Events
* Ways to pass the data between threads
* Atomics
* Transferring the Port
* Transferring the Array Buffer
* Sharing the data using Shared Array Buffer
* Worker thread gotchasWhy do we need worker threads at all?
A server can quickly become overwhelmed by a CPU-intensive workload. To illustrate, imagine you have two endpoints: one performs a simple, non-CPU intensive task, while the other handles a complex CPU-intensive operation that takes 10 seconds to complete. If your server is occupied with the CPU-intensive request, it won’t be able to promptly respond to the non-CPU-intensive request. This problem arises because we violate the golden rule of NodeJS: i.e. Don’t Block the Event Loop.
We are well aware that NodeJS is not designed for CPU-intensive tasks due to its single-threaded architecture. However, this doesn’t mean that we cannot utilize it for CPU-Intensive work or have the benefits of multi-threaded architecture design? Heck No!! Enter the hero: Worker threads to the rescue…

Node.js v10.5.0 introduced the experimental concept of Worker Threads via worker_threads module, which became a stable functionality since Node.js v12 LTS.
Prerequisite to understand what worker threads are

Concurrency vs Parallelism
Concurrency is about dealing with lots of things at once. Parallelism is about doing lots of things at once. — Rob Pike
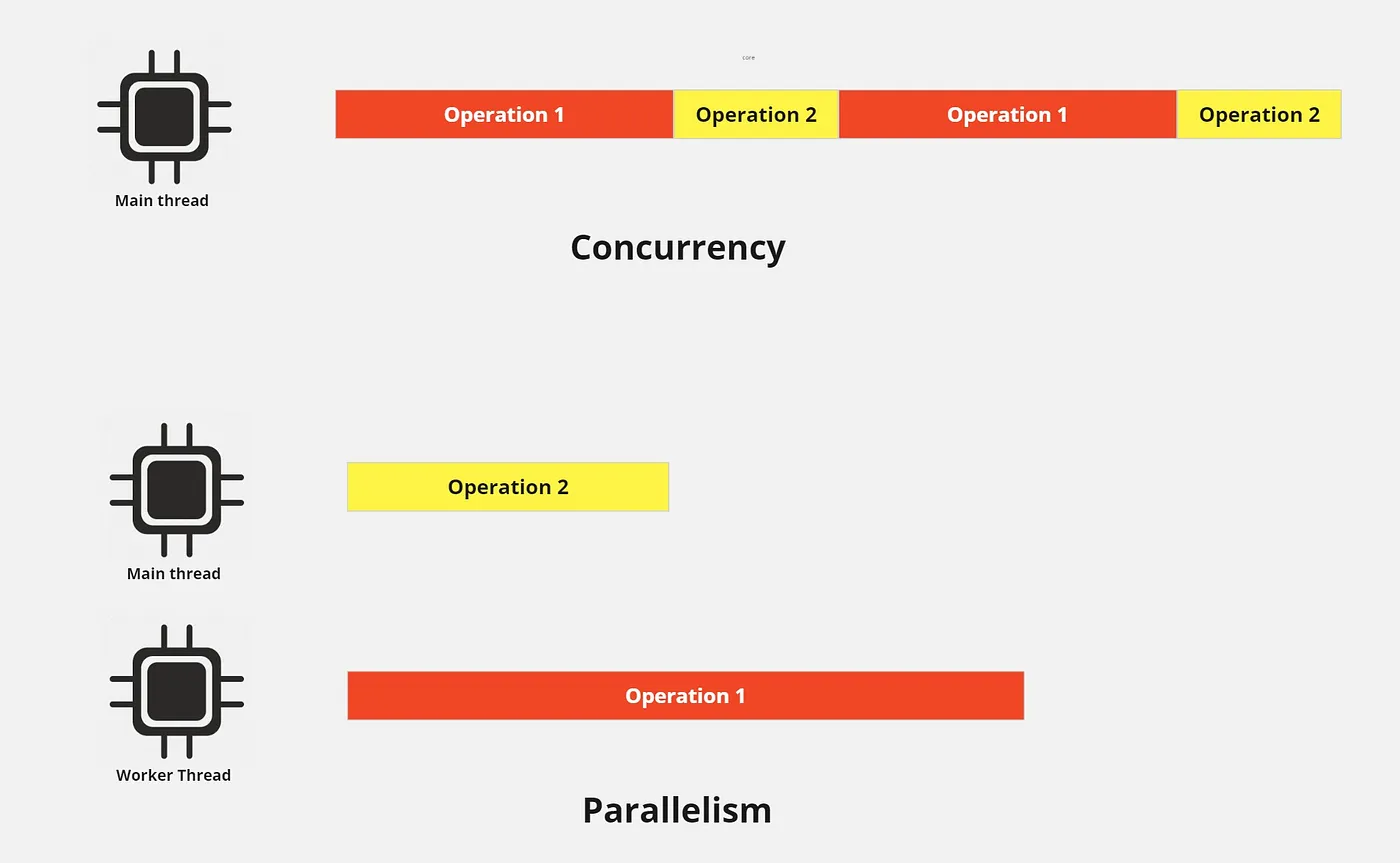
Let’s start by understanding the essence of worker threads: parallelism, not concurrency. As shown in the image above, performing multiple tasks with a single thread (concurrency) takes more time compared to executing them simultaneously (parallelism).
Concurrency model is useful with IO operation as things like network communication, reading and writing into file/database because you are waiting for network or disk to supply the actual data which need to be worked upon. And CPU or thread cannot do much to speed that up. So most of your time goes into waiting. So thread can do other things in that time and that makes more sense.
However, this approach may not be suitable for tasks that are CPU intensive. Although operation 2 was relatively quick, it ended up taking more time because we were only utilizing a single core/thread. By utilizing multiple threads/cores, we were able to delegate the CPU-intensive work to worker threads, while running non-CPU intensive tasks on the main thread.
In NodeJS the I/O operations are handled separately and when they are finished, the event loop adds the callback associated with the I/O task in a microtask queue. When the call stack in the main thread is clear, the callback is pushed on the call stack and then it executes. To make this clear, the callback associated with the given I/O task does not execute in parallel; however, the task itself of reading a file or a network request happens in parallel with the help of the threads. Once the I/O task finishes, the callback runs in the main thread.
Understanding Processes and Threads
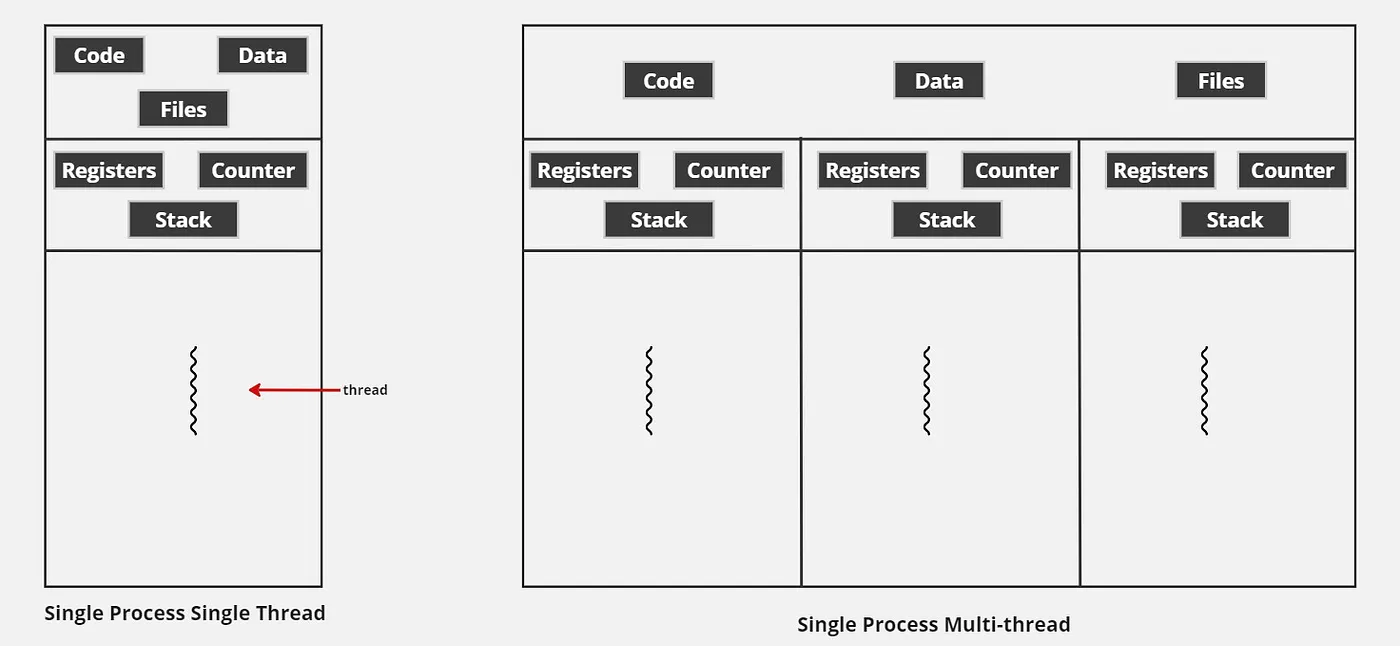
A process is a running program in the operating system. It has its own memory and cannot see nor access the memory of other running programs. Only one task can be executed at a time. On a single core machine, the multiple processes execute concurrently. That is, the operating system switches between the processes in regular intervals. On a multi-core system , the OS schedules each process to execute on each core at the same time. However, if you create more processes than that of number of core , each core will execute more than one processes concurrently until they are finished.
Threads are like processes which can execute one task at a time. Unlike processes, threads do not have their own memory. Instead, they reside within a process’s memory. When you create a process, it can have multiple threads executing code in parallel. Furthermore, threads can communicate with one another through message passing or sharing data in the process’s memory. This makes them lightweight in comparison to processes, since spawning a thread does not ask for more memory from the operating system. When it comes to the execution of threads, they have similar behaviour to that of processes.
The Analogy
In a nutshell worker threads are like having extra cooks along with main chef in restaurant to prepare multiple plates of food at the same time.

What exactly worker threads are then?
In this section, you will offload a CPU-intensive task to another thread using the worker-threads module to avoid blocking the main thread. To do this, you will create a worker.js file that will contain the CPU-intensive task. In the parent.js file, you will use the worker-threads module to initialize the thread and start the task in the worker.js file to run in parallel to the main thread. Once the task completes, the worker thread will send a message containing the result back to the main thread.
in parent.js we have
const {Worker} = require('worker_threads');
const worker = new Worker('./worker.js', {workerData: {num: 5}});
worker.on('message', (result) => {
console.log('square of 5 is :', result);
})
worker.on("error", (msg) => {
    console.log(msg);
 });
console.log('hurreyy')
First, you import the worker_threads module and unpack the Worker class. You create an instance of the Worker using the new keyword that is followed by a call to Worker with the worker.js file path as its argument. This creates a new thread and the code in the worker.js file starts running in the thread on another core.
Following this, you attach an event to the worker instance using the on("message") method to listen to the message event. When the message is received containing the result from the worker.js file, it is passed as a parameter to the method’s callback, which returns a response to the user containing the result of the CPU-bound task.
Next, you attach another event to the worker instance using the on("error") method to listen to the error event.
In worker.js
const {parentPort, workerData} = require('worker_threads');
parentPort.postMessage(workerData.num * workerData.num)
The first line loads the worker_threads module and extracts the parentPort class. The class provides methods you can use to send messages to the main thread. WorkerData contain the data passed from the main thread when the thread is initialized. Then you invoke the postMessage() method of the parentPort class, which sends a message to the main thread containing the result of the CPU-bound task stored i.e. square.
when you run parent with node parent.js you’ll see below output
hurreyy
square of 5 is : 25
What goes on under the hood?
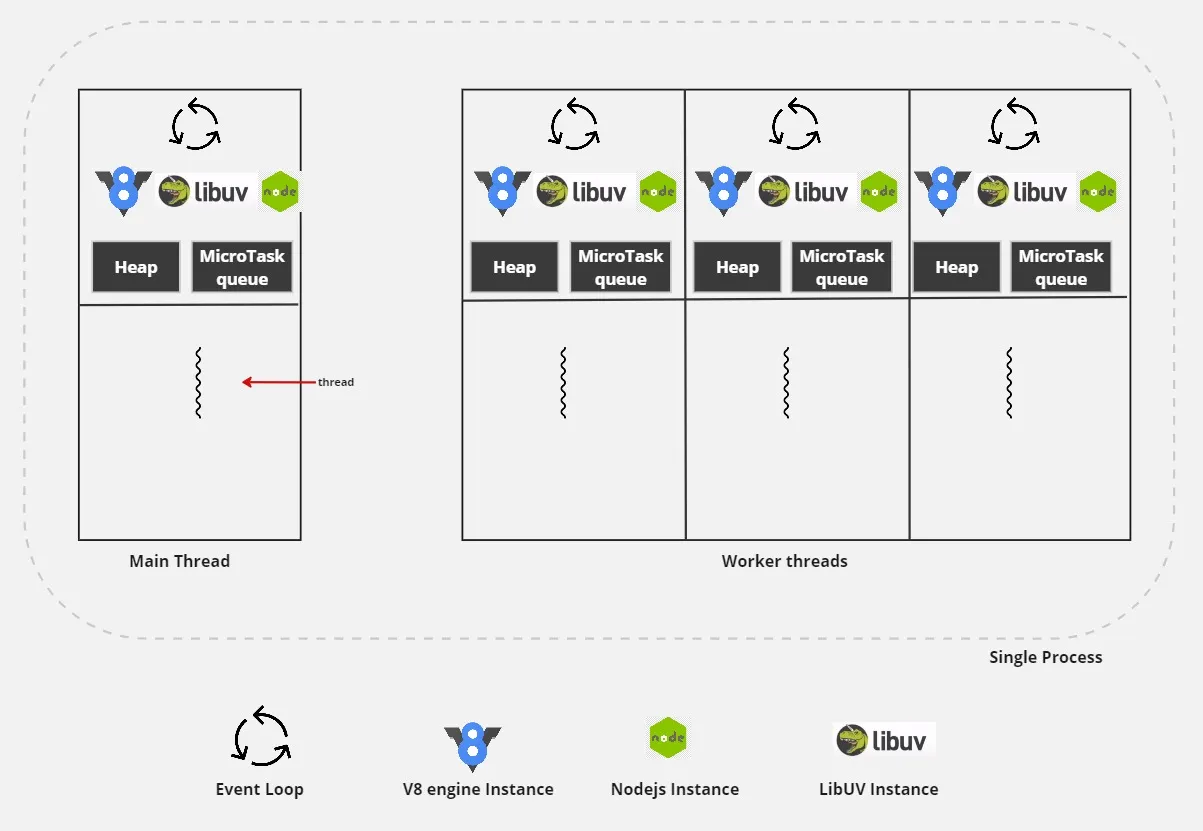
We already know by now that when NodeJS process is launch, it gets launched with One process, One thread, One event loop, One V8 Engine Instance, One Node.js Instance. Just like main thread, each worker will have its own instance of V8, nod, libuv instance and Event Loop within the same process.
A V8 isolate refers to a separate entity within the chrome V8 runtime. It possesses its own JS heap and a microtask queue. This unique setup enables every Node.js worker to execute its JavaScript code in complete isolation from other workers. However, this isolation comes at a cost — the workers are unable to directly access each other’s heaps. Consequently, each worker maintains its own version of the libuv event loop, which operates independently from the event loops of other workers and the parent worker.
With Worker threads, a thread can end at some point and it’s not necessarily the end of the parent process. It’s not a good practice for resources that were allocated by a Worker to hang around when the Worker is gone — that’s a memory leak, and we don’t want that. We want to embed Node.js into itself, give Node.js the ability to create a new thread and then create a new Node.js instance inside that thread; essentially running independent threads inside the same process.
worker_threads implementation provides concurrency by allowing applications to use multiple isolated JavaScript workers where the communication between workers and the parent worker is provided by Node. There’s no implicit memory sharing between the main program and the worker “thread.” Instead, an event-based messaging system is provided so values can be exchanged between the processes.
Each worker is connected to its parent worker via a message channel.
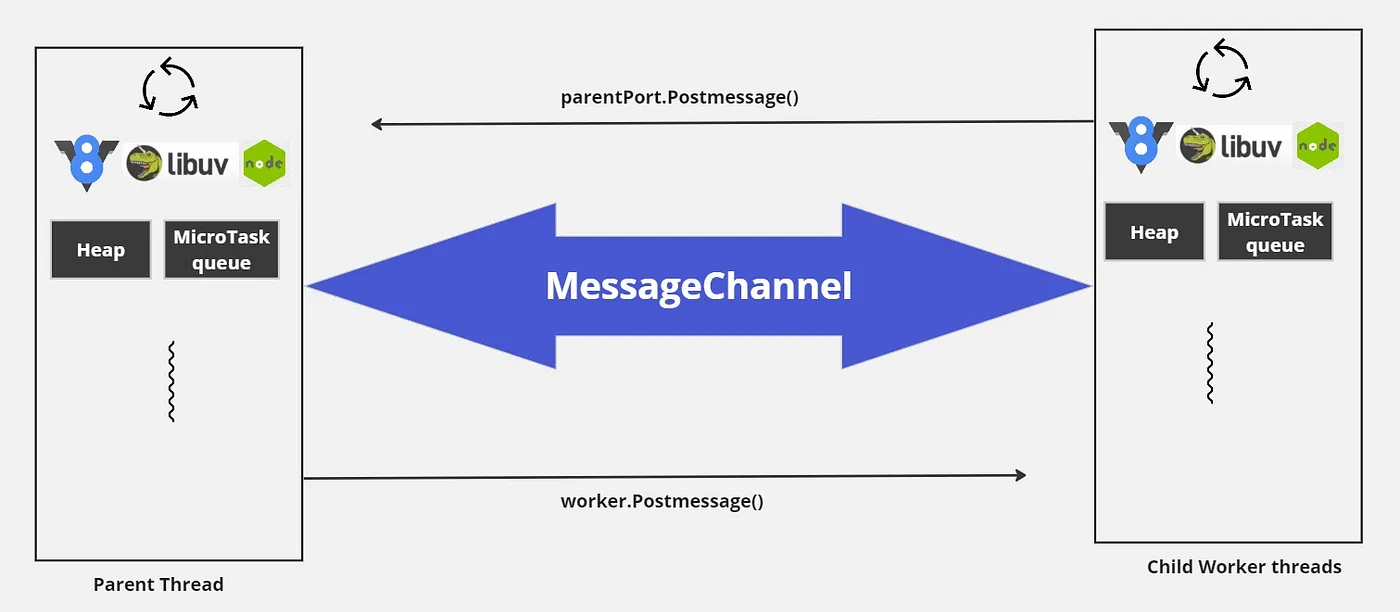
The worker thread operates in two distinct stages behind the scenes. The first stage is the worker initialization, where the worker instance is created and the initial communication between the parent and child workers is established. This allows for the transfer of worker metadata from the parent to the child worker.
What is this initialisation metadata? This is the information that the worker execution script requires in order to start the worker: the name of the script to be run as a worker, the worker data, and additional details. According to our example, the initialisation metadata is merely a message like: Hey Worker, Could you please run worker-simple.js with worker data {num: 5}?
The second stage is the worker execution, where the user’s worker JavaScript script is executed using the workerData provided by the user and other metadata provided by the parent worker. This is where new v8 instance is created and assigned to worker. Then libuv initialized with its own event loop. Initialisation metadata from is read and worker.js is executed.
What all there is to work with?
isMainThread, threadId
If you don't want to create new file for worker you can just pass __filename as worker instantiation script path and it’ll the same file. And with isMainThread you can segregate your logic which you would like to on main thread and worker thread. Instantiated object possesses a property as unique threadId.
worker events
Worker offers few events which we can tie up with the callbacks we want
- message : The
'message'event is emitted when the worker thread has invokedparentPort.postMessage(). - exit : The
'exit'event is emitted once the worker has stopped. If the worker exited by callingprocess.exit(), theexitCodeparameter is the passed exit code. If the worker was terminated, theexitCodeparameter is1. This is the final event emitted by anyWorkerinstance. - error : The
'error'event is emitted if the worker thread throws an uncaught exception. In that case, the worker is terminated. - online: The
'online'event is emitted when the worker thread has started executing JavaScript code.
const {
  Worker, isMainThread, parentPort, workerData,
} = require('node:worker_threads');

if (isMainThread) {
  module.exports = function parseJSAsync(script) {
    return new Promise((resolve, reject) => {
      const worker = new Worker(__filename, {
        workerData: script,
      });
      worker.on('message', resolve);
      worker.on('error', reject);
      worker.on('exit', (code) => {
        if (code !== 0)
          reject(new Error(`Worker stopped with exit code ${code}`));
      });
    });
  };
} else {
  const { parse } = require('some-js-parsing-library');
  const script = workerData;
  parentPort.postMessage(parse(script));
}
The above example spawns a Worker thread for each parseJSAsync() call. In practice, use a pool of Workers for these kinds of tasks. Otherwise, the overhead of creating Workers would likely exceed their benefit.
Worker options
While creating worker along with filename we can send certain options as a second argument. const worker = new Worker(__filename, OptionsObject)some of the OptionObject properties are:
- argv: List of arguments which would be stringified and appended to
process.argvin the worker. This is mostly similar to theworkerDatabut the values are available on the globalprocess.argvas if they were passed as CLI options to the script. - workerdata: The data we want to pass to the worker thread. This data is cloned in worker with HTML structured clone algorithm.
- transferList: Its and array of items which should
ArrayBuffer | MessagePort | FileHandle | X509Certificate | Blob. If one or moreMessagePort-like objects are passed inworkerData, atransferListis required for those items orERR_MISSING_MESSAGE_PORT_IN_TRANSFER_LISTis thrown. More discussed in following. - env: If set, specifies the initial value of
process.envinside the Worker thread. As a special value,worker.SHARE_ENVmay be used to specify that the parent thread and the child thread should share their environment variables; in that case, changes to one thread'sprocess.envobject affect the other thread as well. - resourceLimits: An optional set of resource limits for the new JS engine instance. Reaching these limits leads to termination of the
Workerinstance. These limits only affect the JS engine, and no external data, including noArrayBuffer. Even if these limits are set, the process may still abort if it encounters a global out-of-memory situation. Some of constraints aremaxYoungGenerationSizeMb(The maximum size of the main heap in MB),maxOldGenerationSizeMbcodeRangeSizeMbstackSizeMb - name: An optional
nameto be appended to the worker title for debugging/identification purposes, making final title as[worker ${id}] ${name}. By default:''.
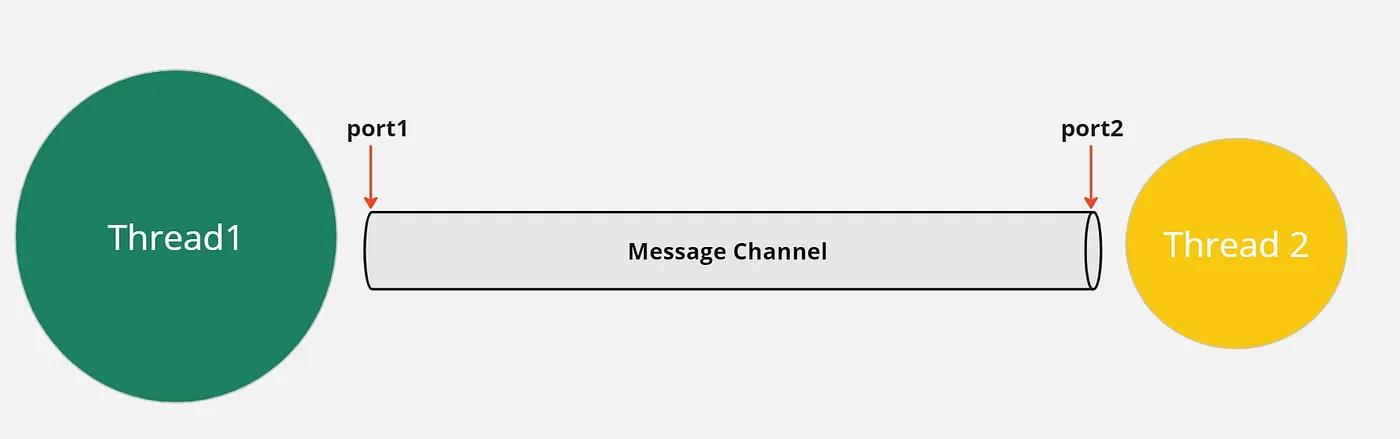
MessageChannel
For communication between threads the two components are important which are a communication channel and port on which they will be communicating on. First the communication channel i.e. MessageChannel has to be established prior to communication.MessageChannel asynchronous, two-way communications channel. The MessageChannel has no methods of its own. new MessageChannel() return an object with port1 and port2 properties, which refer to linked MessagePort instances. Basically port1 and port2 are just two ends of a channel.
const { MessageChannel } = require('node:worker_threads');

const { port1, port2 } = new MessageChannel();
port1.on('message', (message) => console.log('received', message));
port2.postMessage({ foo: 'bar' });
// Prints: received { foo: 'bar' } from the `port1.on('message')` listener
One port is used for sending the message and other for receiving the message. Basically port1 and port2 are just two ends of a channel.
MessagePort & MessagePort Events
In previous we used parentPort.postMessage() for sending messages from worker to parent and used worker.postMessage() and this is because both parentPort and Worker are instances of MessagePort class. This provides postMessage and events such as message and close on which will can tag our callbacks to.
- message: event is emitted for any incoming message,
- close: event is emitted once either side of the channel has been disconnected.
const { MessageChannel } = require('node:worker_threads');
const { port1, port2 } = new MessageChannel();

// Prints:
//   foobar
//   closed!
port2.on('message', (message) => console.log(message));
port2.on('close', () => console.log('closed!'));

port1.postMessage('foobar');
port1.close();
Ways to pass the data between threads
- cloning the data
There are several ways to pass the data between two threads. By default this data is cloned i.e. both sender and receiver has their own copy of the data. And this data is cloned with ‘The Structured Cloned Algorithm’. If the data which is passed is deeply nesting within, then it’ll take a significant processing power to clone the data. So its not always optimal to have copies of data. - transferring the data
One of the ways we can overcome the above disadvantage is by transferring the data. This can be achieved by using transferList option. WithtransferListyou literally give away the data from sender to receiver. Doing this will make that data not accessable on sender’s end.transferListmay be a list ofArrayBuffer,MessagePort, andFileHandleobjects. After transferring, they are not usable on the sending side of the channel anymore (even if they are not contained invalue). Transferring handles such as network sockets is currently not supported (It is doable in with child processes). - share the same data
We can share the same data between sender and receiver by using SharedArray Buffer.
Atomics
Shared memory can be created and updated simultaneously in workers or main thread and we can face race conditions and synchronization problem because of it. To avoid this problem we can use Atomics. When memory is shared, multiple threads can read and write the same data in memory. Atomic operations make sure that operations are finished before the next operation starts and that operations are not interrupted.
You cannot use it with the new operator or invoke the Atomics object as a function. All properties and methods of Atomics are static (just like the Math object).
Atomics.load():Returns the value at the specified index of the array. Kind of getter for index.Atomics.store(): Stores a value at the specified index of the array. Returns the value.Atomics.and()/Atomics.or()/Atomics.sub()/Atomics.xor()/Atomics.add(): Bitwise operationsAtomics.notify()/Atomics.wait(): Provides ways for waiting until a certain condition becomes true and are typically used as blocking constructs.
Lets now try to pass data with different ways
Transferring the Port
This typically useful when you want to pass the ports in transfer list. Now you might think why would we want to do that? Well this way you can reuse the message channels. Lets try doing this.
In parent.js
const { Worker, MessageChannel } = require('worker_threads');
const { port1, port2 } = new MessageChannel()

const worker = new Worker('./worker.js')
port1.on("message", msg => {
    console.log(`Message from worker----> ${msg}`)
})
worker.postMessage({ port: port2}, [port2])
In worker.js
const {parentPort} = require('worker_threads');
parentPort.on("message", msg => {
    msg.port.postMessage('Sent Hi from using  transfered port')
})
this outputs Message from worker — → Sent Hi from using transfered port
Transferring the Data using Array buffer
Array Buffer is a fixed length & continuous memory area and once length declared cannot be changed. You cannot directly access the values inside like normal array, you need something called dataview for it.
Data view is like with what lenses you are viewing that declared Array buffer with.
For example if we declare 16 byte Array buffer (16 bytes === 128 bits).const arrayBuffer = new ArrayBuffer(16)Now with what lenses you will be viewing these 128 bits can be of following way.
You might view these 128 bits as 8 * 16blocks i.e. 8-bit integer array.i.e.const dataview = new Int8Array(arrayBuffer, 0 , 16)
Or
You might view these 128 bits as 16 * 8blocks i.e. 16-bit integer array.i.e.const dataview = new Int16Array(arrayBuffer, 0 , 8)Or
You might view these 128 bits as 32 * 4blocks i.e. 32-bit integer array.i.e.const dataview = new Int32Array(arrayBuffer, 0 , 4)These Int8Array,Int16Array,Int32Array,Int64Array are called as Types arrays (different ways to view or represent data in ArrayBuffer)
In parent.js
const { Worker } = require('worker_threads');

const worker = new Worker('./worker.js')
const arrayBuffer = new ArrayBuffer(16)
const dataview = new Int8Array(arrayBuffer, 0, 16) // all 0 by default
console.log('In Parent Before Transfer' + dataview)
worker.postMessage(dataview, [dataview.buffer])
// console.log('In Parent After Transfer' + dataview)
In worker.js
const {parentPort} = require('worker_threads');
parentPort.on("message", msg => {
    console.log('In worker after transfer' + msg)
})
The output looks looks as

So this proves that data is transferred.
If you uncomment off the last line of parent.js it’ll throw the following error proving that parent.js wont have access to already transferred array buffer.

Sharing the Data using SharedArray buffer
Now lets try to transfer this Array buffer.
In parent.js
const { Worker } = require('worker_threads');

const worker = new Worker('./worker.js')
const sharedArrayBuffer = new SharedArrayBuffer(16)
const dataview = new Int8Array(sharedArrayBuffer, 0, 16) // all 0 by default
console.log('In Parent Before Sharing' + dataview)
worker.postMessage(dataview)
console.log('In Parent After Sharing' + dataview)
In worker.js
const {parentPort} = require('worker_threads');
parentPort.on("message", msg => {
    console.log('In worker after Sharing' + msg)
})
This time the last log from parent is doesn't crib because the data is actually being shared and not being transferred or cloned.
Worker thread gotchas
- NodeJS worker threads are not conventional threads. If you think about becoming multithreaded like other languages, then threads needs to share same state by default. Nodejs worker threads operates independent as that of other worker threads by having their own V8 , libuv instances, event loop & separate heaps.
- Using worker threads for IO is useless. The expense of creating and maintaining the worker’s process with its own V8 engine is much less efficient than Node’s async I/O implementations.
- Worker threads should be used where the performance savings will easily outweigh the process spawn cost.
- By utilizing a shared pool of worker threads, we have the ability to reduce inefficiencies and eliminate the need for constantly creating new ones. This approach not only saves time and resources but also simplifies the management of a worker pool. Libraries like Piscina and Poolifier provide a convenient solution by handling the intricacies of managing a worker pool, allowing you to focus on more important tasks.
- Debugging worker threads can be quite challenging due to the lack of a clear connection between events, the corresponding worker, and the resulting effect. Relying solely on
console.log()statements to debug can be a tedious and error-prone process. However, there is a solution to enhance the diagnostic information you receive. By attaching an AsyncResource to your pool, you can obtain comprehensive async stack traces that precisely track the activities within the pool. This invaluable tool allows you to observe the complete sequence of events leading up to a particular effect. - When confused on weather to use child processes or worker thread, Always remember use worker thread for CPU intensive work and child-processes if you want to scale your app.
- Spawning more threads than that of your number of cores will not really give you much of gain in performance as cpu utilization will waste in context switching itself. That's why they say use thread pool carefully.
- Piscina, Bree, Poolifier, WorkerPool Some of the popular libraries that wrap the module to provide a more convenient interface or higher-level features, such as thread pooling.
References
- https://blog.insiderattack.net/deep-dive-into-worker-threads-in-node-js-e75e10546b11
- https://betterprogramming.pub/a-deep-dive-into-the-node-js-thread-pool-a1f32a4f8628
- https://www.youtube.com/watch?v=-JE8P2TiJEg
- https://www.youtube.com/watch?v=P1sWw1bLyVg
- https://nodesource.com/blog/worker-threads-nodejs/
- https://www.digitalocean.com/community/tutorials/how-to-use-multithreading-in-node-js
- https://snyk.io/blog/node-js-multithreading-with-worker-threads/
- https://snyk.io/blog/node-js-multithreading-worker-threads-pros-cons/
- https://www.youtube.com/watch?v=kDr7YycaZ5E
- https://stackoverflow.com/questions/61831510/when-a-workerthread-is-created-in-nodejs-does-it-utilize-the-same-core-in-which
Before you go!
- Stay tuned for more insights! Follow and subscribe.
- Did you see what happens when you click and hold the clap 👏 button?