Solidity Tutorial: How to Use Remix IDE for Solidity Smart Contract Development.
Learn the Fundamentals of Writing, Testing, and Deploying Solidity Smart Contracts using Remix IDE.

To create smart contracts on the Ethereum blockchain, developers require an environment that simplifies the development process, provides useful tools and features, and streamlines the testing and debugging of smart contracts. Remix IDE fulfills these requirements and is widely used by developers for Solidity Smart Contract Development.
Remix IDE is a powerful and popular Integrated Development Environment (IDE) for Solidity Smart Contract Development.
It is a web-based IDE that allows developers to write, test, debug, and deploy smart contracts on the Ethereum blockchain. Remix IDE provides a user-friendly interface that simplifies the Solidity development process, making it accessible to developers of all skill levels.
One of the key advantages of Remix is that it offers an out-of-the-box-ready solution for decentralized app development. This means that developers don’t have to install any additional plugins or modules in order to start coding. All the necessary tools and features are already built into the platform, making it easy and convenient for developers to get started.
By simply opening a browser and accessing the Remix IDE, developers can immediately begin coding and testing their smart contracts and dApps. This eliminates the need for time-consuming installations and setup procedures and allows developers to focus on their code and their project goals.
The combination of Solidity and Remix IDE is a game-changer for the blockchain industry. With Solidity, developers can create secure and decentralized applications that run on the Ethereum blockchain.
With Remix IDE, developers can quickly write, test, debug, and deploy their smart contracts, accelerating the development process and reducing the risk of errors.
In this Tutorial, we will cover how to use Remix IDE for Solidity Smart Contract Development, including creating and testing a contract, debugging, and utilizing advanced features.
Getting Started with Remix IDE
In this section, we will guide you through the process of getting started with Remix IDE for Solidity Smart Contract Development. By the end of this section, you will be able to access the Remix IDE, understand the interface, and set up your development environment.
1. Accessing the Remix IDE
The Remix IDE is a web-based application, which means you can access it from any modern web browser. To access the Remix IDE, follow these steps:
- Open your preferred web browser.
- Navigate to remix.ethereum.org.
- The Remix IDE should load automatically.
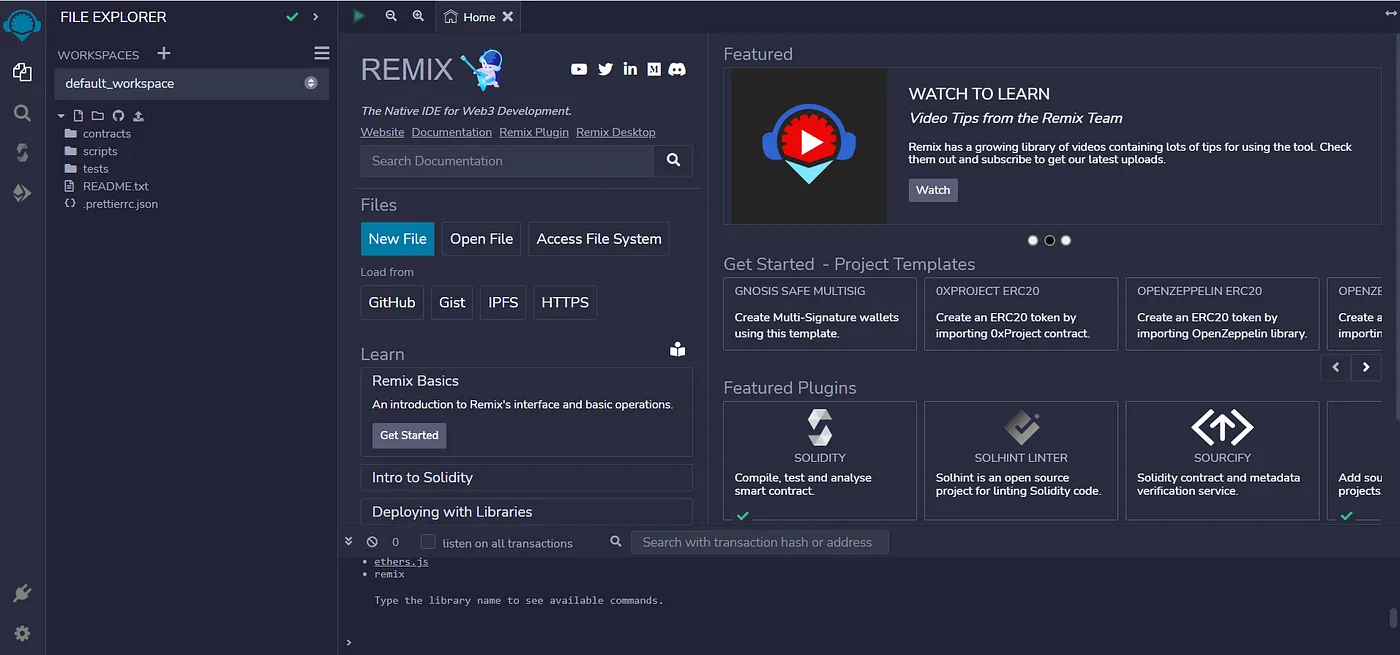
2. Overview of the Remix IDE Interface
Once you have accessed the Remix IDE, you will be presented with the interface. The interface is divided into several sections:
- File Explorer: This section displays the files and folders in your project. To create a new file, click on the “File Explorer” panel on the left-hand side of the screen. Then, click on the “+” icon to create a new file. You can name the file with the “.sol” extension, which is the file extension used for Solidity smart contracts.
- The Code Editor pane: This section displays your new file. The Code Editor includes features like syntax highlighting, auto-completion, and error highlighting to help you write Solidity code more easily.
- Compiler: This section displays the Solidity compiler and allows you to compile your code. To compile your code, click on the “Solidity Compiler” panel on the left-hand side of the screen. Then, select the version of Solidity you want to use and click on the “Compile” button. If your code contains any errors, the compiler will display them in the “Compilation Details” section.

- Deploy & Run Transactions: This section allows you to deploy your contract and interact with it on the Ethereum network. To deploy your smart contract, click on the “Deploy & Run Transactions” panel on the left-hand side of the screen. Make sure the correct contract is selected, and then click on the “Deploy” button. You’ll need to have an Ethereum wallet connected to Remix IDE to deploy your contract.

Writing a basic smart contract in Remix IDE
To create a basic smart contract in Remix IDE, follow these steps:
- Open Remix IDE and create a new file.
- Name the file "MyContract.sol".
- In the Code Editor pane, you can write & test the following codes:
A Basic contract call.
pragma solidity ^0.8.0;

contract MyContract {
  uint myNumber;

  function setNumber(uint _number) public {
    myNumber = _number;
  }

  function getNumber() public view returns (uint) {
    return myNumber;
  }
}
In this code, we have created a basic contract called "MyContract" that has a state variable called "myNumber" of type uint. We have also defined two functions - setNumber & getNumber.
The setNumber function takes a uint parameter and sets the value of myNumber to that parameter. The getNumberfunction returns the value of myNumber.
Simple Storage Contract
This contract simply stores a uint value and allows it to be updated or retrieved.
pragma solidity ^0.8.0;contract SimpleStorage {
    uint storedData;
function set(uint x) public {
storedData = x;
} function get() public view returns (uint) {
return storedData;
}
}
The state variable storedData is initialized as a uint, and can be updated through the set function, which takes a uint parameter. The get function retrieves the stored value and returns it as a uint.
Token Contract
This contract creates a simple ERC20-compatible token that can be transferred between addresses.
pragma solidity ^0.8.0;contract Token {
mapping(address => uint256) private balances;
uint256 private totalSupply; constructor(uint256 _totalSupply) {
balances[msg.sender] = _totalSupply;
totalSupply = _totalSupply;
} function balanceOf(address _owner) public view returns (uint256) {
return balances[_owner];
} function transfer(address _to, uint256 _value) public returns (bool) {
require(balances[msg.sender] >= _value, "Insufficient balance");
balances[msg.sender] -= _value;
balances[_to] += _value;
return true;
} function getTotalSupply() public view returns (uint256) {
return totalSupply;
}
}
The state variables balances and totalSupply are used to keep track of the token balances and total supply.
The constructor function initializes the balances of the contract creator to the total supply of the token. The balanceOf function retrieves the balance of a specific address while the transfer function transfers tokens from the sender to another address. The getTotalSupply function returns the total supply of the token.
Using Remix IDE tools for code editing and management
Remix IDE provides several tools for code editing and management, including:
- Auto-completion: The Code Editor pane includes auto-completion functionality that suggests code completions as you type.
- Syntax highlighting: The Code Editor pane highlights keywords, variables, and other elements of Solidity syntax.
- Error highlighting: The Code Editor pane highlights errors in your code and provides information on how to fix them.
- Code formatting: The Code Editor pane includes options for formatting your code to make it more readable.
- Find and replace: The Code Editor pane includes a find and replace tool that allows you to search for specific code elements and replace them.
- Code snippets: Remix IDE includes a library of Solidity code snippets that you can use as a starting point for your own code.
Testing and Debugging Smart Contracts in Remix IDE
Testing and debugging are important steps in the smart contract development process. Remix IDE provides built-in tools to help you test and debug your smart contracts. In this section, we’ll cover how to use Remix IDE to create and run unit tests for a smart contract and how to use the Remix debugger to step through smart contract execution.
- Overview of Remix IDE testing and debugging tools
Remix IDE provides several tools to help you test and debug your smart contracts, including:
- Solidity compiler: You can use the Solidity compiler to compile your smart contract code and check for errors.
- Test Explorer: You can use the Test Explorer to create and run unit tests for your smart contract.
- Remix Debugger: You can use the Remix Debugger to step through smart contract execution and debug any issues that arise.
2. Creating and running unit tests for a smart contract
To create and run unit tests for a smart contract in Remix IDE, you can use the built-in Test Explorer. Here’s how:
- Open your smart contract in Remix IDE.
- Click on the “Test” tab.
- Click on the “Test Explorer” button.
- In the Test Explorer, you can create and run unit tests for your smart contract.
- To create a new test, click on the “New Test File” button.
- Write your test code in the editor and click on the “Run All Tests” button to run the tests.
- The results of the tests will be displayed in the Test Explorer.
3. Using the Remix debugger to step through smart contract execution
The Remix Debugger is a powerful tool that allows you to step through smart contract execution and debug any issues that arise. Here’s how to use it:
- Open your smart contract in Remix IDE.
- Click on the “Debug” tab.
- Click on the “Start Debugging” button.
- In the “Debug” panel, you can set breakpoints and step through the execution of your smart contract.
- Use the controls in the “Debug” panel to step through the execution of your contract.
- If you encounter an issue, you can use the debugger to investigate the cause and fix the issue.
Interacting with Smart Contracts in Remix IDE
After writing and deploying a smart contract in Remix IDE, you can interact with it using the built-in tools. In this section, we’ll cover how to use Remix IDE to call functions, read state variables, and send transactions to a deployed contract.
Overview of Remix IDE tools for interacting with deployed smart contracts.
To interact with a deployed smart contract in Remix IDE, you’ll need to do the following:
- Connect to a network: You’ll need to connect to a network that hosts the deployed contract. You can do this by selecting the appropriate network from the “Deploy & Run Transactions” panel.
- Select the contract: Once you’re connected to a network, you’ll need to select the contract you want to interact with. You can do this by selecting the contract from the “Deployed Contracts” panel.
- Interact with the contract: Once you’ve selected the contract, you can call functions, read state variables, and send transactions using the built-in tools.
How to call functions and read state variables from a deployed contract?
To call functions and read state variables from a deployed contract, you can use the built-in “Contract” tab in Remix IDE. Here’s how:
- Select the contract you want to interact with from the “Deployed Contracts” panel.
- Click on the “Contract” tab.
- Scroll down to the “Read Functions” or “Write Functions” section, depending on what you want to do.
- If you want to call a function or read a state variable, select the function or variable from the list and click on the “Call” button.
- If you want to send a transaction to a function that modifies the state, select the function from the “Write Functions” section and fill in the required parameters. Then click on the “Transact” button.
- After you call a function or read a state variable, the result will be displayed in the “Output” section.
How to send transactions to a deployed contract
To send transactions to a deployed contract, you’ll need to use the built-in “Deploy & Run Transactions” panel. Here’s how:
- Connect to the network that hosts the deployed contract.
- Select the contract you want to interact with from the “Deployed Contracts” panel.
- Click on the “Deploy & Run Transactions” panel.
- Select the function you want to call from the “Contracts” section.
- Fill in the required parameters.
- Click on the “Transact” button to send the transaction.
- After you send the transaction, you can check its status in the “Transactions” section.
That’s it! With these tools in Remix IDE, you can easily interact with deployed smart contracts, call functions, read state variables, and send transactions.
Conclusion
In this tutorial, we’ve covered the basics of using Remix IDE for Solidity smart contract development, including how to access the IDE, create a new Solidity file, write Solidity code, deploy and interact with a smart contract, and test and debug your code.
If you’re interested in further learning and resources for Solidity and smart contract development, here are some suggestions:
- Solidity Documentation: The official Solidity documentation is a great resource for learning more about Solidity and smart contract development. It includes detailed language references, tutorials, and examples.
- Remix IDE Documentation: The Remix IDE documentation provides detailed information on all the features and functionality of the IDE, including how to use the built-in tools for testing and debugging.
New to trading? Try crypto trading bots or copy trading on best crypto exchanges
Join Coinmonks Telegram Channel and Youtube Channel get daily Crypto News