Photographing Insects: Exposure Settings
What are the best settings to photograph insects?

After a little while I fixed the settings I use for most of my insect shots. But now it is time to reconsider my choices and compare the results for different settings. So I did some extensive testing.
An extended version of this article has appeared in my free book My Journey into Insect Photography that you can download here.
My current settings
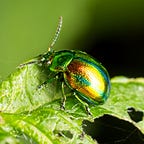
My current camera setup for insect photography is as follows: I use a Canon R7 APS-C camera with the Canon RF 100mm 2.8L macro lens. I take all my shots with a flash (Godox V350) and a diffuser around the lens.
I use TTL for the flash, so the flash power is determined automatically. This leaves four exposure settings:
- Shutter speed. I use 1/320 of a second. That is the fastest speed that still allows for synchronization with the flash. By using a fast speed, very little ambient light is used. Almost all light comes from the flash. If you want more ambient light (e.g. for the background) you need a slower speed, but I would not go below 1/125 of a second on a 100mm lens.
- Aperture. I use F13. This seems to be a reasonable compromise between depth of field and image quality. For a large depth of field, you need a high F number. For the best image quality, you prefer to stay as close to F8 as possible (depending on the lens).
- ISO. I use ISO 200. Normally ISO 100 gives the best image quality (depending on the sensor). But by increasing it to 200 I halve the amount of flash light required, which improves the recharge time of the flash. A higher ISO value will allow for more ambient light and less flash light.
- Flash exposure compensation (FEC). I use +1. Most insects have dark colors. By setting the flash exposure compensation to +1, the flash produces more light than required, making the insects less dark. This works fine most of the time.
In the following sections, I will discuss the effect of changing each of these settings, while keeping the others the same. For fair comparison, all the images shown are the JPG files produced by the camera, without any post-processing.
Shutter speed
The following images show the effect of changing the shutter speed. All the shots use the flash, F13, and ISO 200. As can be seen, the effect of the flash becomes less and the effect of the sun more. So the soft shadows produced by the diffused flash are replaced by harder shadows by the sun. Also, the background becomes a bit more visible. (Click the image to enlarge it.)

Aperture
Changing the aperture has an effect on the depth of field and on the amount of ambient light used. When closing the aperture, more of the insect becomes sharp. But also more of the background and foreground becomes sharp. This effect is even more prominent when photographing really small insects.

ISO
Changing the ISO has a similar effect as changing the shutter speed. When there is no motion, changing the shutter speed is better because no noise is introduced. But you run the risk of motion blur.

Flash settings
As indicated above, I use automatic flash power using TTL, with a flash exposure compensation (FEC) of +1 to accommodate darker insects. This works fine most of the time, but it can make the background too light or, when you e.g. photograph a dark insect on a white flower, the insect is still underexposed. I prefer to play with the FEC, instead of doing manual flash. I set this on the flash itself, as that is easier than doing it in the camera settings.
Here is the effect of changing the compensation. As can be seen, a value of +1 or 0 is best. I prefer +1 and then I darken the background a bit in post-processing.

No flash at all
When there is enough light, you can refrain from using a flash at all. This gives completely different shots. The background suddenly becomes a lot lighter. There are no longer shadows from the flash, but when the insect is in the sun, you can get hard shadows from the sun that often are ugly.

But without a flash, you have to find light somewhere in the exposure triangle. Especially when the insect is in the shade, this is difficult. You can reduce the shutter speed when there is no wind and the insect is sitting really still. You need a steady hand or a tripod, but image stabilization will help, although it does not work too well for macro. You can widen the aperture, but that will reduce the depth of field. This is fine when the insect is not too close. And you can increase the ISO, but then you probably need noise reduction afterward.
Some interesting combinations
Up to now, I studied different settings in isolation. But you should of course combine them. The different settings in particular influence the amount of ambient light that shows in the image, and the depth of field. But they also have an effect on the colors and shadows. Here are some interesting combinations.
Focus on the insect. This was my approach up to now. Use flash, fast shutter speed, narrow aperture, and low ISO. This makes the insect sharp and clearly visible, while the background becomes dark. In post-processing, you can make this effect even stronger.
Insect in its surroundings. Use a narrow aperture, but still allow for a lot of ambient light. Preferably use no flash at all, or only a weak flash. You will have to use a slower shutter speed and higher ISO. This works best when the magnification is not too large and when there is enough ambient light. This requires taking a careful look at the background when taking the shots, because distractions, like ugly leaves, become very visible.
Background for composition. Use a wider aperture and allow for enough ambient light, using a somewhat slower shutter speed or higher ISO. Still use a flash, but weaker. This will reduce the depth of field considerably. It will show more of the background, but this will be blurry. The weaker flash will still put emphasis on the insect. Make sure you have the desired part of the insect in focus. Used correctly, the background will enhance the composition.

Conclusions
Always sticking to the same settings is easy, but it limits the creative opportunities. The settings I used so far purely concentrate on the insect, with little eye for the surroundings. Allowing more ambient light can give more interesting shots, but taking sharp images becomes harder. Focus stacking can help there. Also, composition becomes more of an issue. But I plan to experiment more with this.
Next: The Pizza Box Method
Previous: Is a Macro Lens Worth It?
Mark Overmars is a dedicated insect photographer that loves to share and regularly publishes about his work and about photography in general. You can visit his website at www.insectphotography.org. Download his free insect photography book at www.insectphotography.org/book.