Photographing Insects: The Pizza Box Method
A simple way to find and photograph lots of different insects
By placing a pizza box, umbrella, or tray under some bushes and then shaking the bushes, lots of insects will fall down in the box that you normally would not see. You can then photograph them easily.
An extended version of this article has appeared in my free book My Journey into Insect Photography that you can download here.

Recently, I went to a very interesting lecture by the Dutch biologist and photographer Luc Hoogenstein. He has written a book in Dutch called Mijn 1000 soorten tuin, which translates to My 1000 species garden. In the book he describes how he tackled a challenge to find, in one year, 1,000 different species in his garden. It turned out this was easier than he thought, even though his garden is in the city and rather small.
One of the approaches he described was the pizza box method. You take a pizza box, or any other flat object with a border, place it under some bushes, and shake the bushes. Insects will fall down in the pizza box and you can then find out what they are or try to photograph them. Applying the method, Luc found a new species for the Netherlands, the microterys seyon.

Trying it myself
I had to try this for myself. Rather than using a pizza box I used some tray. The surface of the tray was, I think, slightly better for taking pictures. I have some ivy barriers between my garden and the neighbors, and I know there are lots of insects there. So I put the tray under them and gave it some shakes.
The results were amazing. All pictures in this article were done in one hour of shaking and photographing. I had never seen any of these insects before in my garden.
The insects
Most of the insects you catch this way are rather small. For me that is great. I love photographing the really small ones. But it does mean that you need a good macro lens to take pictures with a large magnification. My setup with an APS-C camera and a lens with 1.4 magnification is great for this.
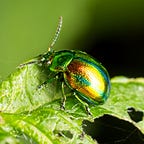
I got lots of small beetles, plant hoppers and little spiders. But also a lot of other insects. I did get some flying insects but you have to be quick otherwise they are gone. It seems the insects are a bit surprised about what has happened to them. So initially they tend to sit still. But after a little while they start running around or fly away.

Taking photographs
To make it convenient to take pictures of the insects, I put a table and chair close to the ivy. After I caught some insects in the tray I placed it on the table and sat down. This gave me a nice and stable position to take the shots. I used the table as support. That made it possible to use much larger magnification as can be seen in the images here. It also made it possible to use the Raynox 250 close-up lens to get even more magnification. The following image of a close-up of a common earwig is an example.

Because the insects are on the tray, you can easily rotate the tray to get them in the correct orientation for the pictures. Although, for some reason they always seem to turn their back towards me again. Of course the surface of the tray does not provide a natural background. You can add some leaves or stems in there but I was not too concerned with it. I think the dark background I used works better than cardboard.
An unexpected color
Except for some butterflies, there are few insects that are blue or purple. So I was really surprised when I saw the insect below that was bright purple. (I did not change the color in post-processing! This was exactly how it looked.) Actually this is not an insect but a common rough woodlouse. It is also not a special insect at all, but rather common. Normally they are gray and somewhat boring, but sometimes they get infected with the Irodo virus. That gives them the bright purple color. It is great for photographers, but not for the animal, as this is lethal.

Conclusions
As you can see from the examples, I got some rather special stuff that is not seen very often. I did photograph some five other insects on that first day I had not seen before, and also a lot of tiny spiders that I will talk about in a future article, even though they are no insects.
The pizza box method opens a whole new range of possibilities. This is great because this time of the year the number of insects you see in the Netherlands in the normal way gets much smaller. I have already used it at a different location, again resulting in some great shots. So I am definitely going to use it more.
Next: Focus Bracketing
Previous: Exposure Settings
Mark Overmars is a dedicated insect photographer that loves to share and regularly publishes about his work and about photography in general. You can visit his website at www.insectphotography.org. Download his free insect photography book at www.insectphotography.org/book.