Photographing Insects: Focus Bracketing
Using automatic focus bracketing for enhanced focus

Focus bracketing and stacking is often the only way to get insects completely in focus. Here I discuss this approach, using the in-camera focus bracketing of my Canon R7.
An adapted version of this article has appeared in my free book My Journey into Insect Photography that you can download here.
Depth of field is always an issue when photographing insects, in particular when you want to take a shot from the front. With a high magnification, the part that is in focus becomes very shallow. You can improve this by raising the aperture but that is limited and with narrow apertures (higher numbers) the picture becomes less sharp due to diffraction.
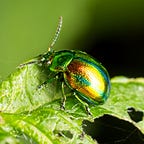
The (life) bug in the image above was about 15 mm long with very large antennas. Even with a narrow aperture, such a shot is impossible to get fully in focus.
The solution to this is focus stacking. You create a number of images with different focus distances and combine them using special software, taking the sharp parts from the different images. The picture above is combined from 20 shots each with a slightly different focus distance.
Here is another example: a grasshopper. The first shot focuses in front of the head while the last one focuses on the ends of the rear legs. Below the image you find some of the original shots (without any post processing). Click to enlarge.


To avoid confusion, focus bracketing is the process of taking a set of shots with different focus distance, and focus stacking is the process of combining this stack of images into a single image.
The Canon R7 has the possibility to do focus bracketing automatically. It can also combine the resulting stack of images into a single image in-camera. Many other modern cameras have similar features. In this article I investigate this automatic approach. Some parts are a bit specific to the Canon cameras, but for other cameras it works in similar ways.
Two approaches
There are two approaches to focus bracketing. The first approach is to hold the camera at the same position and change the focus distance. This is what cameras use when doing automatic focus bracketing. The second approach is to keep the focus distance the same, but move the camera towards the subject, changing the part that is in focus. (Motorized) focus rails use this approach, but it can also be done handheld. I will discuss that in a later article.
Using automatic focus bracketing on the Canon R7 is rather easy. You set the number of images and the focus increment between the images. Next you focus on the nearest position you want in focus, or slightly closer, and then press the shutter. The images are taken using the electronic shutter at 30 frames per second, so very fast (until the buffer gets full).
You will sometimes get an error though. There are two types of errors: either there is too much motion, or there is not enough information in the image(s) to combine them (they are blurry and flat). Don’t worry about these errors too much. Just look at the merged result to see whether it is ok. Often you do not need all images to get a good final result.

Initial focus
You need to start the bracketing at the nearest position you want in focus, or slightly in front of it. This is harder than it may seem. The reason is that focus bracketing only works when the camera is in autofocus mode. In that mode, when you press the shutter, the camera focusses on the selected focus point, which is often not the nearest one. So the front part is not in focus in the resulting image.
To solve this, use back button autofocus. In the menu make sure that the shutter button only does metering. Use the focus button on the back of the camera to focus on the correct distance. Now reposition the camera, e.g. by moving it slightly towards you. And then press the shutter button, without refocusing.

Avoid motion
Even though the image composition software can realign the images, you should avoid motion as much as possible. There are three types of motion:
- Motion of the insect. There is nothing you can do about this, but wait. This type of motion cannot be corrected by the software. But you can be lucky. For example, if the insect moves the front legs during the sequence, chances are that the shots that are needed for the legs have already been taken.
- Motion of the plant, in particular due to wind. Sideways motion can be corrected by the software. Back and forth motion is more of a problem. Focus stacking with wind has a lower success rate.
- Motion of the camera. The best way to avoid this is to use a tripod, but that takes time to set up and limits you considerably. A monopod provided some help. When shooting handheld, try to find some support to rest the camera against.
By using fewer images (see below) the time to take the shots is decreased, reducing the risk of motion.
Exposure
Focus bracketing on the Canon R7 (currently) only works with the electronic shutter and, hence, no flash can be used. This makes it impossible to use a very narrow aperture (but that is what focus stacking is supposed to solve anyway). When it is sunny and the insect is in the sun, I use 1/125 sec. or faster shutter speed, aperture F8, and ISO 100–400 depending on the actual amount of light. When there is no sun or the insect is in the shade, you easily loose 3 or 4 stops of light. I recommend not to reduce the shutter speed to avoid motion blur, unless you use a tripod. So I typically use 1/125 sec., F5.6 or F4, and ISO 400–1600.

Focus increment
In the focus bracketing settings you must provide the number of images and the focus increment. When shooting handheld, I do not want to use many images as that reduces the chance for success considerably. So in most of the examples in this article I set it to 10 images.
The focus increment is a value between 1 and 10. It is not very clear from the Canon R7 documentation what this value means. It does not represent a fixed distance. The documentation states that the actual change depends on the aperture.
I ran a lot of experiment using the RF 100mm macro lens to figure this out. As a first experiment, I set the lens to a magnification of 0.8 (which corresponds to 1.28 on APS-C). I used aperture F8. Here are the results for a focus increment of 1, 4, 7, and 10, using 10 images. Note that the ruler shows centimeters and is at an angle of about 45 degrees, like the way in which you would photograph many insects.

As expected, the depth of field increases when the the increment increases. Click on the image to enlarge it. The following image shows an enlargement of the increments 7 and 10.

Now, if you look carefully, in the right image you will see some bands where the image is less sharp. Three of these bands are indicated with the arrows. (Enlarge the image to see it better.) These bands occur where the images are stitched together. Here they are the least sharp. Focus banding should be avoided as much as possible. The smaller the increment, the less banding you get, but the more images you need to cover the same focus range. For shooting insects handheld, increment 7 seems a good compromise between the number of images you need, and the amount of banding (which is hardly visible).
When using F4 (for when the insect is in the shade) the area that is in focus is almost halved. So the camera indeed reduces the focus shift when the aperture is wider. Again, there is focus banding for increment 10, and for 7 this is hardly visible.
I also did experiments with magnifications 0.4 and 1.4 (the maximum). In both cases there is noticeable banding for increment 10 which is largely gone at increment 7 (both for F8 and for F4). The area that is in focus does get considerably smaller when the magnification goes up. For magnification 1.4 and F8 only some 4 mm of the ruler is in focus. For magnification 0.4 this is 30 mm. The values for F4 again are about halve of those for F8 or, stated differently, you need twice as many images to cover the same depth range.
This leads to the following conclusions for insect photography: (Disclaimer, this might be different for a different lens!)
- In all situations I encountered, an increment setting of 7 works fine.
- When using F8, 10 images normally cover the area you need, unless the magnification is very high.
- When using F4, the area that is in focus is about halved, so you will need more images (like 15 or 20).
- When the insect is relatively far away, like with the dragonfly above, you can use less images or a smaller increment of 4 or 5.
All examples in this article, except the first, used 10 images and increment setting 7. Only if you use a tripod, and the insect is not moving at all, you can go for a smaller increment and increase the number of images. Very small focus increments only make sense when you do hundreds of images in a controlled indoor environment or when you need to cover a large depth range. (To cover the complete depth range of the RF 100mm macro lens, even with increment of 7, you need about 200 images!)

Artifacts
When combining images some artifacts might occur. For example, consider the following image of a large water surface bug (but here sitting on a leaf).
If you enlarge the photo you will see that the surface of the leaf is blurred around the legs and antennas, but sharp elsewhere. The reason is that the combination software at those locations did use the data from the images where the legs or antennas were sharp. This often occurs when there is a jump in distance and you want both distances in focus. If you look carefully, you also see it in the dragonfly image. The tail is not in focus because the image for the wing is used.
You can improve this a bit if you use external software for focus stacking, but not with the in-camera combination. And it is not completely solvable. There is no image in the stack where the part around the legs is sharp. In the image where the focus is on the background, the blurred leg will cover the area.

Using it in the field
I experimented a lot with automatic focus bracketing in the field. The results were mixed. Doing it completely handheld, without any form of support, was very hard, except for relatively low magnifications, like when photographing butterflies or dragonflies. However, when I could rest the camera against some object, like in the case of the bug and the grasshopper, it did work very well.
Wind was less of an issue than I expected. A slight motion of the leaf is no problem for the software that combines the images. However, motion of the insect itself normally resulted in a fail or in images with some weird artifacts.

Conclusions
Using the automatic focus bracketing and stacking of the Canon R7 works rather easy, once you figured out the correct value of the focus increment setting. You can use it handheld if you have a stable hand or when the subject is not too small (like the butterfly above), but I prefer to rest the camera against something solid.
I now placed the settings for focus bracketing under one of the the custom modes, such that I can quickly switch between my usual mode and focus bracketing. But I think I will use it infrequently. You need the right weather (much light and little wind), cooperative insects that do not move, and a location where you can either use a tripod, or rest the camera against something solid. Most insects do not sit at such locations.
And remember, not everything has to be in perfect focus for a nice shot. It can actually look unnatural. Sometimes it is better to have only part of the insect in focus (typically the eyes). It helps the viewers to focus on what is important. So use focus stacking with care.
Next: Night Moths
Previous: The Pizza Box Method
Mark Overmars is a dedicated insect photographer that loves to share and regularly publishes about his work and about photography in general. You can visit his website at www.insectphotography.org. Download his free insect photography book at www.insectphotography.org/book.