Photographing Insects: Adding a Close-up Lens
How to get even more magnification, using the Raynox DCR-250

Since I bought a true macro lens with 1.4x magnification I thought I no longer needed to use my close-up lens. But since I use the pizza box method for finding small insects, I find myself in need of extra magnification. Here is how I use it.
An extended version of this article has appeared in my free book My Journey into Insect Photography that you can download here.
Initially, I was photographing with a normal kit lens and extension tubes or a close-up lens. This led to a magnification of around 1, which becomes 1.6 on my APS-C camera. When I bought my Canon RF 100mm Macro lens the maximal magnification went up to 1.4, which is 2.25 on APS-C. So I thought that was more than enough. Also, because I am shooting handheld, 1.4 is already very hard to handle.
But all this changed when I started using the pizza box method. Here you put a tray (or pizza box, or upside-down umbrella) under some bushes and shake the bushes or hit them with a stick. All sorts of insects fall down. But most of these are rather small. And I love the really small ones. So the extra magnification would help. But what was more important, I could put the tray with the insects on a table leading to a stable surface for the camera. This made it possible to actually use the extra magnification handheld.

Using the close-up lens
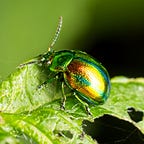
So I added my Raynox DCR-250 to my macro lens. You can simply click it on when you need it. This brings the magnification factor up to a maximum of 2.25, which becomes 3.6 on APS-C. Stated differently, I could now take pictures that cover a width of just 1 cm. Adding a digital crop from 32MP to 8MP (which is still enough for most purposes), the width becomes 0.5 cm. That is great for insects that are just 2 to 3 mm in size.
Warning: Make sure the focus range of your lens is set to the maximal range! Many macro lenses have a focus limiter. When I shoot macro I normally set this to the near range (26–50 cm for my Canon RF 100mm Macro). But the Raynox needs the whole range up to infinity!
Using the Raynox, together with the macro lens at close to maximal magnification, creates a very small depth of field. Also, with the Raynox the distance between the nearest focus point and the furthest point is just 5 cm. So focusing becomes a serious issue.
I proceed as follows. I put the bottom of the front of the lens on the tray and use the focus button. Depending on the angle the camera makes with the tray, the focus distance is smaller or larger. This influences the magnification. Now I slowly slide the camera towards the insect until it gets in focus. I use the autofocus again to do the precise focusing and take the shot.

Obviously, this only works when you want to take a shot from the side or front and the insect is sitting on the tray (and not moving). When you want to take a top-down shot or the insect is sitting on a little stem or leaf, like in the first two images, I hold the front of the lens between the thumb and index finger of my left hand and place the other side of my hand on the tray. I can now easily change the distance between the camera and the insect while keeping the camera very still.
All this gets problematic when the insect starts moving around. A trick that sometimes works is to guess where it will go to and focus there and wait. But the chances for success are slim. Better wait until it stops moving again.

Focus stacking
You can still use the in-camera focus bracketing and stacking of the Canon R7, with the Raynox DCR-250. But you have to be careful. The smallest focus distance with the Raynox becomes some 4 cm from the front of the lens while the further focus distance is 9 cm. So you can cover a range of just 5 cm. This must contain the complete part you want in focus.
But the camera does not know this! It does not know you are using a close-up lens. It thinks the nearest focus distance is 9 cm from the lens (for the 100mm macro lens), and the furthest is at infinity. So for the focus bracketing to cover the complete 5 cm, it actually has to go all the way up to infinity.
If you use F5.6 and a focus increment of 7 (see my article on focus bracketing), you need some 300 images to cover the complete range! For F8 this becomes 200. If you increase the focus increment to 10, these numbers are halved, so 150 and 100, which is still a lot to do handheld, in particular, because the buffer gets full and the image shooting slows down considerably. (Only save as JPG to avoid this problem partially.) At a focus increment of 10, you do get some banding.
Fortunately, you hardly ever need the complete distance range. When you reduce the focus range to 4–6 cm or 6–9 cm from the lens, the number of shots required is halved. And if you want to shoot with the Raynox, the insects are normally very small anyway.
So I typically use 40 images with a focus increment of 7. I try to use at least F8 if possible and otherwise F5.6. When I can use a narrower aperture, I reduce the number of images. Here is an example. Because this grasshopper was in the full sun, I could use F11 and reduce the number of images to 20.

Conclusions
When you can rest the camera on a stable surface, or use a tripod, you can combine a macro lens with a close-up lens to get even more magnification. This works great when photographing very small insects or when making close-ups. It requires some practice though, and initially, you will have many shots that are out of focus. Because of the very shallow depth of field, you need to take the shots from above or the side, or you need to use focus stacking.
When used correctly, the resulting details become amazing. And you might take shots of insects you did not know existed.
Next: September Shots
Previous: Night Moths
Mark Overmars is a dedicated insect photographer that loves to share and regularly publishes about his work and about photography in general. You can visit his website at www.insectphotography.org. Download his free insect photography book at www.insectphotography.org/book.